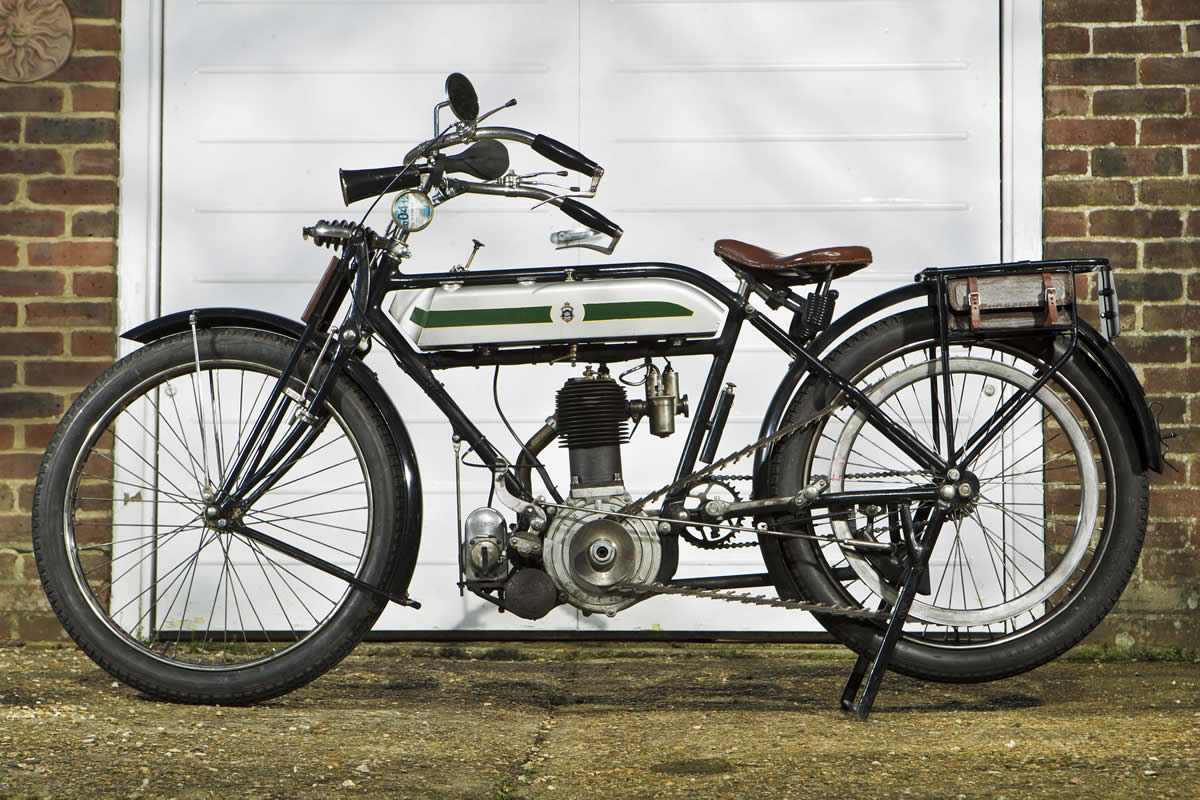
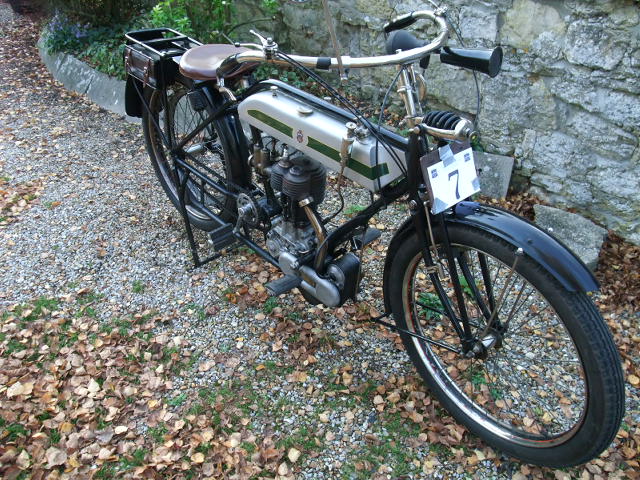
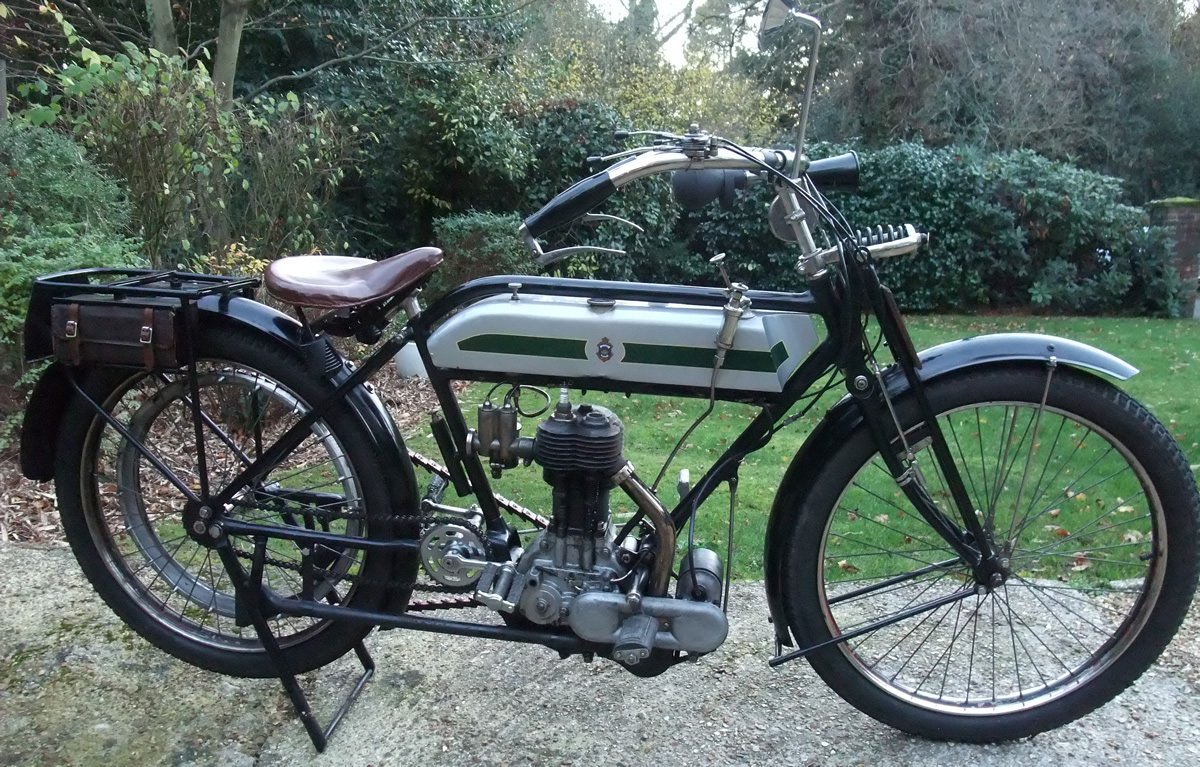
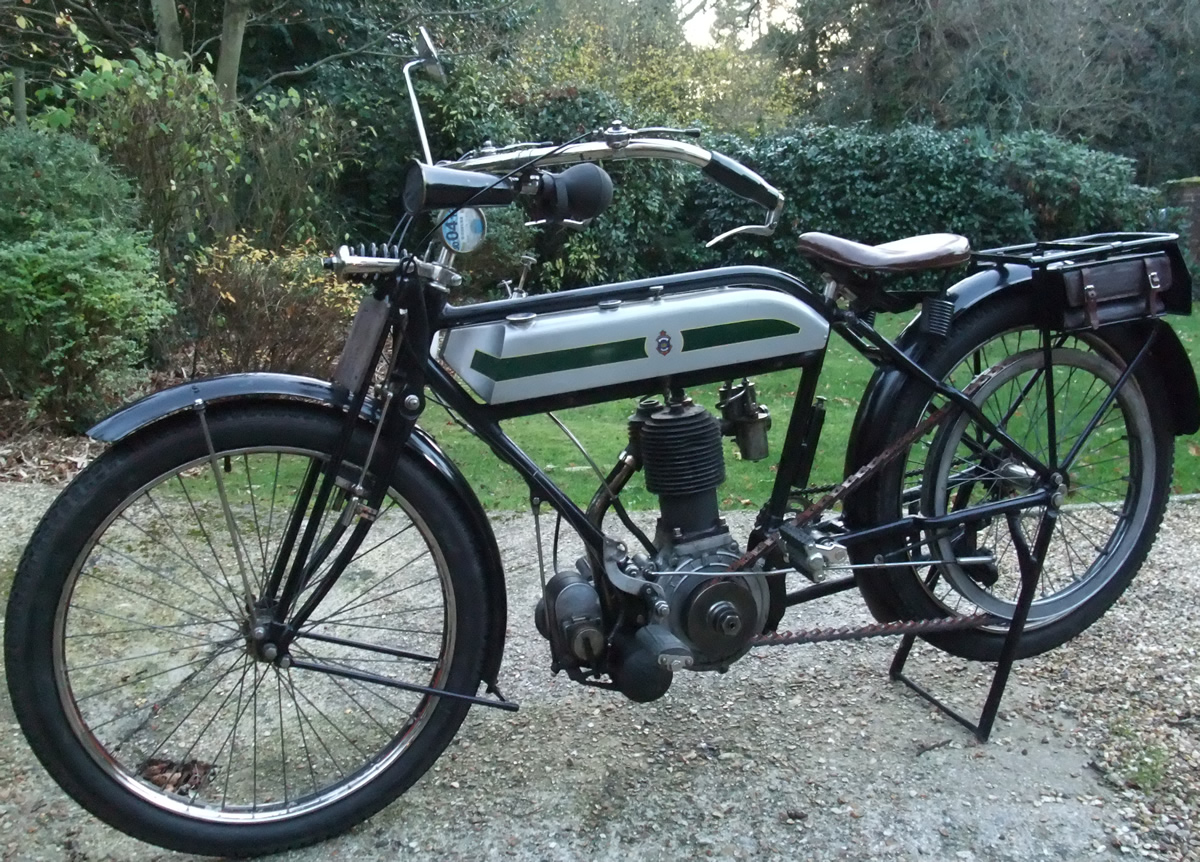
This web page is all about a veteran motorcycle - a 1914 Triumph motorcycle, a 4hp 550cc motorcycle. It does not have a clutch or any gears and has no electric or kick starter as it was made in 1914. The 1914 Triumph Motorcycle was probably the most reliable bike available in its day. My bike is a 1914 Triumph 4hp. It is a Type B Roadster Fixed engine model which means the engine directly drives the rear wheel via a V pulley on the crankshaft via a linked belt to a big pulley on the rear wheel. It has no clutch so you either pedal it or run and jump on it to start it. It has no gears. Riding it is quite an experience. When it was new it cost £49 and 17 shillings.
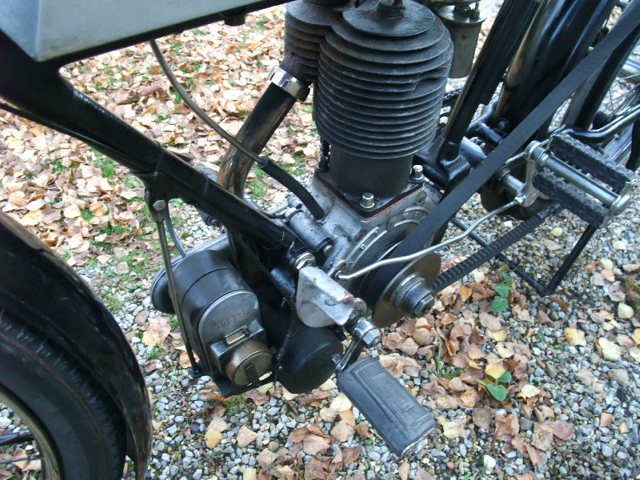
My 1914 Triumph motorcycle is started by either pedalling it along to starting speeds or running alongside it and jumping aboard. The gear ratio is not adjustable whilst you are moving but you can adjust it when stopped - though it is not a two second job. The engine has a V shaped section pulley on the lefthand side of the crankshaft and a toothed belt runs in this to a larger pulley attached to rear wheel. You can adjust the gap between the two sides of the front pulley so that the belt rides higher or lower in the V of the pulley. This changes the ratio depending upon whether you want hill climbing ability or top speed on the flat.
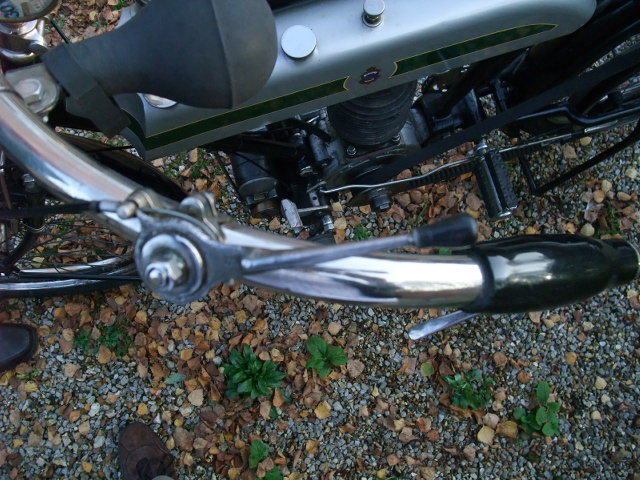
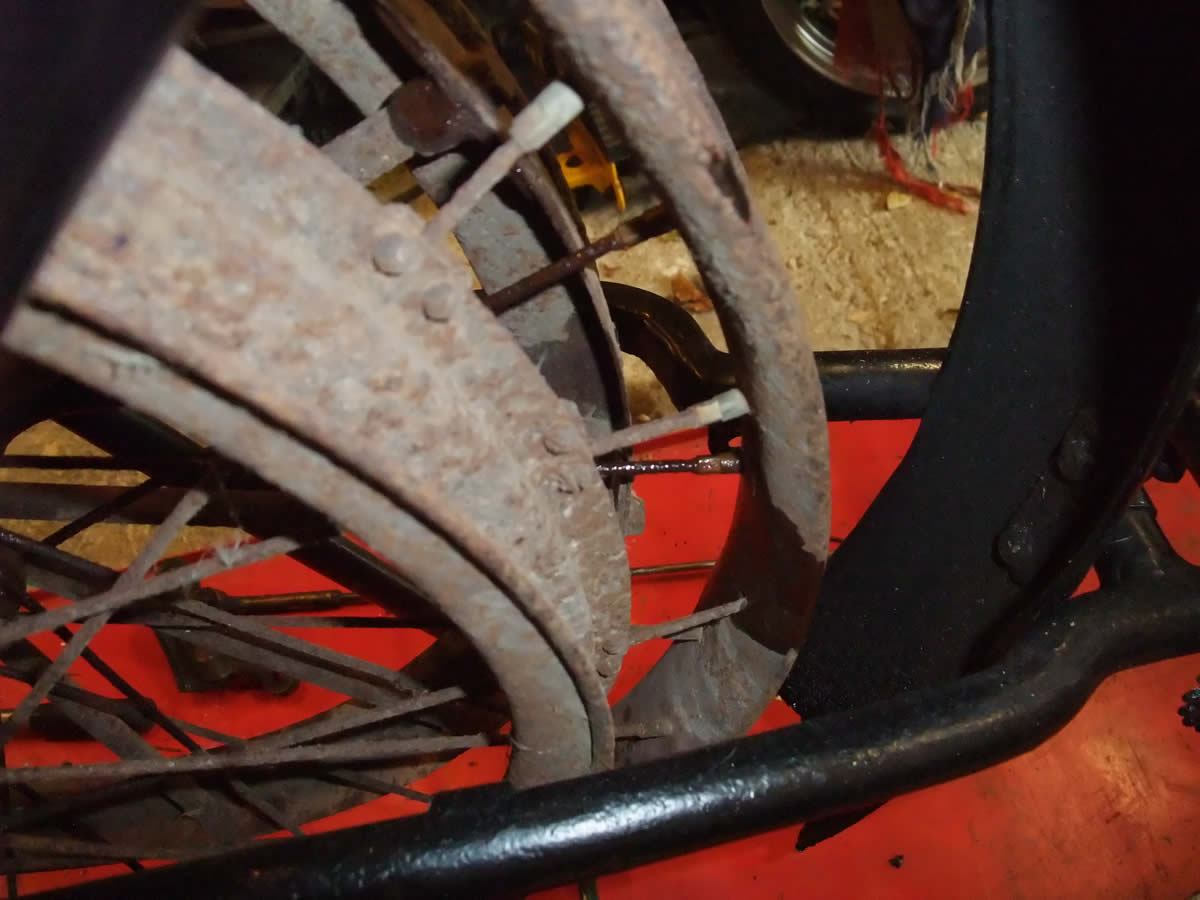
The front brake was probably fine in 1914 when no other vehicles could stop any quicker than you, but in 2011 it must be considered almost comical in operation. It is a old fashioned (as you would expect) stirrup type brake. On each side of the wheel rim is a small rubber brake block and these are pulled upwards against the wheel rim. The rear brake has a simple brake shoe that rubs against the rim of the rear drive belt pulley. It is better than the front brake.
Veteran motorcycles are motorcycles built prior to 1915, so this 1914 Triumph is one of the last of the veteran motorcycles.
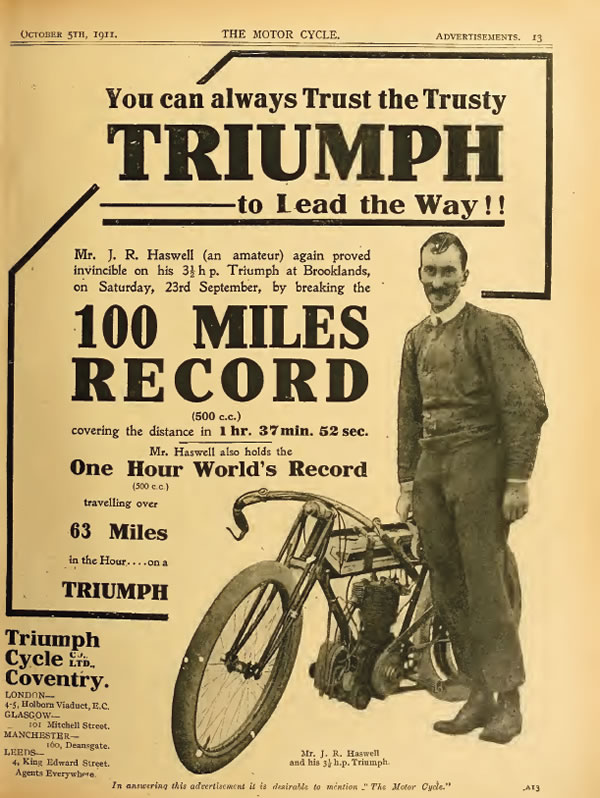
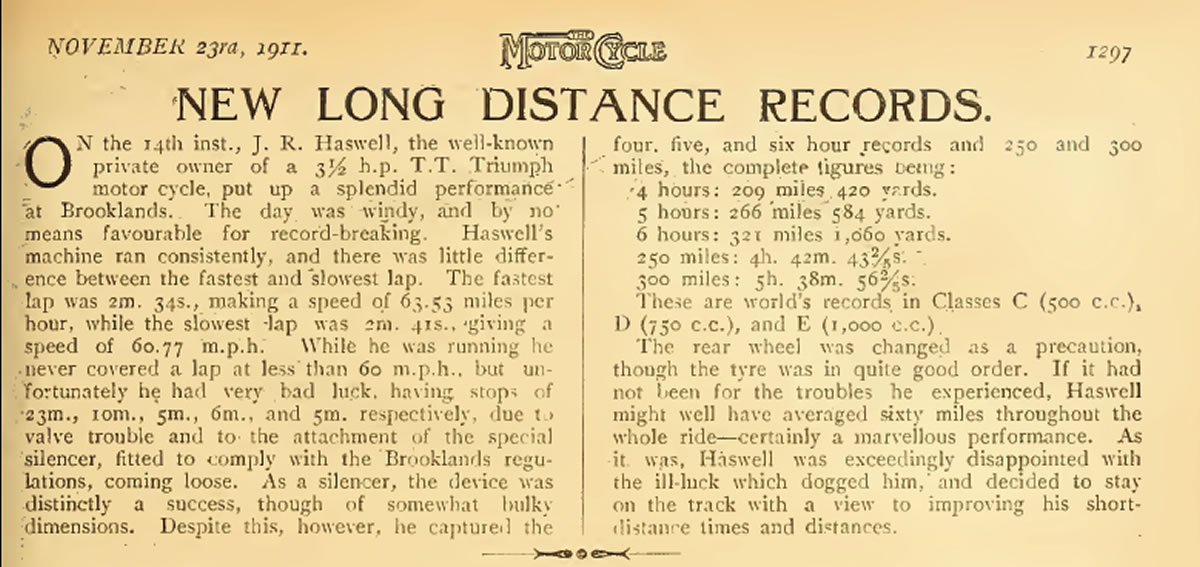
Now you may consider such elderly bikes to be barely able to cover more than a few miles, consider the following feats recorded one hundred years ago in 1911:
Below is an advert in The MotorCycle of 1911 following one of Mr JR Haswells record breaking rides.
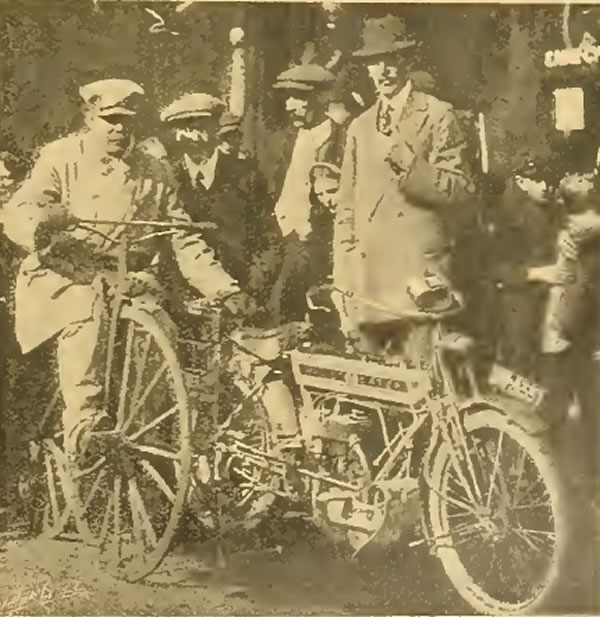
Below is a picture of Harry Long at the 30,000 mile milestone on his very Trusty Triumph, he is sitting on the cycle.
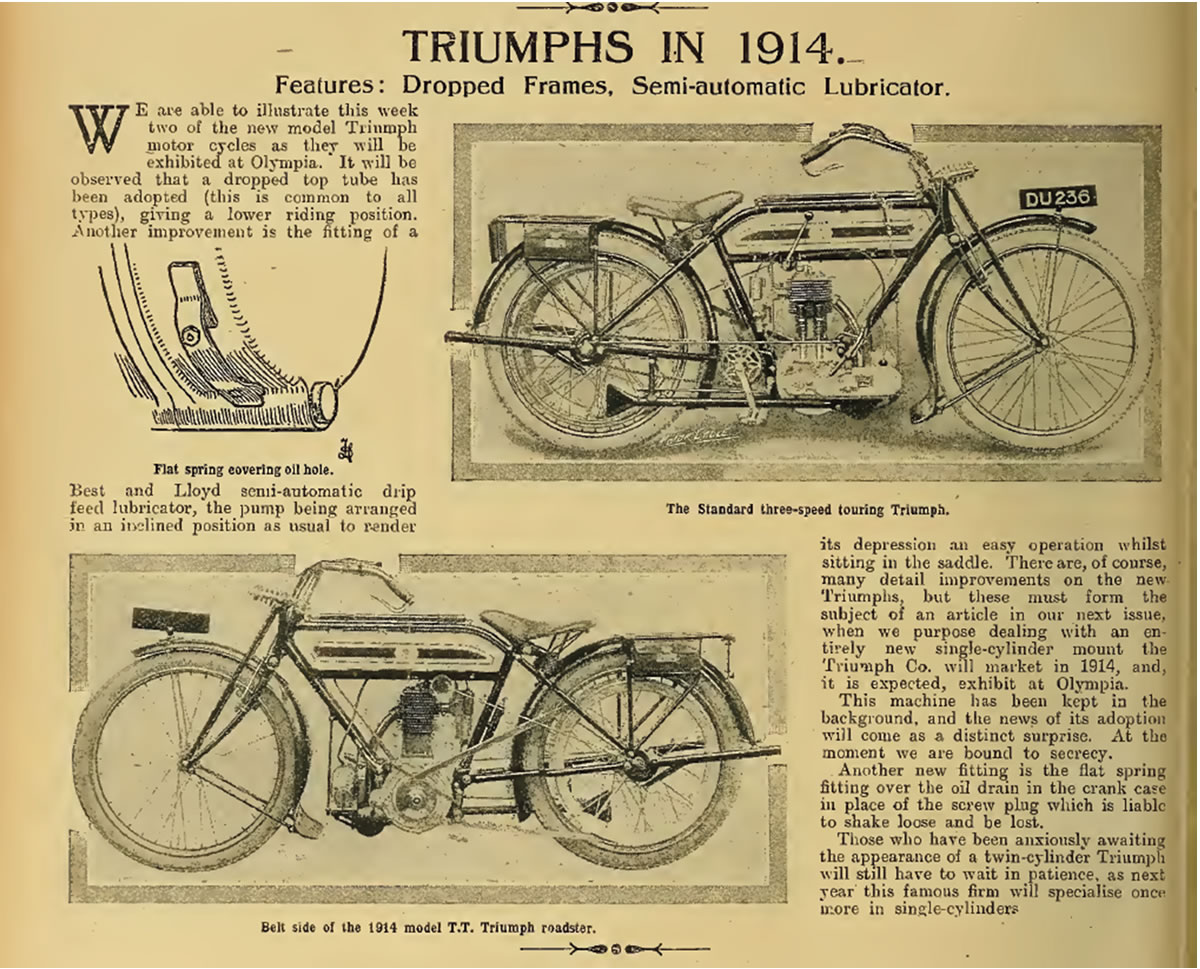
Below is a review of the "new" 1914 model as written about in the 1913 edition of The MotorCycle.
I bought my 1914 Triumph on November 21st 2011 and it is the first really old bike that I have owned and the first veteran Triumph or veteran motorcycle that I have owned. I normally travel about on a fast Ducati so it is quite a contrast.
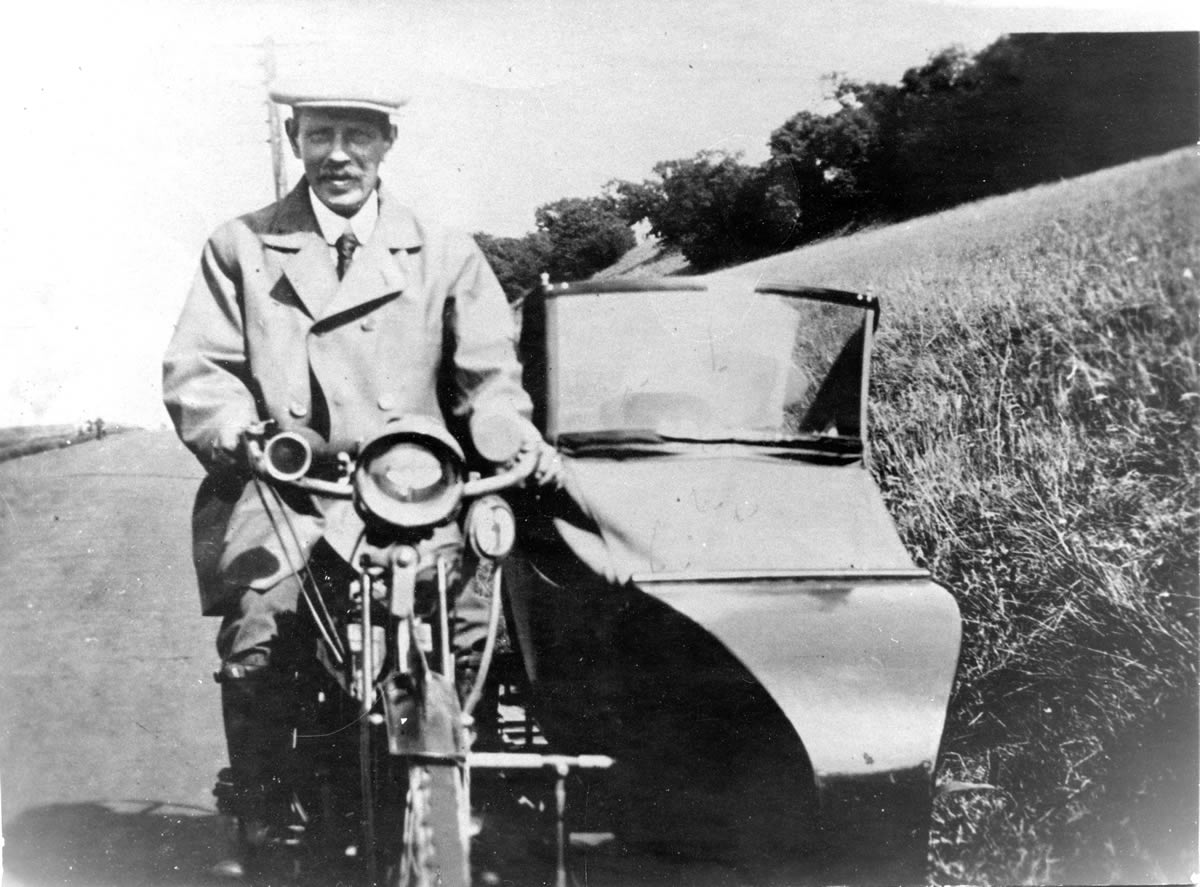
My Grandfather was a Pioneer motorcyclist who starting riding at the start of the last century. He successfully courted my grandmother via a 110 mile roundtrip to see her every Sunday, no easy journey on the bikes and unsurfaced roads of over 100 years ago. He progressed to a 1908 Moto Reve and then a 1911 Triumph. He was quite taken with the Triumph and continued riding it until he was 70. I avidly read and reread his 1911 edition of “Hints and Tips for Motor Cyclist”, full of everything that a pioneer motor cyclist needed to know. It was a fascinating era when every bike ride was an adventure.
My Grandfather Thomas owned a 1911 Triumph until 1945 so I am continuing a family tradition. My Grandfathers bike still exists and you can see a web page about it here or click on the picture of him on his Triumph below. My veteran Triumph is a couple of years newer, but almost the same as veteran Triumphs only changed very slightly each year.
I have visited the Pioneer Run for almost 30 years and would often see one of my grandfather’s bikes on the run but they were never for sale. I had always wanted a veteran and realised if I held out for a “family” bike then it may never happen. When a friend told me of a 1914 Triumph coming up for sale within an hour I was talking to the owner and a few days later went down in Dorset to see it.
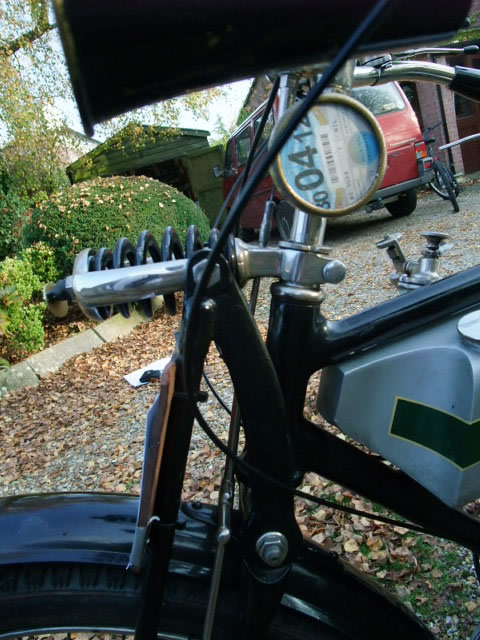
On November 21st the owner very kindly delivered it to me and we headed out to some quiet lanes for my first ride. It is a 1914 4hp model, a 550cc side valve single with a pulley on the crankshaft that directly drives the rear wheel via a belt. It has no clutch, gears and almost no brakes and is started by pedalling or pushing. The handlebars have levers to adjust air, throttle, ignition timing, engine decompressor and front brake. It is about as primitive or pure a motorcycle as you can get. Triumph dominated the era with bikes like it as it was the start of useable reliable motorcycles.
To master this bike I will need to put some miles on it so that riding it becomes second nature as I have not owned anything like it before. In its era riders would do quite serious mileage on them – hundreds of miles in a day – so they are capable of being used. As the centenary of the end of the veteran era looms, I intend to try and use it as our predecessors did a century ago. Whether this is naivety, folly or the start of a great adventure only time will tell.
See below for how I get on with it!
21st November 2011 - 10 miles
The previous owner (Peter) very kindly delivered it to me and then took the time to give me a few instructions on how to ride it and a few pointers on maintenance and generally how not to kill yourself on it.
In its heyday it could lap the TT Mountain circuit at over 50 mph on dirt roads and one holds the last officially sanctioned ACU Land End/John O ’Groats record – 29 hours to do c890 miles over the dirt roads of the era. After this record when the UK speed limit was still just 20mph and the Triumph averaged 30+, no more record attempts were sanctioned due to the “dangerous and extreme high speed”. So with all that said it should be capable of getting me places.
As its a sporting model! it obviously dispenses with the need for gears or a clutch or lights or working brakes or well almost everything ... and the engine directly drives the rear wheel so you have to run and jump on to start it – all quite exciting!
My new steed arrived in a van and after a cup of tea and a chat with the nice old chap who owned it, we headed up to some quiet roads for my “training” session.
It started immediately by pulling it up onto its stand which lifts the rear wheel clear of the ground and then pedalling it to turn over the engine. It was then was allowed to chuff away for a minute to warm up and then with the multitude of levers set for an ideal low tick over the decompressor was pulled in and the motor chuffed to a stop. Peter then showed me how easy it started by pushing the pedal down a half turn and it chuffed into life on its stand.
It was then time for me to set off on my maiden voyage and with some trepidation I pushed it onto the road (gentle downhill wisely selected) and prepared for the unknown of riding a near hundred year old bike! I decided to start it by pedalling it away rather than a run and a jump as if it starts and you don’t mount it in time it will set off without you. Pedalling it was decidedly odd as the pedals are not in the same position as you are familiar with on a normal pedal bike. In addition the handlebar ends almost brush your knees and the whole thing feels quite odd and unstable when pedalling. After a few very wobbly attempts and with the aid of the steepening hill we reached starting speeds and released the decompressor to give the motor full compression and we immediately had powered motion and we chuffed away with me adjusting a variety of levers to see what happens.
The two levers on the right handlebar are a little mysterious to me at the moment and you cannot just move one to accelerate, but both need moving and adjusting backwards and forwards to generate acceleration and keep the engine balanced as too much of one will seem to choke it up. I can see that these little levers will take a little time to master and no doubt the effect will vary by air temperature and certainly by incline. I also had a fiddle with the adjustable ignition timing but as I was also juggling all of the other levers I am not sure I could notice any effect so will need much more experimentation to master it.
The handling was much better than expected and perfectly pleasant at the moderate speeds I was travelling at. The brakes are rather interesting to say the least. The front brake (stirrup type block) has a lovely smooth action and you can sense it doing something, but can’t really feel it slowing the bike down. Most of the time I did not bother with the brakes and just balanced speed to the corners and hazards. With the owner following he reported that I was doing 45 at peak and it seemed unstressed but a little fluffy at times when I probably had levers in the wrong place. No doubt my complete amateur approach to balancing all the levers didn’t help matters and I am sure with further experience will make things smoother.
I rode it for about 10 miles and enjoyed every minute. I probably spent too much time tinkering with all the levers, but they seem to need constant attention on the undulating roads I travelled over. Perhaps I am fiddling with them too much. It is much smoother than I expected and the power is applied in an elastic kind of way through the belt drive soaking up any shocks.
I now realise that it is going to take quite a few miles to get the hang of riding it, but riding it is really lovely as it gently chuffs along. Even the levers have an appeal as you have to feed it the perfect blend of air and petrol to get it to give you its best.
After the owner had departed I fired it up in the garden and let it run for a minute at a lovely slow tickover and then stopped it and sat with a mug of tea and just admired it. No doubt my grandfather did the same over 90 years ago when he took delivery of his Triumph. After my tea I decided to start it again for further appreciation of it in action, but it would not cooperate and despite a number of pedalling sessions it refused to chuff into life and indeed then some oily petrol ran out of it – so I assume I had flooded it. With light fading I stopped for the evening and put it away in the garage with its new friends. Weather permitting tomorrow I shall have another go.
Before I rode it I called up my insurance company to add it to my policy. An amusing conversation ensued including - No it hasn't got an alarm fitted - it barely has electricity!
22nd November 2011
I have been chatting with a couple of friends that have veteran Triumphs and I suspect that I was moving the levers around too much yesterday. Whilst they do apparently need adjusting in motion, it is not required constantly so I was over adjusting things. I should be able to find an ideal postion for both levers and then almost leave them alone until a hill, corner or junction looms up.
The weather was not up to much today so I took my time to look it over. Peter has done a lovely job of restoring it.
25th November
A couple of friends Geoff and Chris came over to see it today. They have owned veteran Triumphs for decades and are a huge font of help and knowledge. Their verdict was that the engine was excellent and as a good as one can get. This bodes well for me riding it. They also showed me how the carb comes apart and a multitude of other useful hints and tips.
27th November 2011 - 20 miles
Every day since I bought it I have been practicing starting. I thought it better to master this at home rather than stranded miles from my garage. Each successful start boosted my confidence in this 97 year old bike. I start it from cold and at different engine temperatures to get the hang of it. It does start very easily once you know how.
Well today was the day for a proper test ride and whilst I have some fairly rapid modern ish bikes lurking in the garage, I felt quite nervous knowing that I was going out on it.
I was going to do it this morning but last night was invited to a shoot and this took up my morning. All through the shoot I just hoped the weather would stay fine for when I got home. I mentioned this more than once to my shooting companion who humoured my strange new mode of transport and my enthusiastic descriptions of what it’s like.
So it was after 2pm before I put it on its stand and fired it up. I had checked it all over and topped up the petrol and put my selection of tools into a tool box as I assumed it would stop somewhere and misbehave. I was expecting to break down and just wondered how far from home I would be! I had even worn walking boots rather than bike boots to make the push home easier. I had a final cigarette before I set off, feeling a little like someone about to go “over the top”.
Well I am just back from my ride and not an “involuntary stop” as they would put it a century ago.
It is quite a thing to ride. The mental energy needed to look at every possible road hazard and then decide upon the best approach, I would say is many times more taxing than riding a quick Ducati at several times the speed of the Triumph. In addition to the mental energy used it also takes a physical toll from exertion from starting it - if a junction didn’t favour me just rolling through it.
I can’t get the hang of pedalling it away, with the tiny pedal cranks as it’s like trying to ride a kid’s bike, but a few scoots with flailing legs and it chuffs away.
I set off just intending to do a small loop home, but ended up on the outskirts of Petersfield and with the town approaching took an easy left to avoid any traffic getting in my way. I can see that turning left will be my favourite option at any junction on this bike. I continued onwards on empty B roads, gaining confidence and feeling very chuffed soon arrived at South Harting. Naturally I turned left and back towards home with all running very sweetly and getting a better feel for how to use the engine controls.
In the flat easy sections of the roads I gave the brakes a good try out to see what they are capable off. The front has a sweet action but it doesn’t progress beyond this to any actual retardation. The rear brake does have enough to power to be able to sense that you are slowing, though probably about the same as the engine braking from pulling in the decompressor.
The near empty country lanes seemed well suited to it as we chuffed along at probably around 30-40mph.
The “big” right turn onto the A272 provided my first stop and I had to push it across the road into a pull-in on the other side, as pedal starting it across a busy junction is not yet a skill I have! Within seconds a chap on a Trike had stopped to see if I was OK. I popped it onto its stand and it kick started off the pedals and surprised both myself and the Trike owner that it started so easily. I did the start on the stand as I wanted to ensure that the levers were in a good tick over position. I had tried to do this as I approached the junction but as it was by FIRST right turn much was whirring around in my head.
I had thought of trying to go left and do another loop but a few cars were driving with lights on as the light was fading and as I don’t have lights I decided to go right and head for home.
Stopping the motor and folding the stand away I then got back on it and scooted along up to starting speed and we then off for home and another looming right turn into my road a few miles ahead!
Very satisfyingly the 30mph sign flashed its “you are going too fast warning” as I passed. So it’s capable of getting me a speeding ticket. I wonder when the last veteran motorcycle was involved in a court appearance for speeding – probably pre WW1. The UK National limit was 20mph when this bike was built.
As I slowed for the right turn into my road with right arm outstretched and with a lucky break in the oncoming cars I entered my road a little more quickly than I had expected. On a modern bike it would have no speed at all but on this it seemed suddenly quick and I had to lean it over the furthest so far to make the turn and instinctively stuck my right foot out (many years of offroading kicking in this useful reflex action). A second or so later I was just back in calm control wondering how far you can lean it over and can you get the foot pegs down when I remembered it was time to open the throttle to prepare for the slight hill up to my house. In a car you don’t notice the hill, on foot homeward bound from the pub you do and I had no idea if it would make the hill from such a slow start. It romped up it and I had to close off well before my house. With more expert lever control no doubt it will go even better.
It chuffed onto the drive and I had arrived home. When I set off an hour before I had half expected to return by foot, but it had not let me down and I had a real sense of both relief and achievement.
Tara had also not been overly confident that she would not get a rescue call and had put off starting on a bottle wine in case she was called out. I think she was as surprised as I was to arrive home and a bottle was soon started.
Naturally I first needed a traditional cup of tea to hold as I stood in the garden and admired it. Tara asked me how far I had been and I explained the route but had no exact idea how many miles it was as the bike has neither speedo nor milometer. A quick visit back to the 21st century and Google maps informs me that my maiden flight was 20.5 miles.
Back to the bike and a quick post flight check and all seems well, nothing has fallen off or even come loose. I now remember that I had not checked the tyre pressures and a gauge reveals just 15psi in each. Not good as they need 30-40psi as they can apparently easily come off the rims with low pressure. My fault for not checking and encouraging that they stayed on the rims.
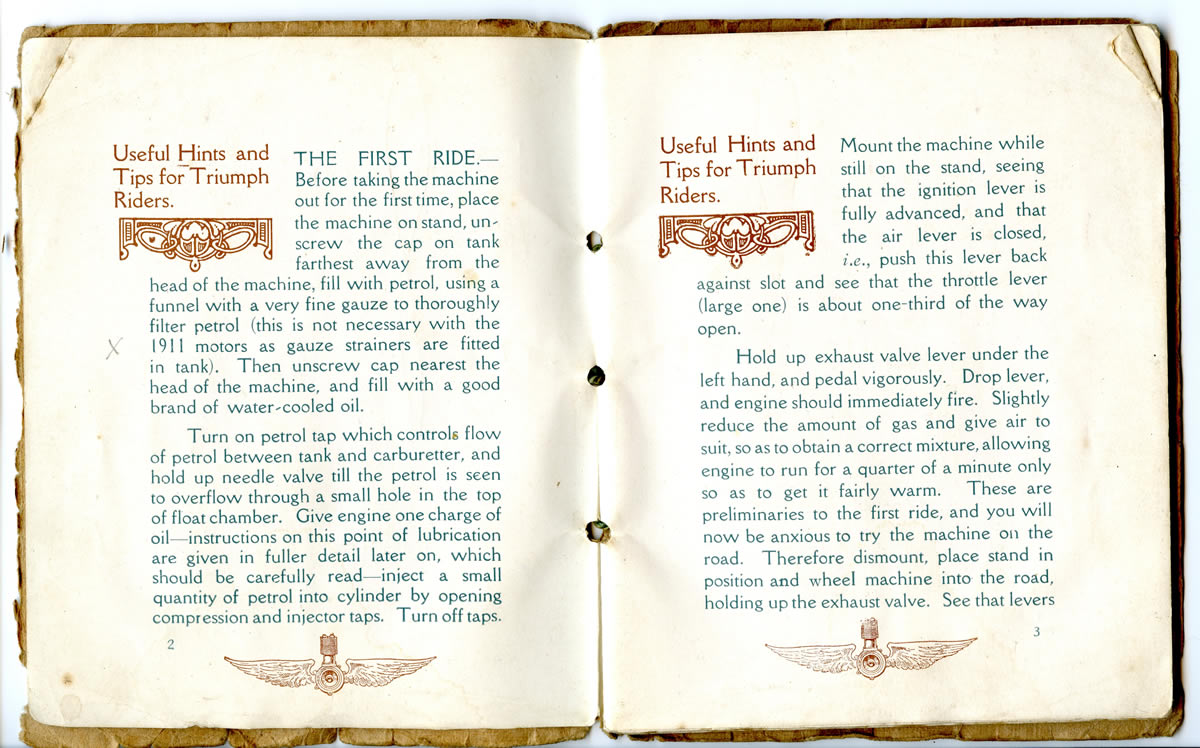
It is a real credit to the previous owner that a complete novice can ride it 20 miles without any issues. They were designed to be ridden by novices a century ago and they came from the factory with charmingly helpful booklets aimed at the new rider with advice on how to ride them and look after them.
An hour after I arrived home I could still sense the fizz of adrenalin in me from the ride, marvellous as I doubt if we had topped 45mph!
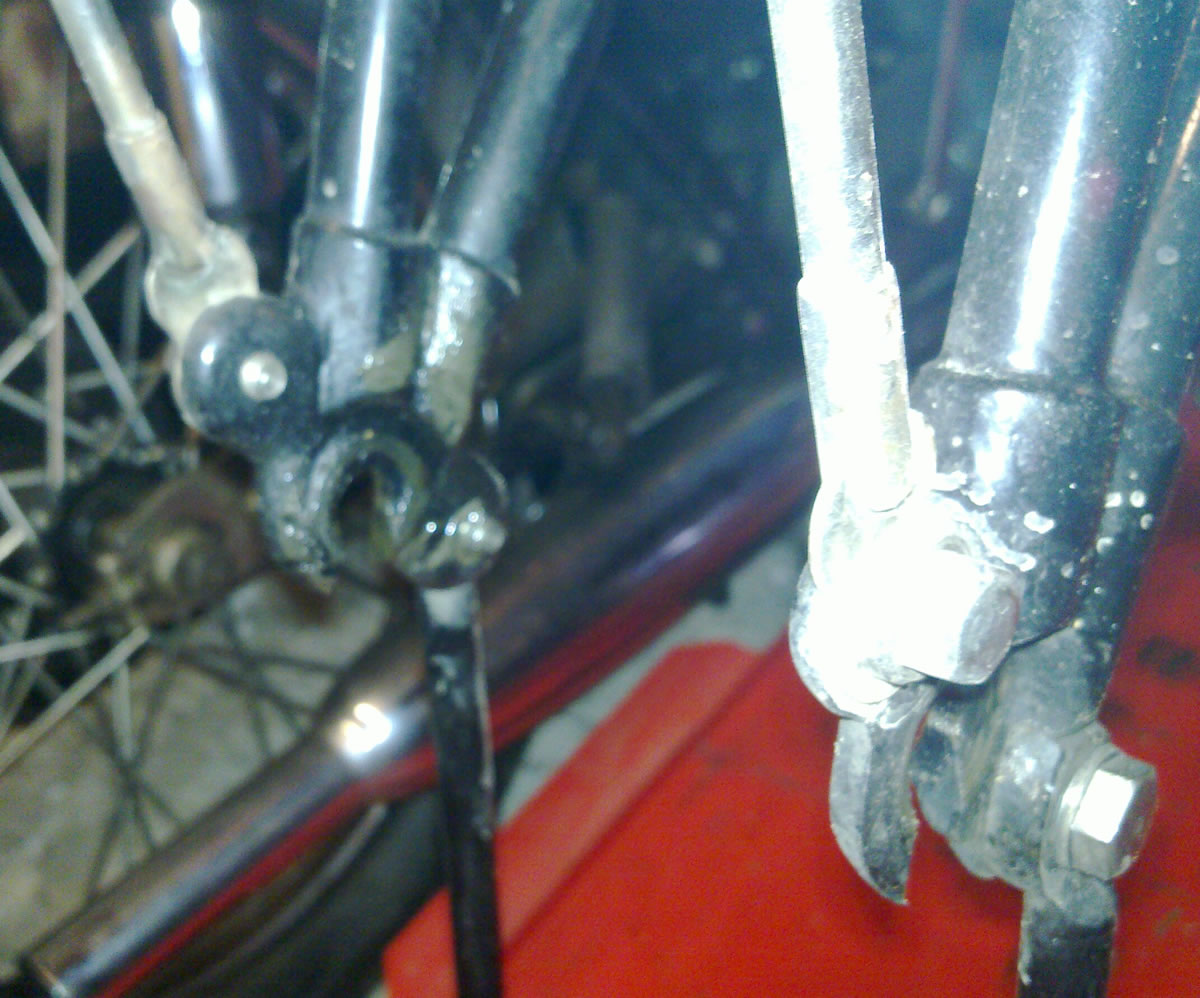
As it will be much easier to start by pedalling, I need to sort out some longer pedals and I may need to take a link out of the belt as it is much looser after the ride and if you turn the engine over without the decompressor then it slips a bit around the front pulley – but is OK with the decompressor pulled in.
The next morning I discovered a few aches in new places from the ungainly straddled flailing of legs used to start it and probably from the riding position. The foot pegs are quite far forward which stops you putting too much weight on them and means more of your weight sits on the saddle than a more modern bike. A new original type saddle is definitely on the list to get and also I will next try riding it with my weight on the pedalling pedals to see what that is like.
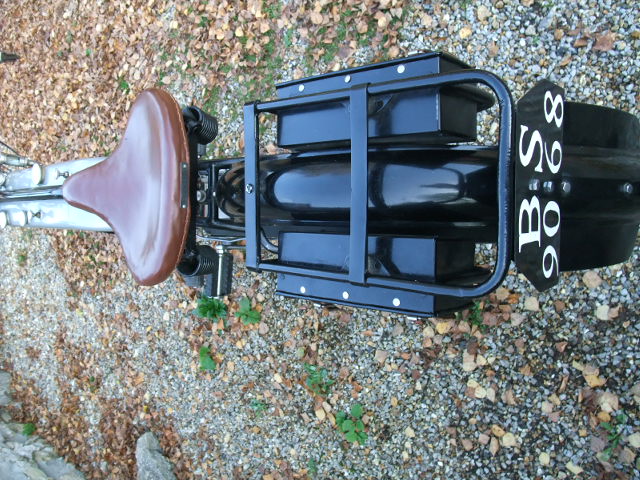
The two pictures below were taken on return from the ride.
29th November 2011
I thought I should get a few spares to take out on my rides and as usual Geoff and Chris were a font of all knowledge on the subject and pointed me in the right direction.
Spark Plugs. I expected that finding the correct plug for a near hundred year old machine might be a little fraught, but one phone call and I had all I needed. They even knew which type of plug you need for whether the engine is running hot or cold! The Green Spark Plug Company is UK based and has a web site - http://www.gsparkplug.com/ I also bought some spare HT lead and the little clips that hold the HT lead to the plug, I now know that they are called KLG spring clips. A spare HT spade end connector and a couple of spare spark plug gaskets and that should be all I need to keep me running - spark wise anyway. All of these bits were £18 and arrived the next day. They advise that if your bike runs coolish use a Champion D16 and if it runs hot use a Champion D14.
Oil. The bikes runs either SAE 30 or 40 as I had none in the garage a quick look on the web revealed that Morris do this and seem well respected in the Veteran and Vintage circles. I am used to eye watering prices for the oil my Ducati's consume so it was refreshing to buy 5 litres of both type for just £16.50 each. The oil arrived the next day and came from http://www.stationaryengineparts.com
I was out and about in the car and popped into a few local cycle shops to see if I could get a couple of solderless nipples as if a nipple pulled out of any cable it could stop me my tracks. Both the shops I tried were shiny mountain bike shops and the kids behind the counter had no idea what a solderless nipple is - the look one gave me implied that he thought a solderless nipple was some kind of kinky sex toy... I need to find an old fashioned bike shop or have a search of the web.
Raining all day so no chance for a ride.
I thought I should also carry a spare tube and Geoff once again pointed me to a good source. Vintage tyres have an excellent web site - http://www.vintagetyres.com/ and a quick call to check what I needed resulted in a new 26 inch tube for just £13.20 delivered
Another wet day so no chance of a spin.
3rd December 2011
The bike came with a spare pair of pedals and sprocket so I decided to swap them over as the pedal crank is about 50% longer than the ones fitted and will make it easier to pedal - I think. The replacement pedals had slightly smaller holes and the cotter pins that hold them to the crank would not fit. So I set off to my nearest old fashioned bicycle shop to see if I could get some to fit. The chap behind the counter tried a few and they didnt fit and then asked me what they were for and was a little surprised with my answer, but his search of his shop continued until he found two that fitted. He also had some solderless nipples and two cotter pins with nuts and washers and three solderless nipples - £6. I was a bit late getting back as I called into see a friend who had just bought an eight wheel drive amphibious truck - as you do! and had to have a look at it. Over a mug of tea we decided that we need to take it swimming, so anyone with a lake near Godalming/Haslemere - please get in touch!
A little tweaking with a file was called on to get the whole thing to fit on the pedal crank and then the chain was reconnected and all was done. As I have now dramatically increased the mechanical leverage at the pedals - I consider this my first performance upgrade. The pedals and sprocket are not quite the same as the original Triumph, but similar enough for now until some real ones can be found. I then decided to check the final drive ratio and remember a hint from an old magazine followed their advice. I made a small mark at the top of the front pulley with a marker pen (chalk was suggested in the 1911 article!) and another on the rear pulley at the point it crossed a frame tube (so I had a datum point). I then turned over the engine and counted each rotation of the front pulley until the rear one had done a full circle. Thus the ratio of the front pulley to the rear one is 5.5 to 1.
As I was finishing up and comtemplating a ride a couple of friends turned up on bikes to see the Triumph and so it was wheeled out and I talked them through the starting procedure and it easily chuffed into life and then settled to a sweet slow tickover. A few more demonstration restarts and some coffee and biscuits and much discussion over all of its features then ensued. Chris pointed out that the latest Ducati uses the engine as a stressed member as does the Triumph, so nothing new in the biking world. They both had a sit on it but declined a go! With the final start (just kicking the pedal down) showed the belt still slipping on the front pulley. I have read in old articles about the issues of removing a belt and shortening it but it needed to come off and loose a link. Pull the belt to the edge of the rear pulley and then drive it around the pulley by turning the pedals and in one rotation it was off. The metal "T" headed pins that hold the links together are turned 90 degrees and then can pass through the slot in the belt. It was a little fiddly, but soon came apart and I removed one link.
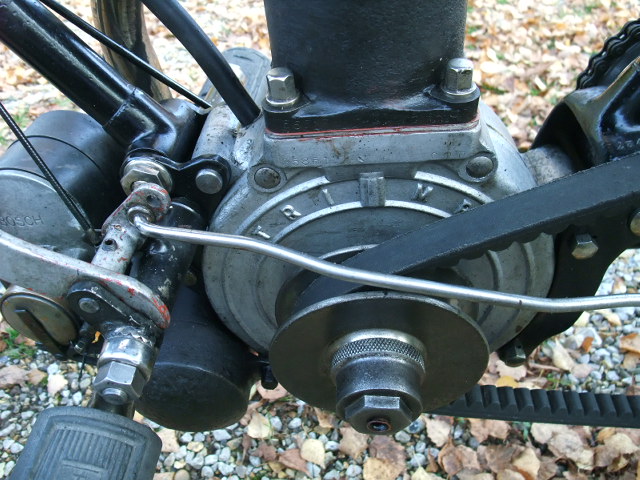
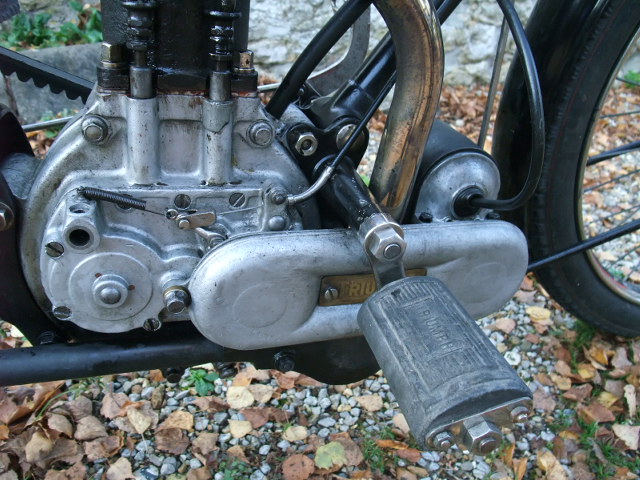
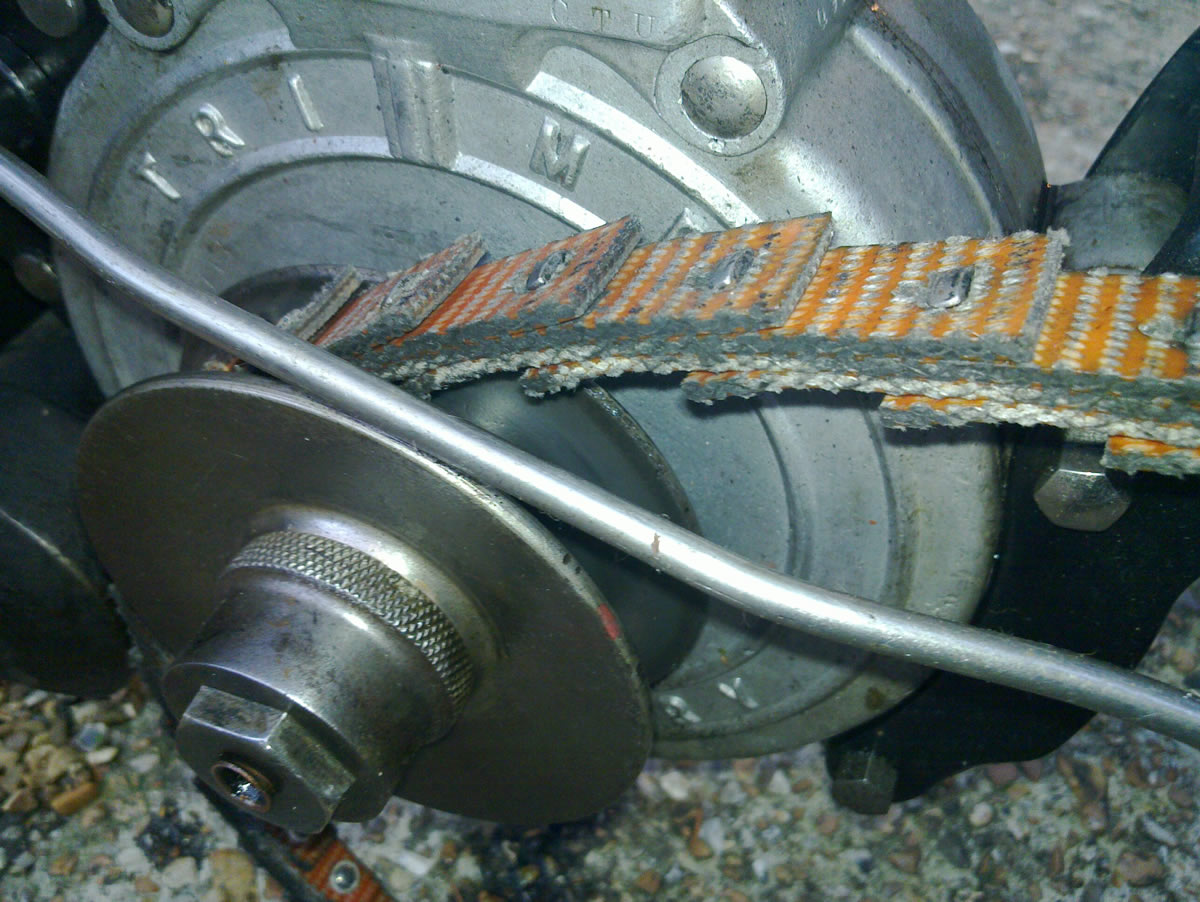
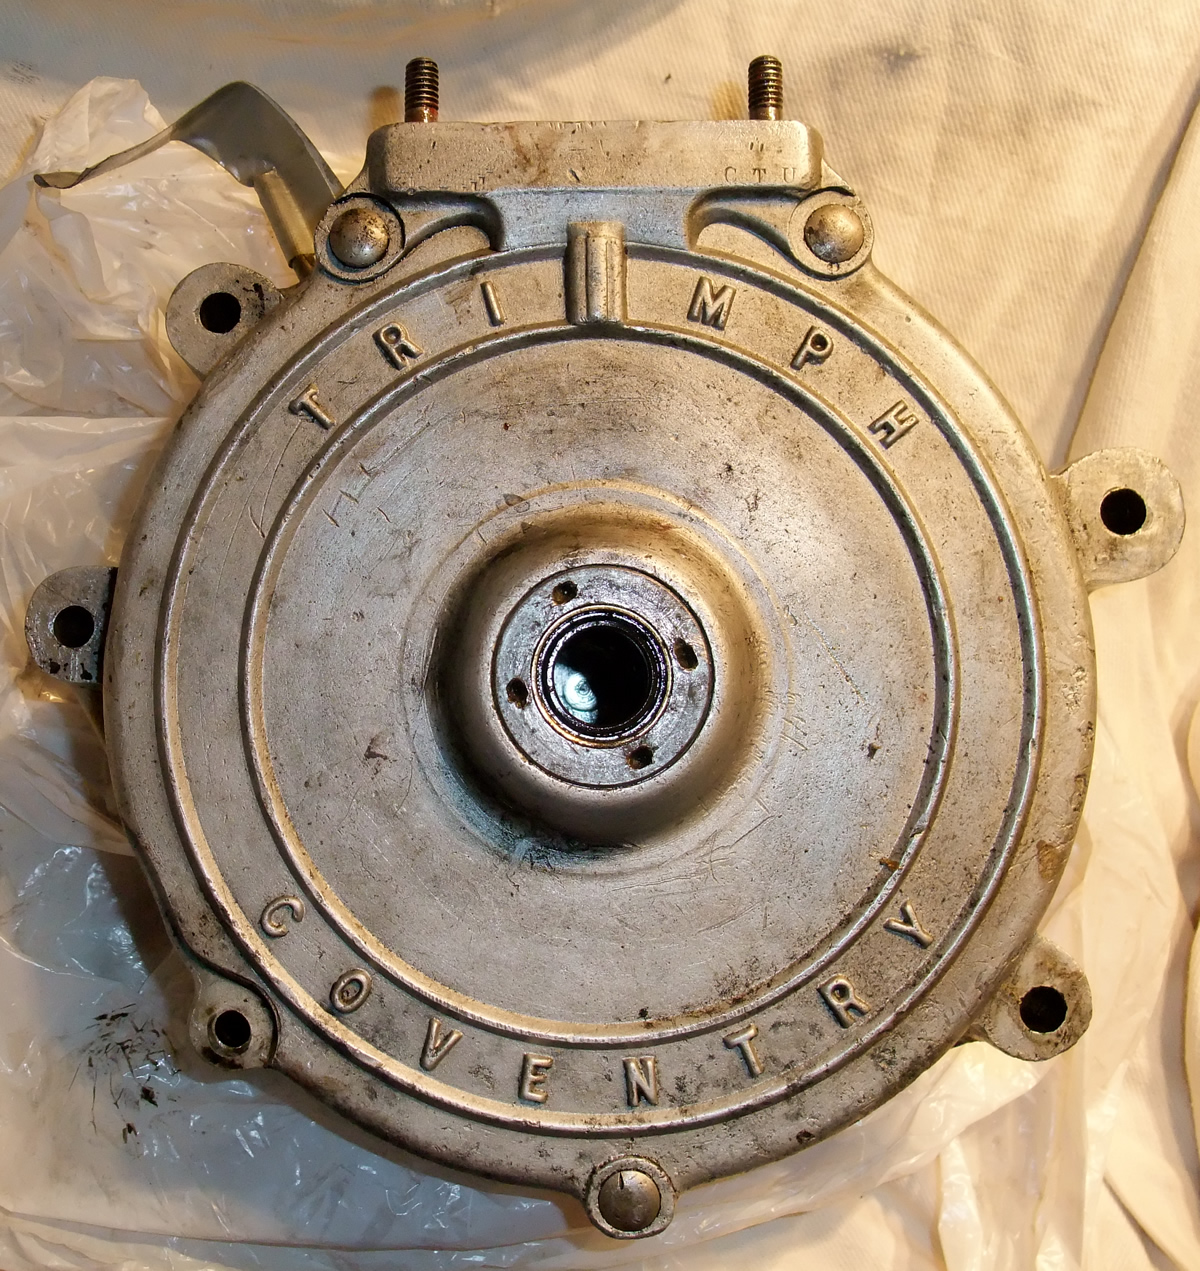
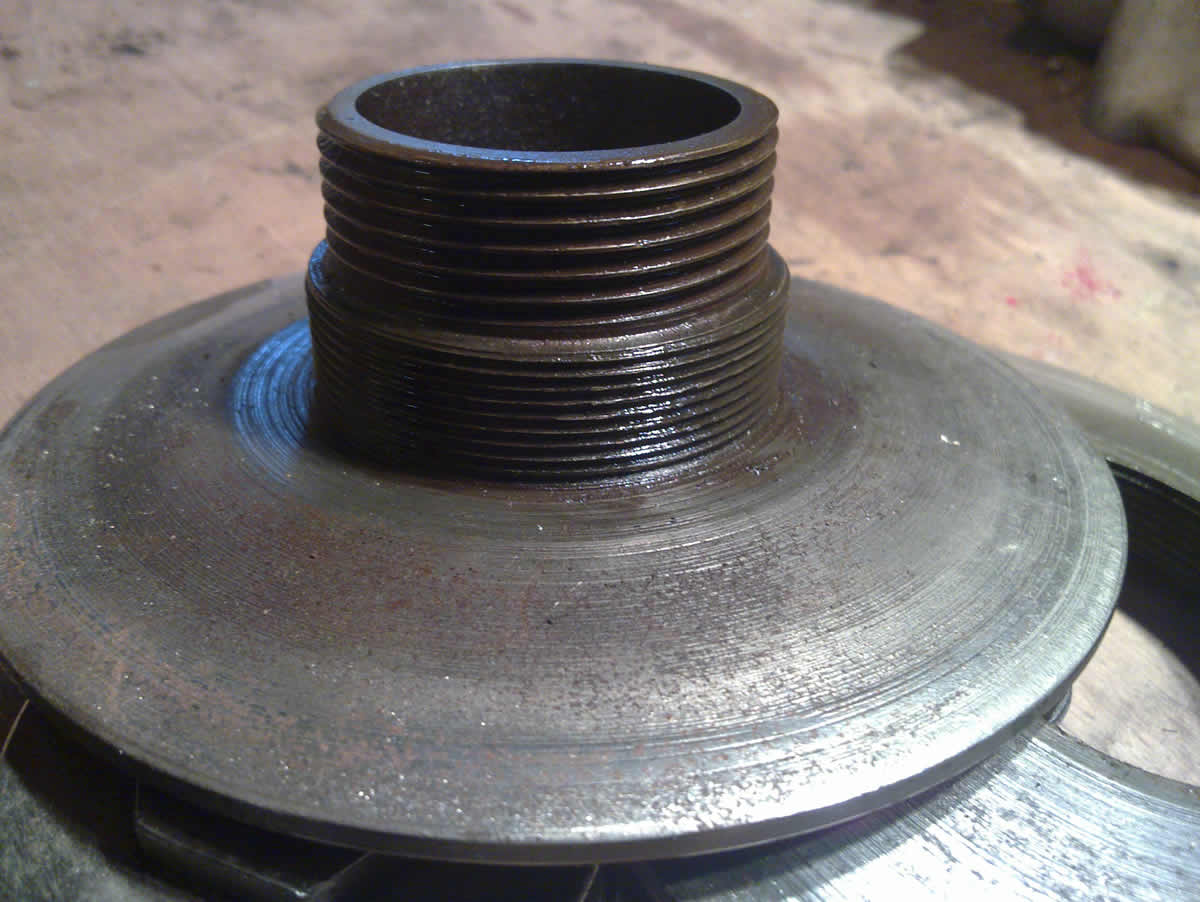
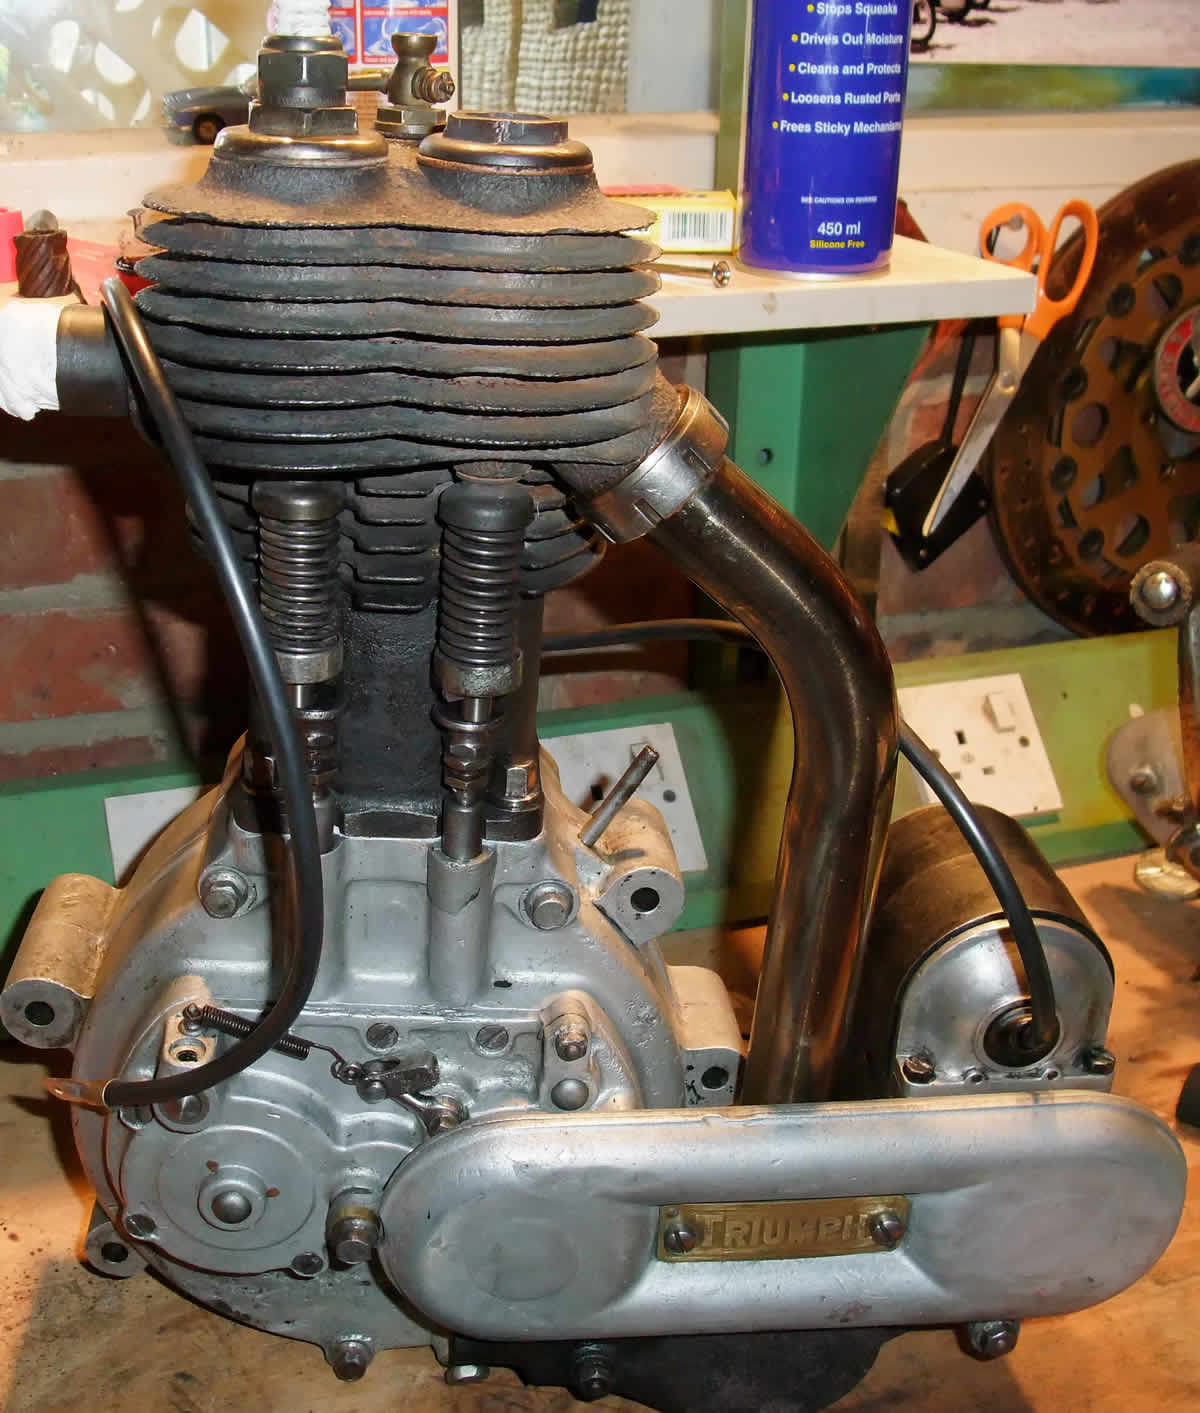
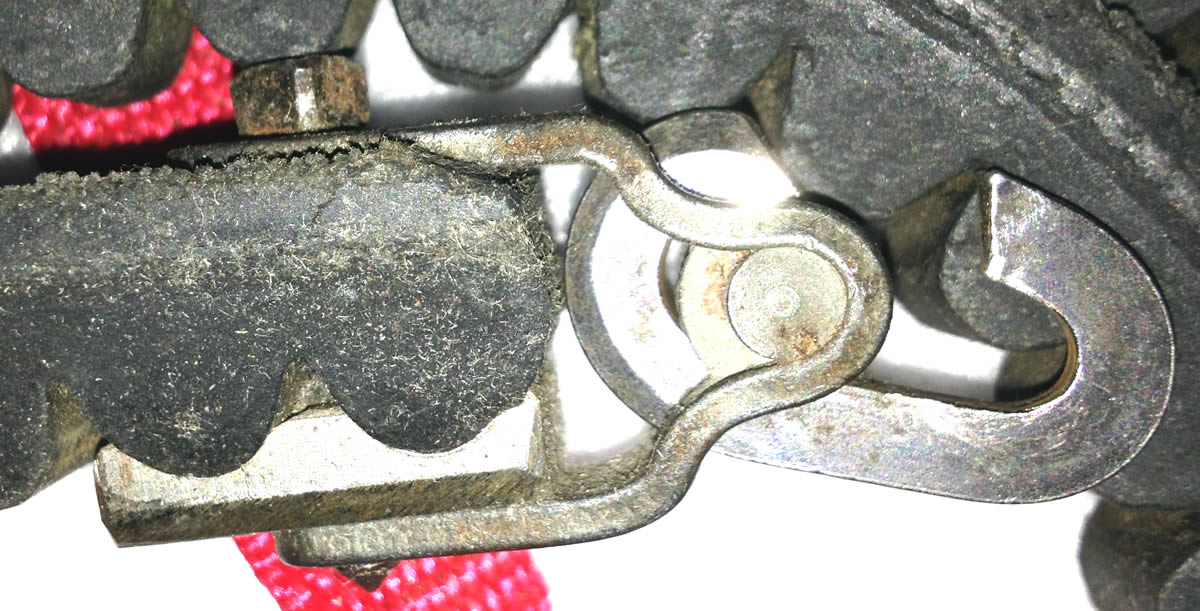
Below is a picture of the untensioned belt on the front pulley. You can see the multi layer construction of the belt. The "CTU" letters showing on the top of the engine reveals that this engine (or at least the crankcases) were built in August 1914. This was the start of The Great War and a batch of 100 Triumphs left the factory in the middle of August and headed out to France. So mine was either built early or late in August or could have been one that went off to war. No way to know for sure, but at least I know now when its birthday is.
As the belt felt a little oily (which cant help traction) I took the advice of the previous owner and cleaned it. It went into a plastic bucket (yes I should use a 100 year old metal bucket ...) with some washing powder and enough hot water to cover it. It was left to soak for a while and then given a scrub and dried off with an old towel. As Tara was out it then sneaked into "her" airing cupboard to dry out properly. I am generally banned from bike bits in the house due to a number of incidents over the years. I should point out that a dishwasher is an excellent tool for cleaning baked on muck and why shouldn't I use it to clean up some old crankcases.... best to do it when she will be out for the whole day.
So with the drive belt in the airing cupboard, the Triumph came back into the garage as the light was going. At this time of year in the UK, the light starts going about 4pm. I think I will try getting the hang of pedalling it tomorrow along the local field without the belt installed. That way I can get used to the oddly positioned pedals without the motor starting up.
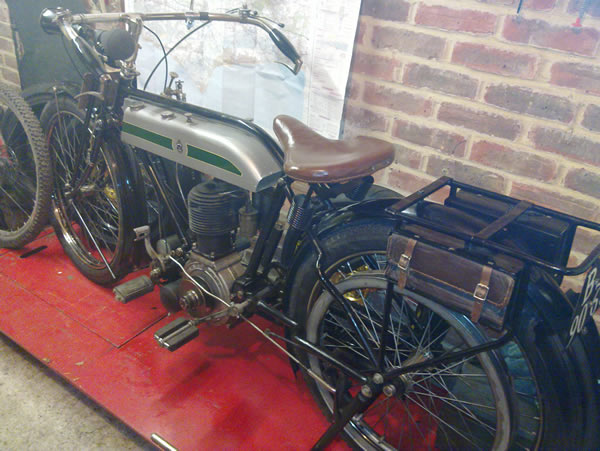
Below, back in the garage and taking top spot in the garage on the bike bench.
4th December 2011 - 20 miles
Yesterday morning dawned clear and bright if a little chilly and another ride was in the offing.
I topped up the oil tank (the front part of the fuel tank) with SAE 30 oil and checked the petrol and tyre pressures. Then I took it out onto the road without fitting the belt to try and get the hang of pedalling it. Now you may be wondering why I am going on about the pedalling as a bicycle is easy to pedal. Well this bike has the pedals in a different place and the ends of the handlebars foul your knees so you have to pedal with knees close together in a slightly odd way. A few goes and I was able to ride the bike about just on its pedals. Back to the house and I refitted the belt which took just a minute or two. The belt no longer slips on the pulley so taking out one bit seems to have done the trick. I then gathered up all my new spares and a few more tools and put them in the leather tool boxes at the back of the bike and all was set for a ride.
The decompressor cable is at the end of its adjustment and I am not sure if it is fully working. I have a slotted cycle adjuster and fit this to the cable and readjust it so that it goes from no tension (when off) to pulling the lever much further round.
A friend Christopher was on his way round on his KTM SuperMoto to say hello, so I hang on until he showed up then started the beast and warmed it up. Chris arrives wearing a tweed jacket to keep in keeping with the era of the bike and reports that tweed is surprising warm on the bike. On with a leather jacket for me and a helmet and off we set down my road. I had to stop at the T junction at the bottom of my road and with the drag of the engine the pedalling was not as easy and I reverted back to scooting along to start it and off we went. A mile or so later and we took a right down a small road and looming ahead is a very narrow 400+ year old stone bridge with a big 4x4 coming towards me, but I slowed the bike down and the car had just cleared it by the time we arrived. A few miles of up and down the small hills that are at the back of the Sussex Downs and I am impressed by how well it pulls up the hills. The throttle/air levers are now slightly loose and slowly close on their own so need a little tinkering with to keep the motor sweet. I shall tighten them up when I get home. We go for mile after mile through little Sussex villages and slow to almost walking speed as we pass some horses. A few more miles and I come to a long open straight and pull over into a lay-by. It’s quite a mental exercise riding it and a smoke is in order. Chris has been following on his KTM and taking a few videos of my progress and I have pulled over to let him have a go. My Zippo lighter is out of fuel and wont fire up, but a few drips from the Triumph and it produces fire. I explain the controls to Chris and how best to ride it and explain that the brakes are more ornamental than functional. He tries to pedal it off, but also has trouble pedalling and balancing and ends up scooting it away. By the time I have got my helmet on and set off on his KTM he is out of sight. A minute later I am behind him and that rear tyre looks tiny and we are bowling along according to the KTMs Speedo at around 35-40mph. The road rolls on for a few miles without a junction and I have warned Chris that it ends at a T junction with a minor road. As he approaches the junction I can see him experience the full wonder of the brakes and he stops just in time with feet on the ground skidding along. A quick push and it is off again and heading for home. On one steepish downhill section as he shuts of a few pops and flashes of flame rush out the end of the exhaust pipe – splendid stuff. A few miles later and we are all back home and I think Chris is quite taken with it.
We then stand around it for a good thirty minutes with warming mugs of coffee, discussing how well it goes and what a great experience riding it is. Neither of us can quite believe the huge mileages that people put on these bikes in there day and the feats of endurance riding by Albert Catt etc. Considering the state of the roads they must have been extremely fit, skilful, brave and very good riders. From my very limited experience on my Triumph I would liken an hour on it to at least 4 hours riding at a high level Enduro event in terms of mental energy used.
It has been clocked at 45mph today which it reaches easily on the flat. It would go quicker but at that rpm (whatever it is) it sounds like any more and it will be slightly strained and so 35ish is a nicer cruising speed. I think the engine revs to about 3,000 rpm and do not want to run it near its maximum if I can help it. As it will seemingly pull up every hill I have taken it to and reaches its maximum (gearing limited) top speed easily, I need to have a think about altering the gearing and need to explore what is a good compromise. At the moment the ratio between the front pulley and the rear is 5.5 to 1. The ideal will be to find the gearing that allows it to clear any hill whilst giving it the highest top speed. I am not planning to break any speed limits, but if I can cruise on the open road at a higher speed but at lower revs then that would be ideal and still have the gearing to be able to start it by low speed pushing – that would be the ideal. Perhaps I will try it first on its current gearing up some of the really steep hills in the area – like the one leading up Bury Hill first.
On checking it over I found that one of the nuts holding the fuel pipe was finger loose, so will need to go over the whole bike again with a spanner.
Another 20 miles on it today and confidence continues to grow its ability to go places and climb hills. I still need to master the pedal starting and I think the next time I go out I shall take it somewhere off the road and try and get some decent practice. I am still surprised by it arriving at junctions and still wanting to drive me forward. I use the decompressor and brakes but try and balance this with staying at engine running speeds, which means that you arrive at a junction at say 5+mph rather than zero mph in a modern vehicle. Maybe if I master the pedalling then stopping will not be such a physiological issue.
Very pleased with it and it has now covered about 50 miles and I am learning more about it with every tinker and each ride. It is lovely chuffing along a deserted country lane on it and since it arrived none of my other bikes have even been started.
Here is a video of this days outing: http://www.youtube.com/watch?v=Erhzi1VjR7k
10th December 2011 - 15 miles
My objective is to climb Bury Hill. It is the longest steepest hill in the area and if it will get up this then it should be able to climb almost any hill. I have no idea if it will do it. A modern motorist has almost no concerns about the ability of one’s motor to climb a hill, but 100 years ago it was the big issue, with many hill climbs taking place wherever there were motors. With low power and often no gears or clutches a machine could prove its ability by cresting the largest and steepest hills in a region. The results of these hill climbs were much featured in the period magazines and advertising. The trip out today will be just over 30 miles. Next weekend I plan to do 40 and then 50 and so on until I can do 100 miles in a day. With that landmark completed I will aim to ride to the Pioneer Run in March 2012, do the Run and ride home - a roundtrip of around 130 miles!
Today dawned bright and frosty with the lane outside my house well covered in ice. I decided to take the dog for a good walk and let the sun burn off the freeze before setting out. A few hours later and the ice was giving way to the warmth of the sun and with an encouraging blue sky it was time to get the beast out. I check it over and tightened a bolt or two and it easily fired up in the garden and I let it warm up and them put on my riding gear – full leathers today as it was still quite nippy outside.
It started easily again and chuffed down the lane outside my home and I had to stop it at the T junction at the bottom of the lane. It restarted easily and I chuffed down our towns High Street and luckily all of the traffic lights stayed green. Quite a few people stopped walking to stare as I passed by, not everyday you see such a machine in motion – in fact I have only ever seen them running on The Pioneer Run. Maybe I am the only person on the planet riding a 1914 Triumph today.
I continue on until the next small town and the roundabout is clear for a right turn and then on south for a mile or so and then a left towards Fittleworth and then south to the A29. We are motoring along in fine style and probably keeping to about 30-35 mph. At the A29 junction I pass a line of cars queuing for the junction and have to kill the motor as the traffic is too busy to cross the road under power. It takes a couple of pushes to restart and then Bury Hill starts to loom in the distance. I have now increased the oil drip feed to setting “3”, I normally use “2” and give it a fresh pump of oil as I approach the hill. All of the period literature advises the rider of 100 years ago to “charge the hill” and so I do with all the taps open and a good strong rate of acceleration as we start up the hill. The Hill climb is almost a mile of constant uphill with slight variations in the incline. It rises from about 10m above sea level to around 150m above sea level in just less than a mile. The throttle is wide open for the first time since I bought the bike and we are barely slowing as we assault the hill. Each second I think the power will start to tail off and we will slow to a stall, but no we keep on climbing and climbing and perhaps only lose 5-10 mph of speed by the time we reach the top. We have done it, we have conquered Bury Hill and I let out a whoop of celebration and as we crest the peak. The engine has sounded sweet and I slow it down to let it cool as we chuff the mile gently downhill to the Whiteways Cafe. I park it proudly outside the cafe with the other bikes as this spot has been a bikers gathering place for decades. I give it a quick check over and nothing is loose or missing and we have just climbed Bury Hill! I make a couple of quick phone calls to like mined enthusiast to boast of our success and then a sausage sandwich and a coffee beckon.
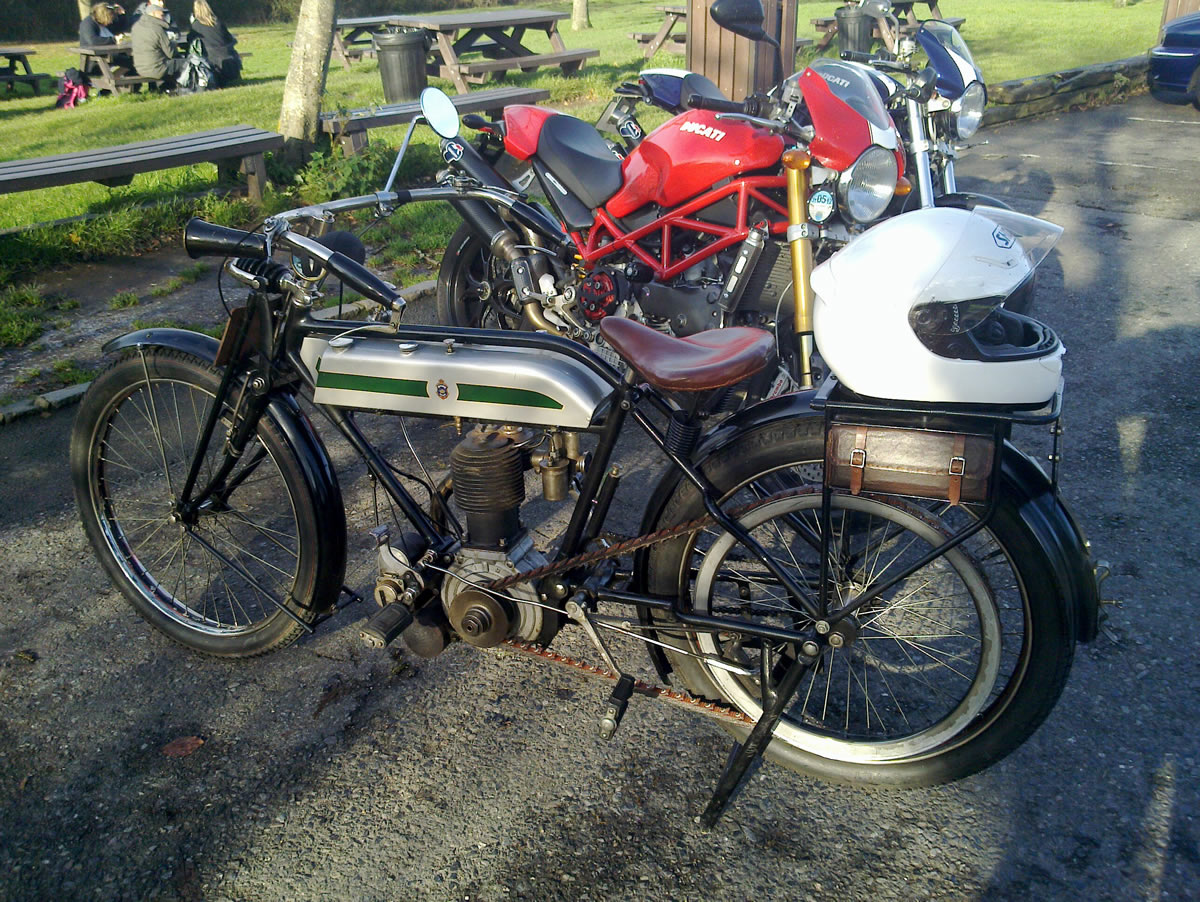
Below is the fine machine parked up amoungst it more modern bretheren.
After 30 minutes of taking in the hill top scene and chatting with motorcyclists its time to return home and brave going down Bury Hill with almost no brakes.
The bike is on its stand and when pedalled the belt slips around the pulley, so its out with the tools and I take a link out of the belt and refit it. It is then that I discover the belt is slipping as the engine is seized solid. A spanner on the pulley/crankshaft nut does nothing and neither does rocking the bike gently back and forth. I am 15 miles from home so a push is not an option. A couple of telephone calls to other veteran Triumph owners to see if they have any suggestions and it becomes obvious I won’t be riding home. I have breakdown insurance and the call is made.
As a place for the Triumph to expire, it could not really have chosen a better spot. A great view, good company and unlimited supplies of tea and sausage sandwiches. An hour or two later and we are home.
We did manage a further 15 miles enroute today and I enjoyed every moment of the trip.
We summitted Bury Hill!
13th December 2011
With the bike on the workbench I put a socket on the pulley/crankshaft nut and gently applied some force. It would move about 5-10 degrees in either direction before a solid clunk stopped play.
If the piston was seized then this could be just slack in the bearings so I take out the central plug in the head and slide in a plastic drinking straw. I find it best to only use materials softer than the engine when trying this and a plastics straw can cause no harm. With the pulley nut moving the crank must be moving slightly and the straw moves to show that the piston is also moving. This indicates that either the main bearings have failed (but still allow a little movement) or more likely that the big end has seized. The Big End is the bearing through the lower part of the conrod where it is attached to the crankshaft.
The engine will have to come out of the frame and will need to be completely stripped down.
It takes about 90 minutes to get the engine out as I am carefully checking everything as I go – I have never taken an engine out of one of these before! It is all very simple and I think you could get the engine out in 10 minutes in future. I take numerous photographs to remind me how it will go back together. None of the bolts are tight and it all comes apart very easily. As I take out the engine bolts I support the weight of the engine on a jack and slide big screwdrivers into the bolt holes to support it until all the bolts are out. It then just lowers out of the frame and I pick it up and put the engine on the bench – it is heavier than it looks!
The next step is to completely strip the motor and see what has failed.
14th December 2011
I take up the kind offer of Chris R, a fellow veteran Triumph owner, and take the whole engine down to his workshops. The trip down is enjoyable as I take the TVR and the weight of the Triumph engine in the boot helps its 300+bhp find traction on the wet roads.
Chris’s workshops are THE Aladdin’s cave of veteran Triumphs. Almost the complete Triumph range from pre 1915 is present in his workshop and the shelves are packed with Triumph parts and goodies. My engine could not feel more at home. Naturally a mug of tea is needed before we start.
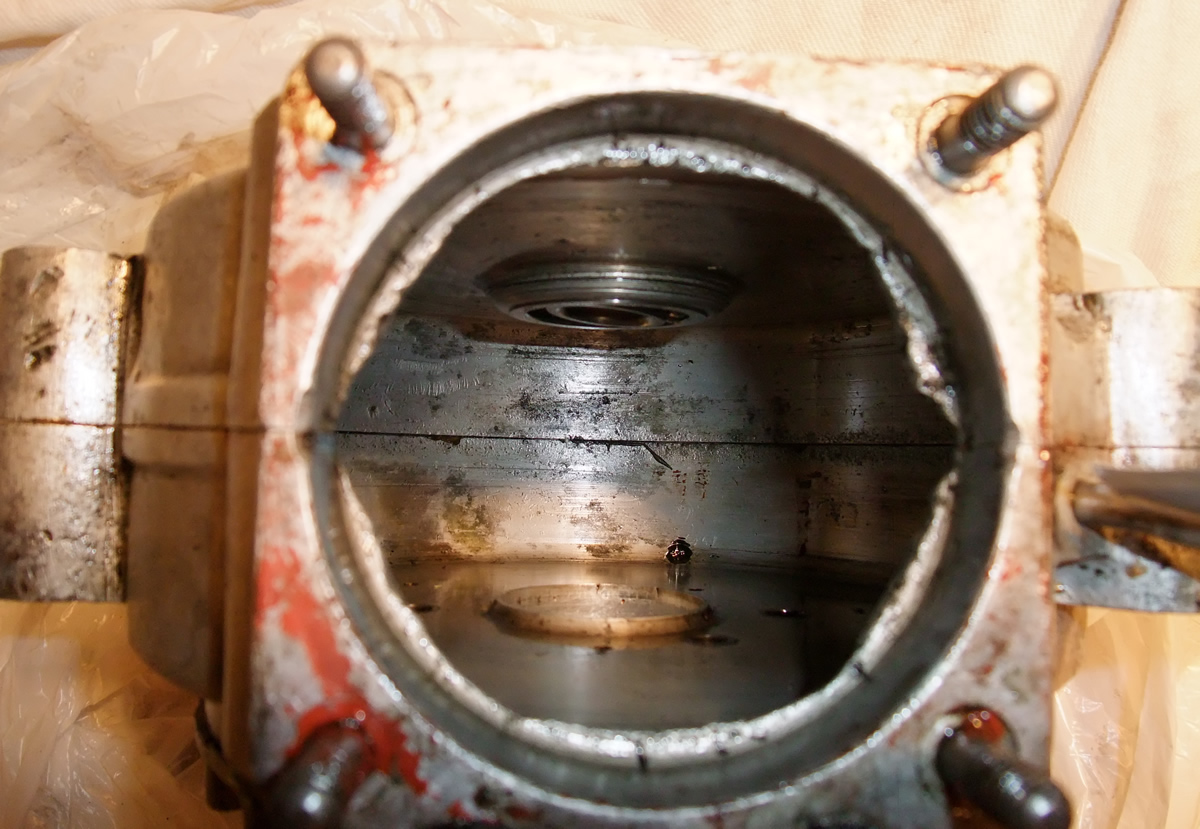
Four nuts hold the barrel to the crankcase and these undo easily and the barrel easily slides off over the piston with the conrod gently supported as it is slid off. The piston is alloy and in fine condition. The inside of the barrel is good with no obvious wear – so all looks good. We can now see that the big end is indeed seized.
The valve train assembly is removed and turns out to be a very clever and simple design. A small idler gear is driven from the crankshaft and this turns two larger cam wheels. These have the cam profile cut into the inside of the gear and it is a very simple and clever way to turn the rotation of the engine into the up and down motion required to move the valves up and down. I have taken complex Ducati desmodronic engines apart and this is quite beautifully elegant and simple. It all comes apart easily. The intake push rod has a slight burr on the bottom, but a few touches with a file and these are removed and all is removed. Perhaps the pushrod material is a little too soft as it should not burr – perhaps an item to change.
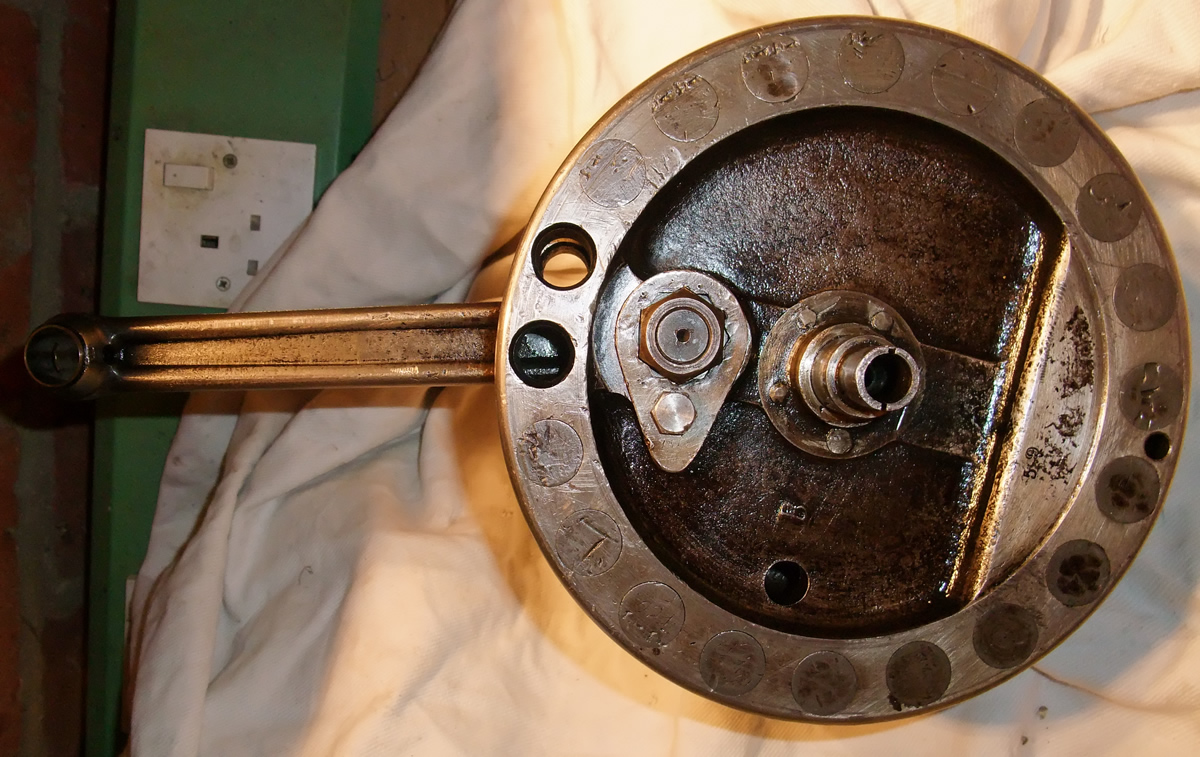
With the pulley already removed the crankcases come apart with a gentle pull and a few taps from a hide hammer and the cases are split. The crankshaft is a substantial and heavy assembly and apart from the seized big end looks in good condition. Plenty of oil inside the cases and no sign of any damage or loose bits of metal. We try gently tapping the conrod with a hide mallett to see if the big end will free but it is solid.
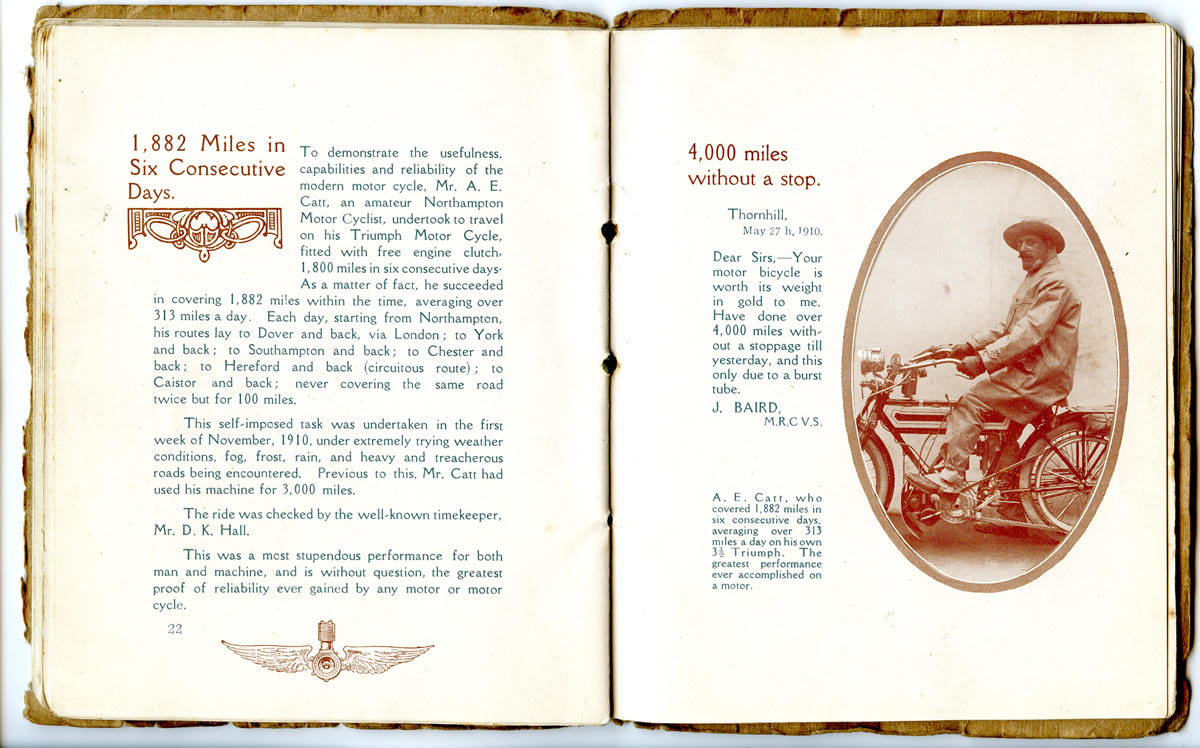
I am not the first Triumph rider to suffer a big end seizure. In the winter of 1910 Mr Catt was attempting to see how many miles could be ridden in 6 days. He completed 1,882 miles but would have probably exceeded 2,000 miles if a seized big end on the last day had not caused a 7 hour delay. As reported in The Motor Cycle November 10th 1910 - " Mr. Catt started in high spirits early on the last morning (Saturday, November 5th), announcing his intention of extending the distance to complete 2,000 miles. He made a fine run through the rain and fog in darkness to Great Chesterford, between Hockerill and Newmarket, where felt, his engine stopping under him as he ran down a slight gradient. Though he hastily injected more oil, he felt the engine seize at 8 a.m. precisely. Dismounting, he easily took off the cylinder, but discovered the big end of the connecting rod had seized immovably on the crank pin. After telephoning for assistance, he took the machine into a local flour mill, which boasted a forge. The engine was taken off the frame, the crank case and flywheels removed, and after the bearing had been heated with a white-hot bars of iron, and the connecting rod had been gripped in a vice, the parts were finally freed". "The cause of the seizure was the derangement of the oil pump valve by some mysterious bits of fluff, which had somehow found their way into it, so that Mr. Catt was pumping oil in and out of his tank when he thought he was lubricating his engine".
I like the use of the word derangement to describe a mechanical failure!
The engine is now completely stripped and Chris produces a selection of sandwich bags for all of the parts to be carefully labelled and stored separately.
The big end assembly is not something that I can take apart as the fly wheels need to be split. This will need specialst equipment to do and a new bearing will be required and then careful reassembly. Engineering shops specialising in veteran Triumph engines are not exactly thick on the ground, but everyone suggests the same people as THE people who are experts in this.
My dismantled engine heads home in the TVR and I put in a call to the Triumph guru’s!
Below is a picture of the mechanism that operates the valves. The central gear is driven from the crankshaft and it turns the two gears on either side. On the other side of each gear is a cutaway that the follower runs around inside and follows the cam profile. The cam followers follow this cam profile and lift the valves which are returned back down by springs. Very simple and elegant.

Below is the otherside of one of these gears and you can see the cam profile cut into the back of the gear.
Below is the combined head and barrell and the valves stay in it when you remove it.
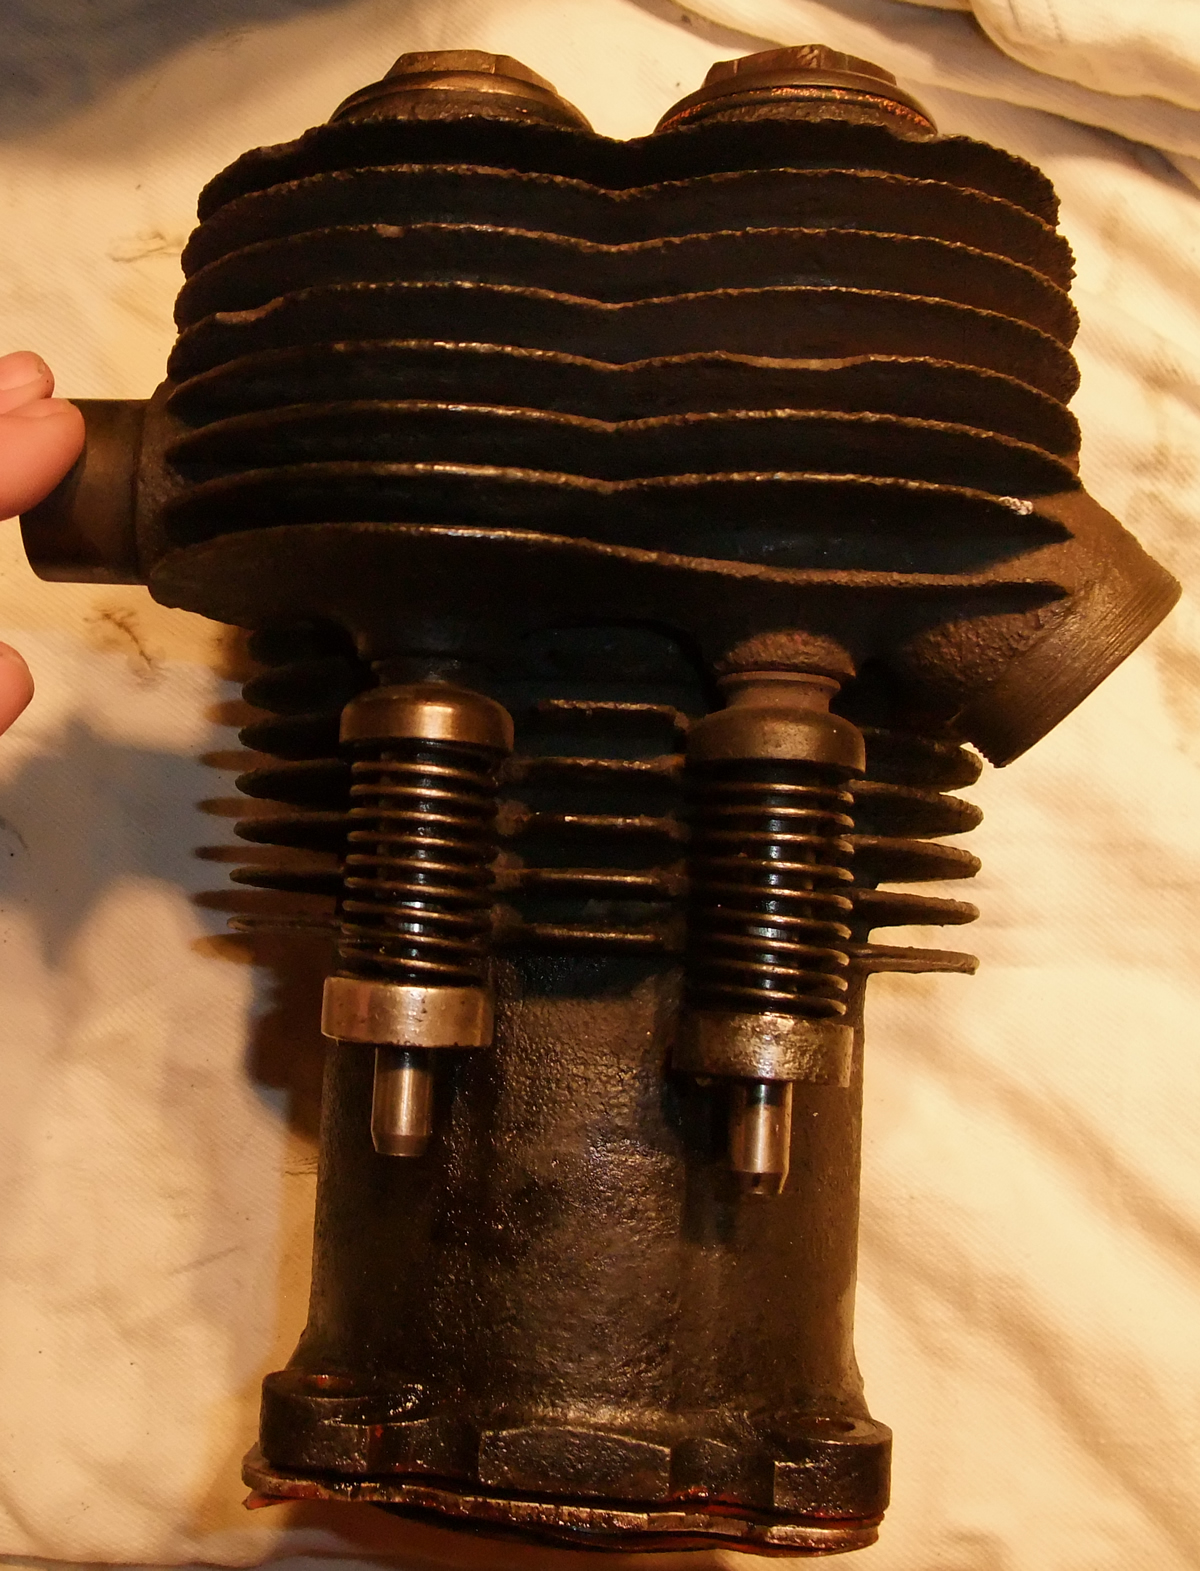
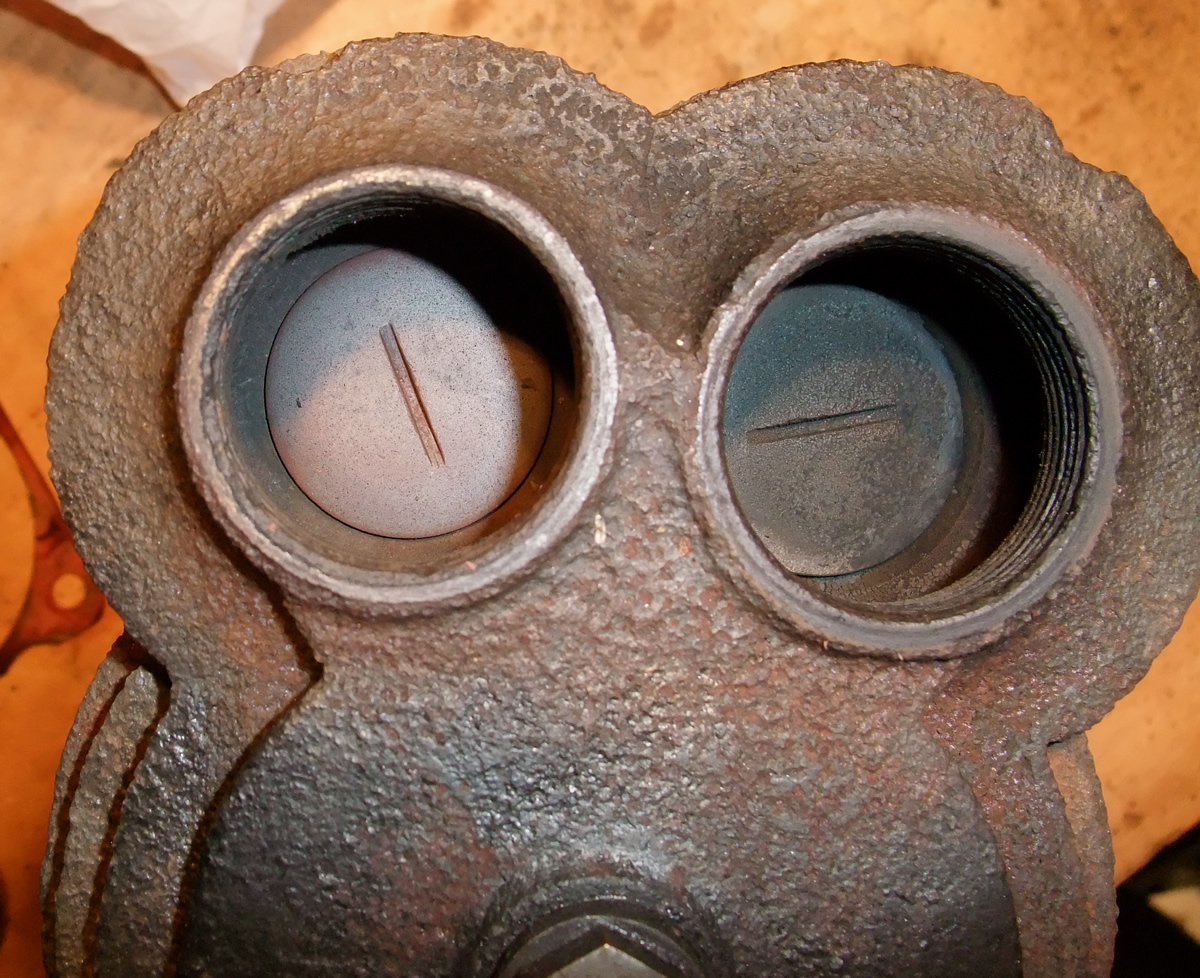
It is a side valve engine and if you unscrew the valve caps you can look down at the valves.
The crankcases are very light and simple.
The crankshaft is large and heavy and keeps its energy spinning at low revs. It weighs about 12.4kg or 27lb!
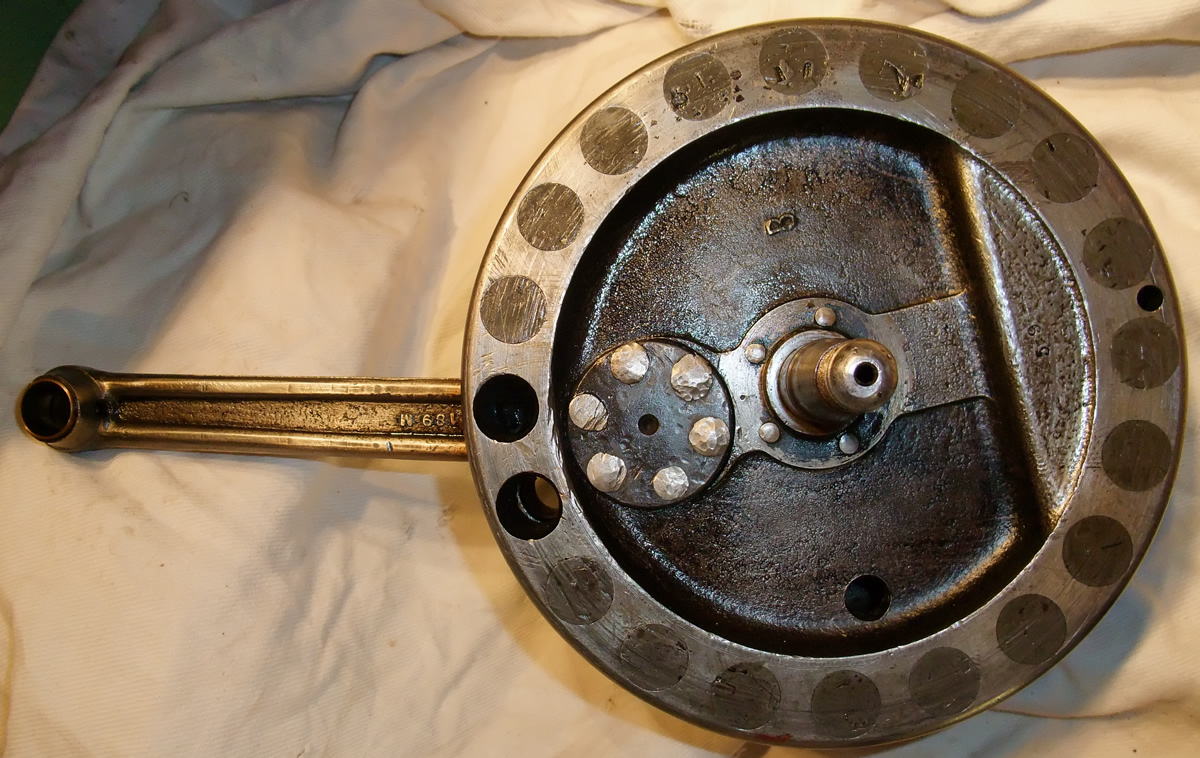
The circular patterns around the edge are lead, which is added to give extra weight and to balance it.

The complete engine will be going up to the Ian THE Triumph engine man. He will be fixing the big end and checking it all over thoroughly and replacing anything that is not 100% and fingers crossed it will be back with me and in the frame at the very end of January 2012. I should then have an engine that is better than new and ready for me to put some miles on it.
I have not ridden any other bikes since the Triumph arrived as I have been out on it at every opportunity, but yesterday I popped to the shops on a Peugeot 100cc Scooter (bought it for my father for his 80th birthday and have hung onto it) and after just riding the Triumph it seemed quite quick and had really powerful brakes! All things are relative after all.
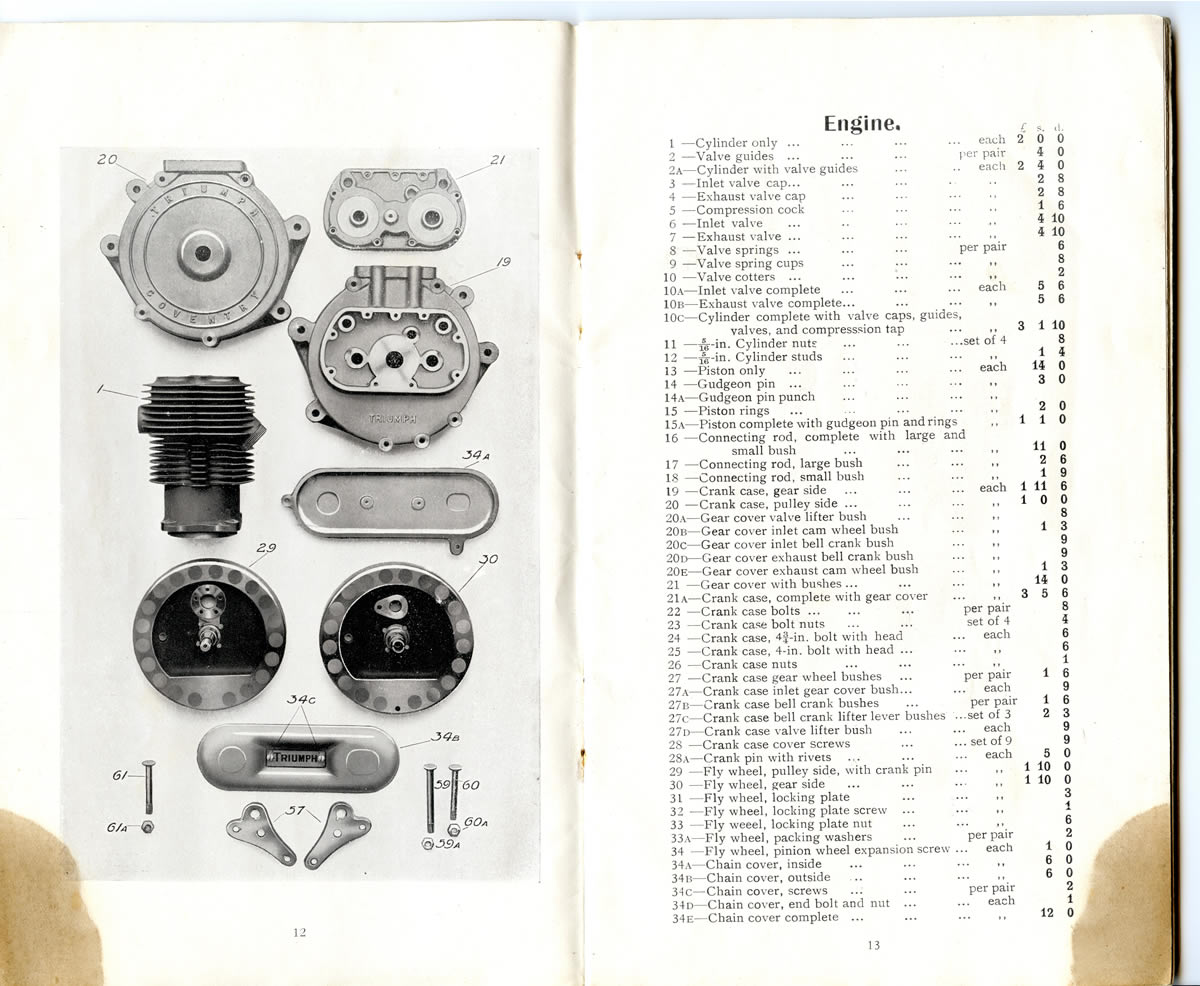
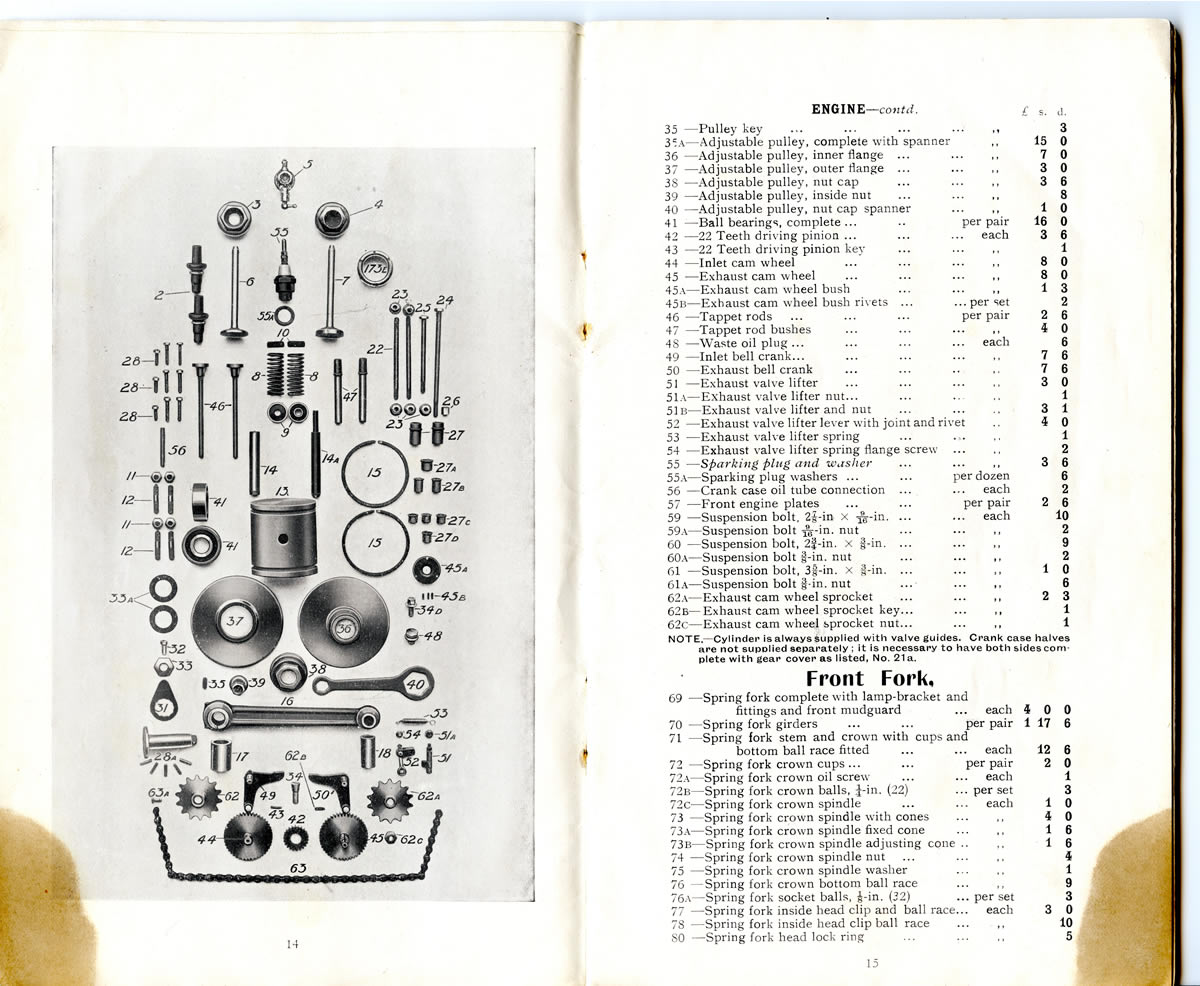
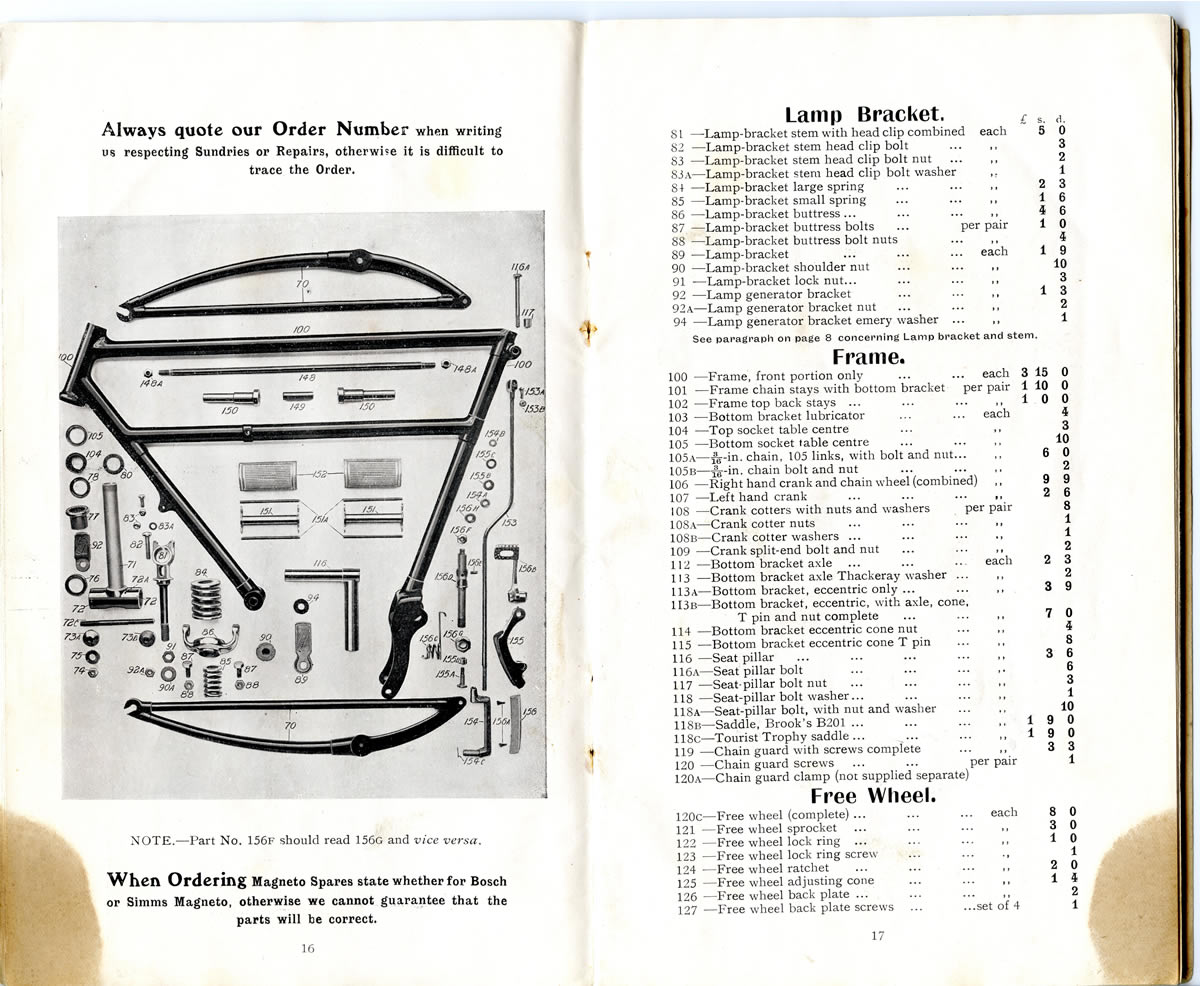
To see all of the parts that make up a veteran Triumph engine, below are pages from a 1911 Triumph parts book.
Friday 13th January 2012
The engine is still away and I am hunting down a pair of flywheels to get it back on the road. My flywheels have had the rivet holes around the big end bored out slightly at some point in the last 97 years and now whilst it will run like this, it is not ideal for the big end assembly. As I intend to use it thoroughly! I am trying to get the engine into as close to perfect condition as possible. My engine is in the very best of hands as Ian Jennings is the most expert of veteran Triumph experts and has been rebuilding them for longer than I have been alive. His workshop is like visiting the Triumph workshop in 1914!
Hopefully next week I will collect some flywheels. The ones I am hopefully buying do not have lead in them so a friend has very kindly volunteered to help put the lead weights back in. With this done we will hopefully be back on the road in February.
Thursday 19th January 2012
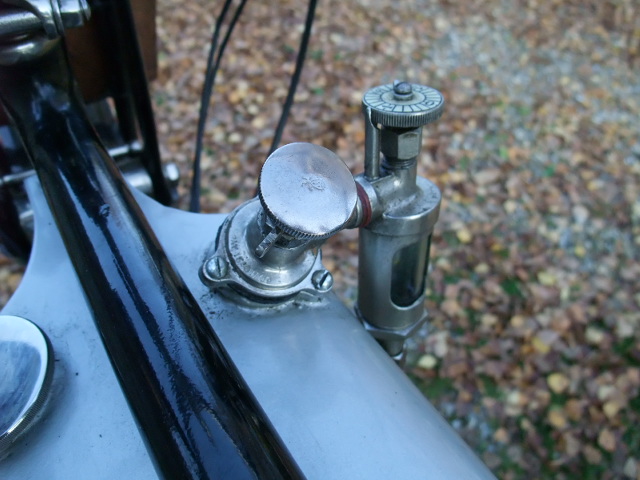
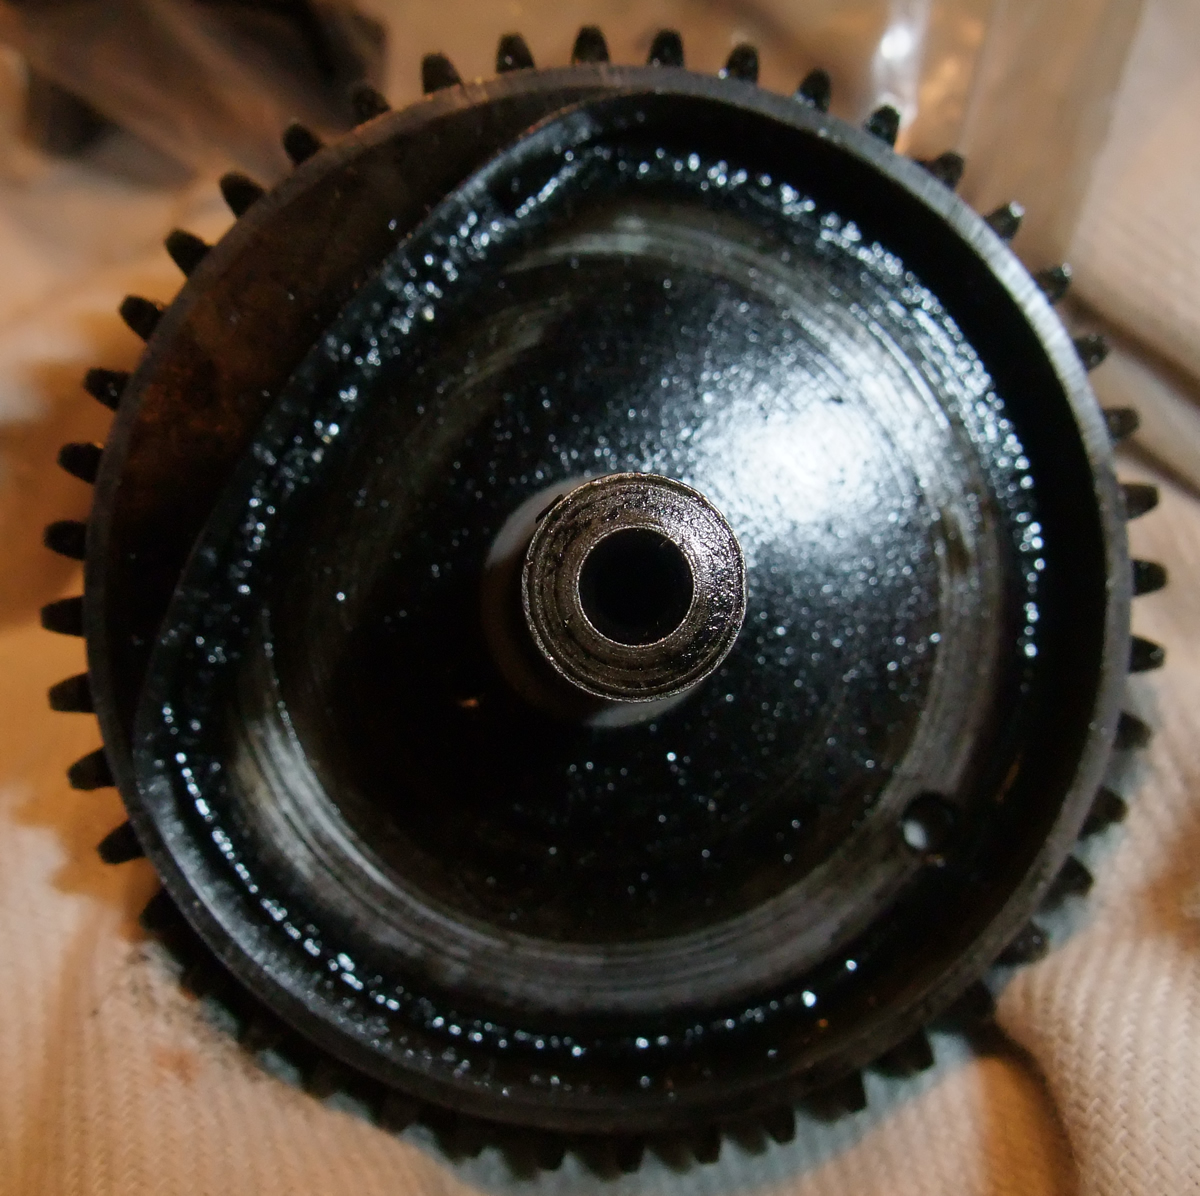
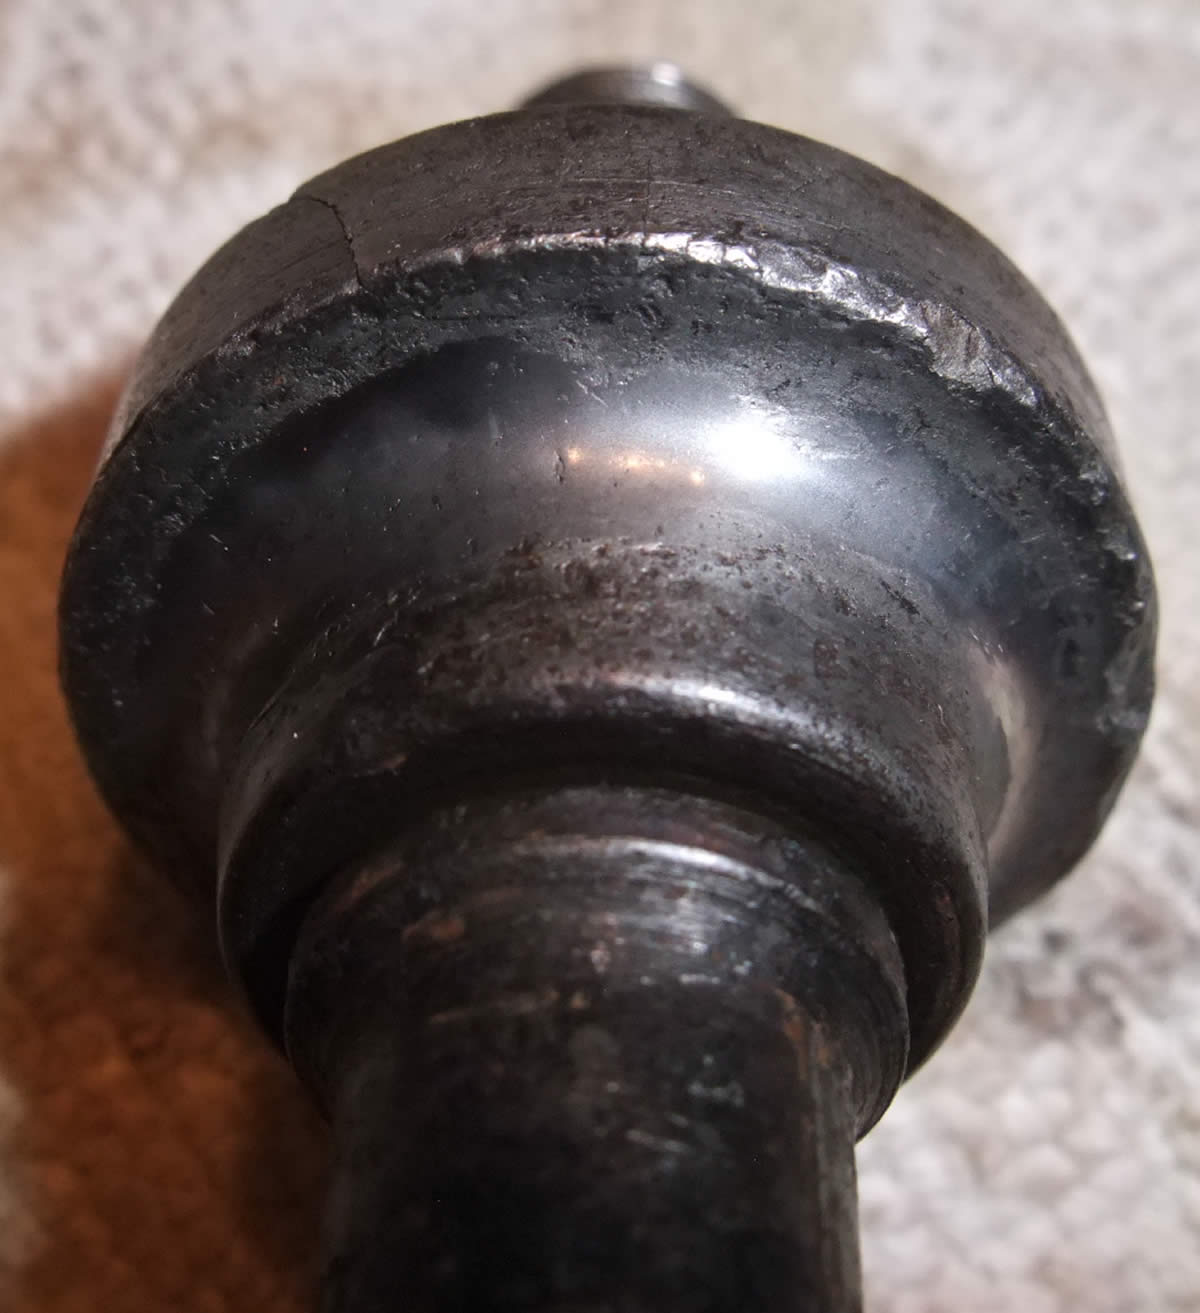
I have been considering what spares would be ideal to get and apart from engine parts, I have made a list of bits that if they failed/fell off then I would not be riding until I tracked one down. As tracking down bits is not a quick process I have started my spares collection. As the drive pulley rotates and vibrates and takes load a spare has been acquired and is pictured below.
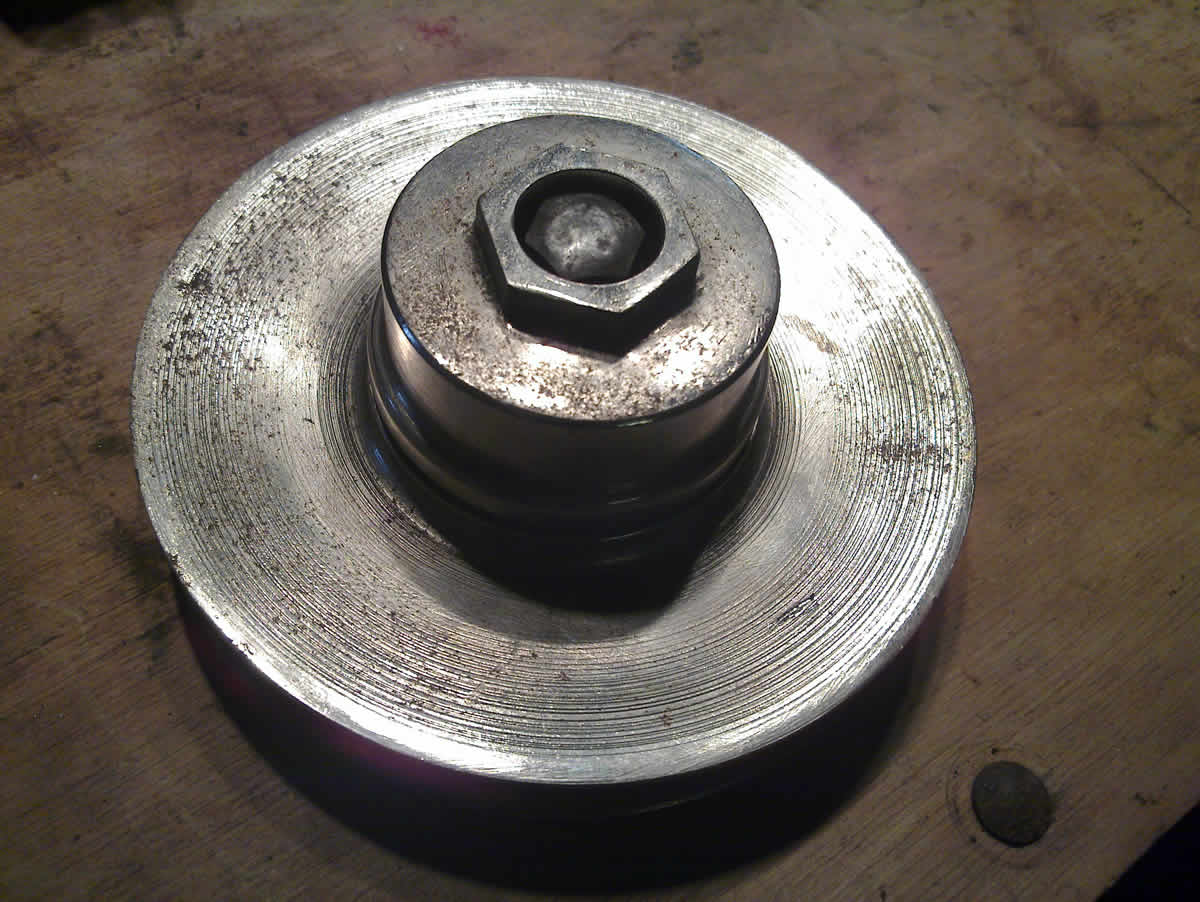
The outer face of the pulley is adjustable via the fine thread and screws in and out to adjust the position the belt will run in the "V" of the pulley and hence vary the gearing ratio. the smaller diameter coarser thread is for the big locking nut. The smaller nut sits inside the pulley and is bolted to the end of the crankshaft.

25th January 2012
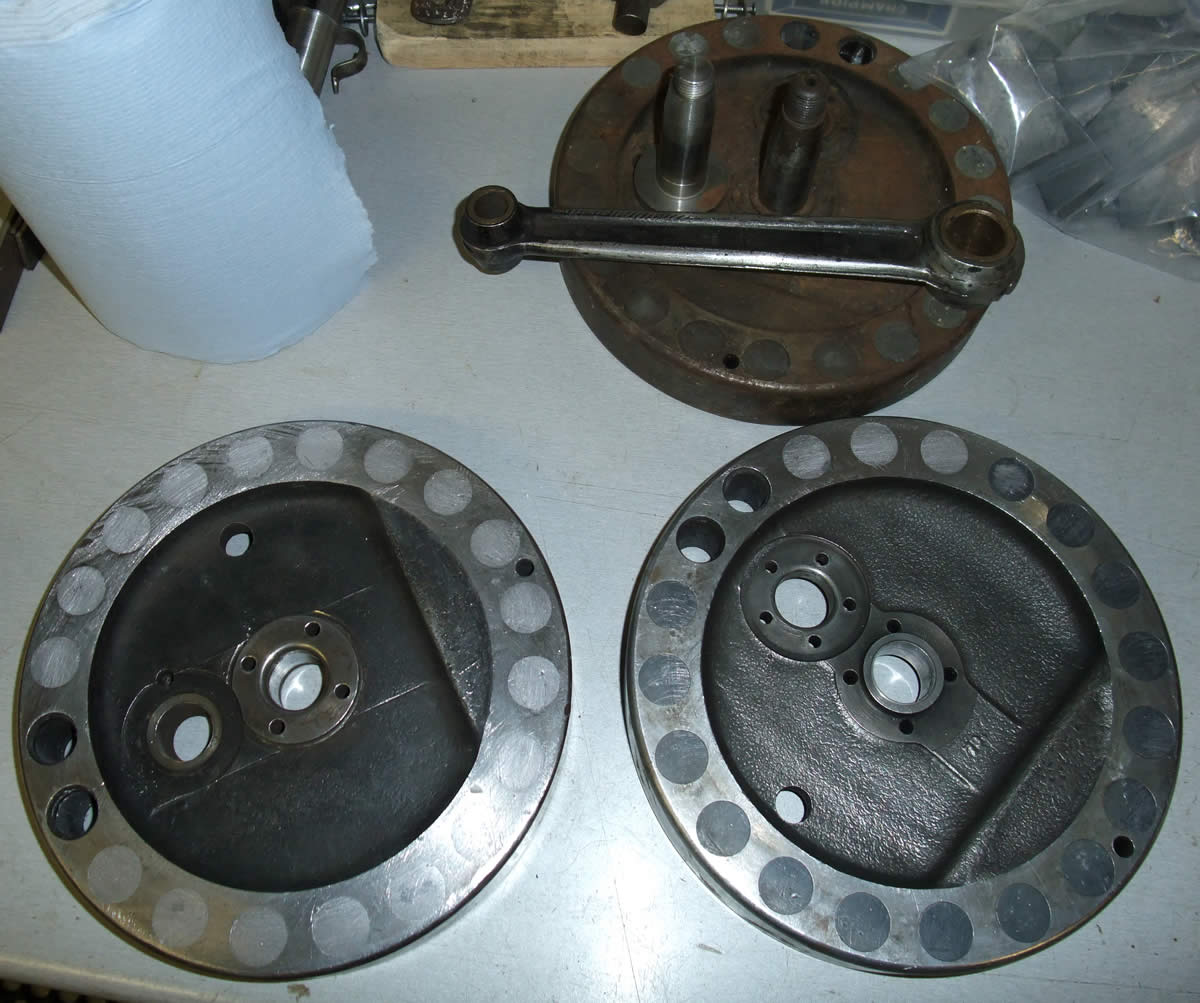
A friend had very kindly taken the spare flywheels I bought last week and cast new lead slugs/weights for them and pressed them into the flywheels. Below are the the (lower) two with freshly added lead and above an original one with a new crankpin and a very secondhand conrod.
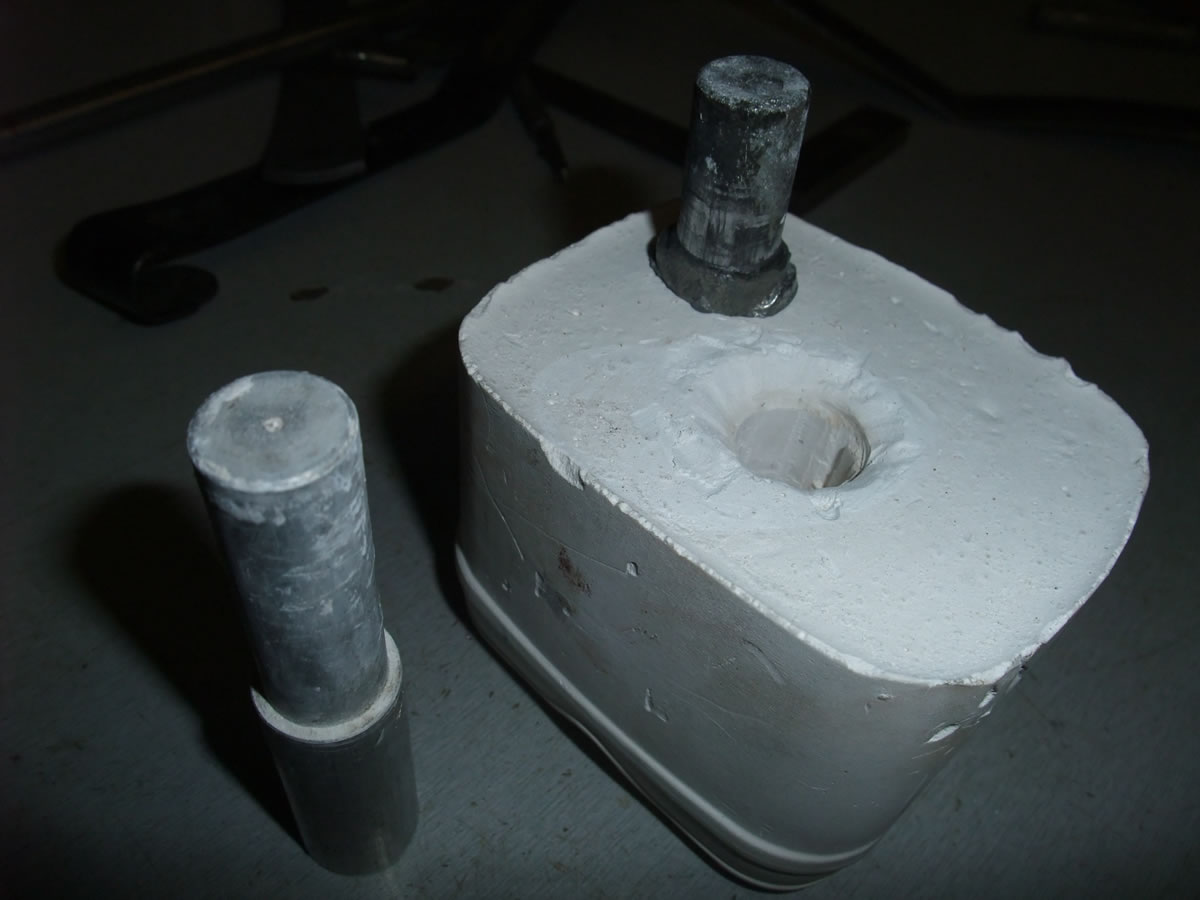
Below is how the lead slugs were made. Just pouring moulten lead into the holes in the flywheels does not work so you need to precast them. On the left below if a alloy rod that has been turned down to be the exact fit for the hole in a flywheel. This is then used to make a female mould in dental plaster and moulten lead is poured into this. The resulting lead slug is then tidied up on a lathe and pressed into the flywheel. the ends of the slug are then hammered to ensure it expands into the flywheel and grips it. The excess lead is then removed with a rasp/file until flush with edge of flywheel.
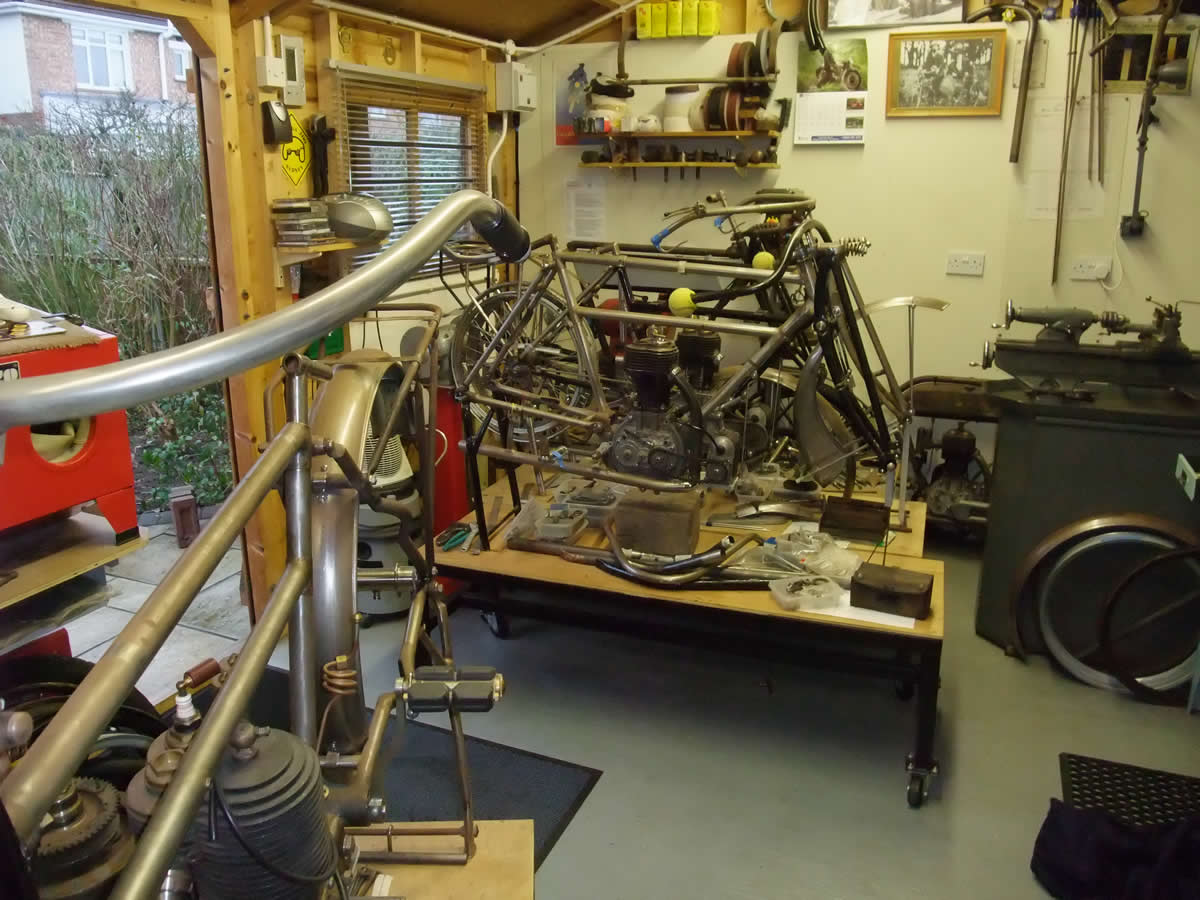
All of the above work was done by a friend who has a fantastic workshop that is full of veteran Triumphs and its like visiting a Triumph dealers workshop in 1914!, see below.
February 3rd 2012
I have been asked about how the valve timing is set on a veteran Triumph and thanks to a Chris - a veteran Triumph owning friend I now have the following two pages from a period Triumph book.
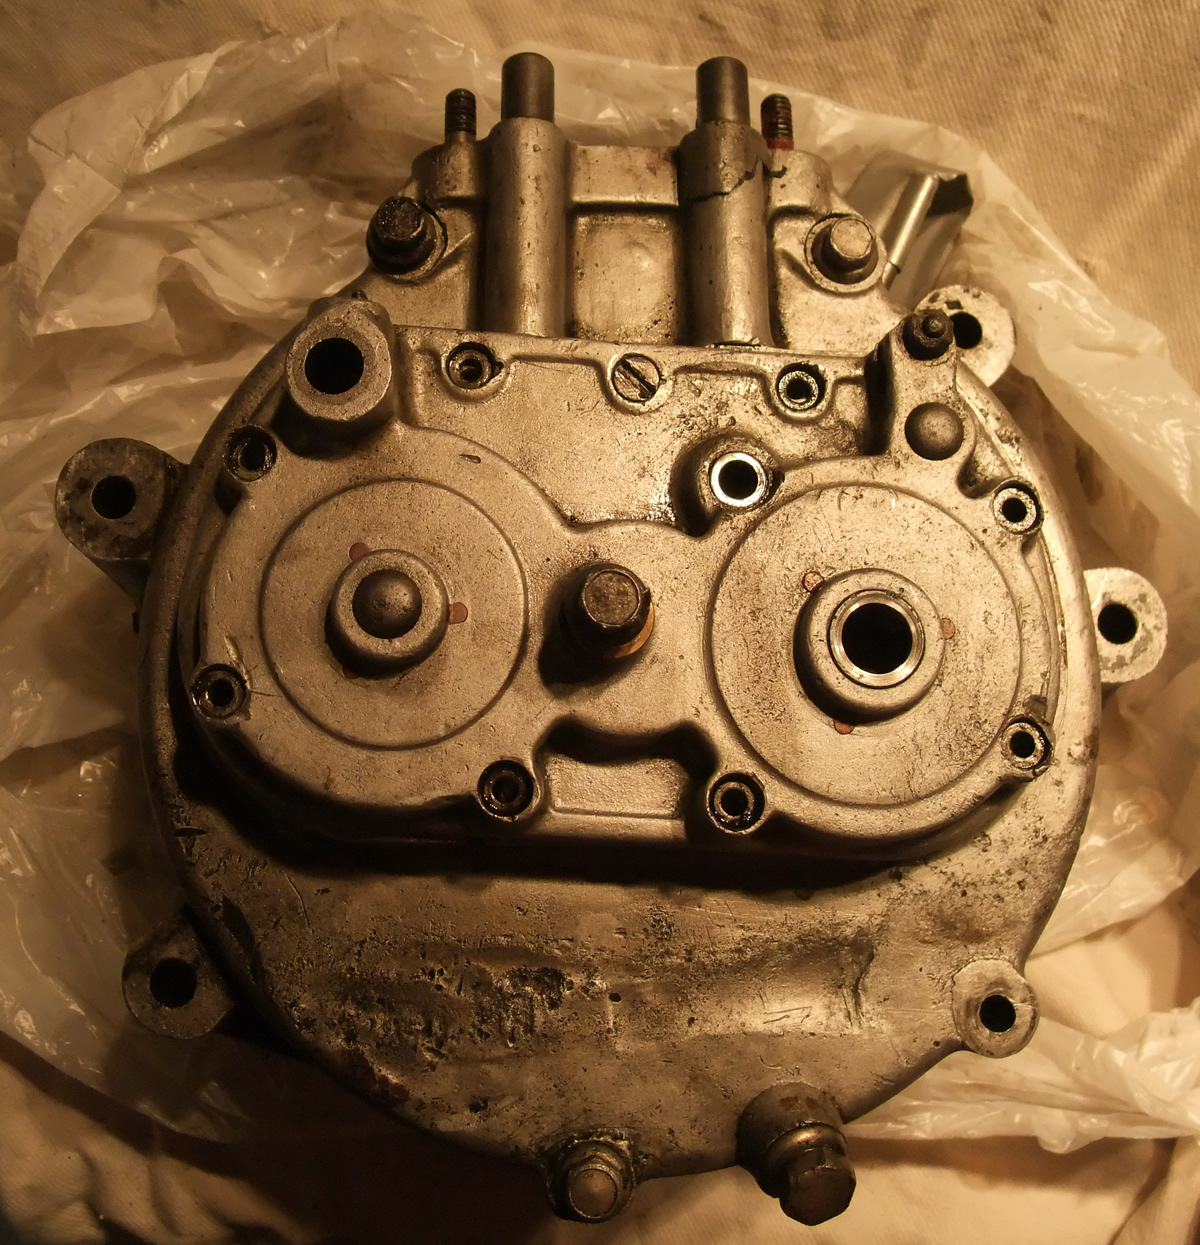
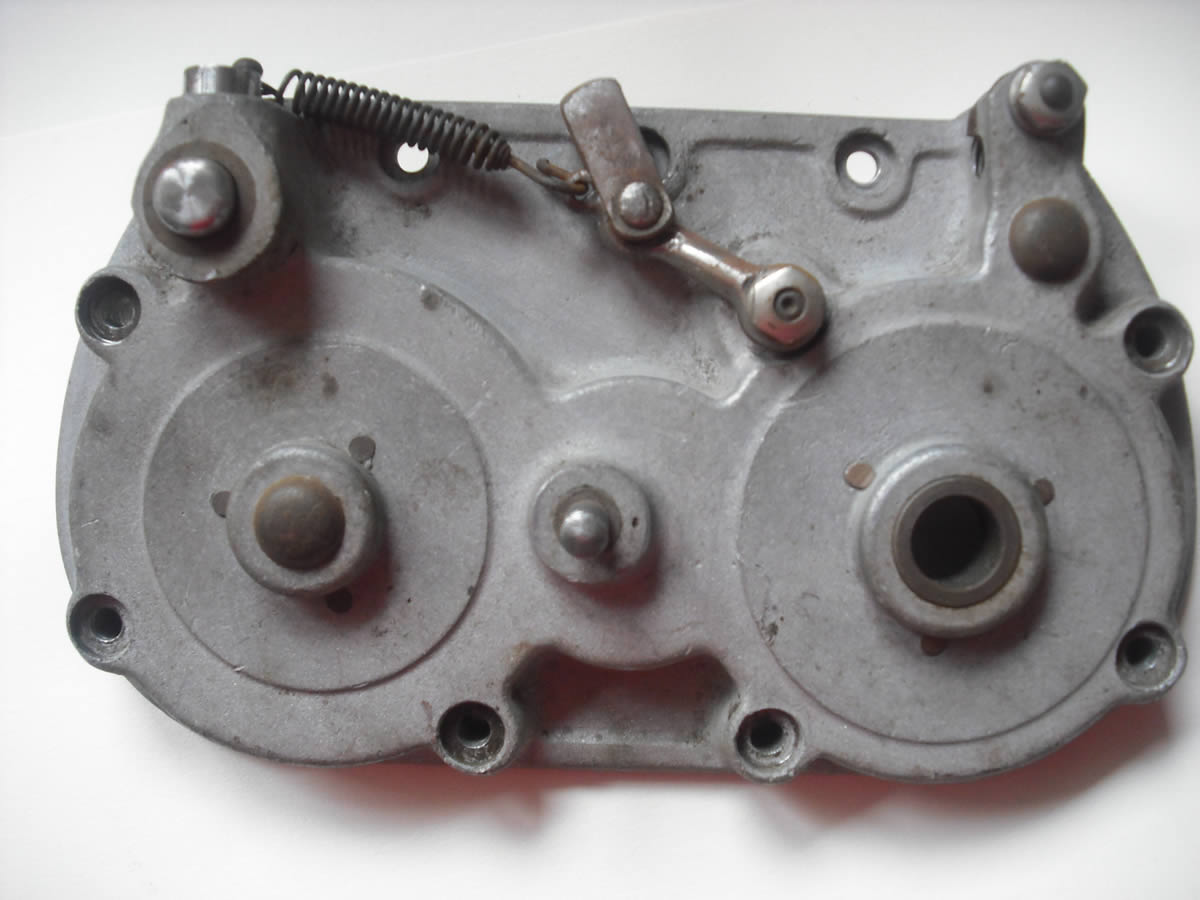
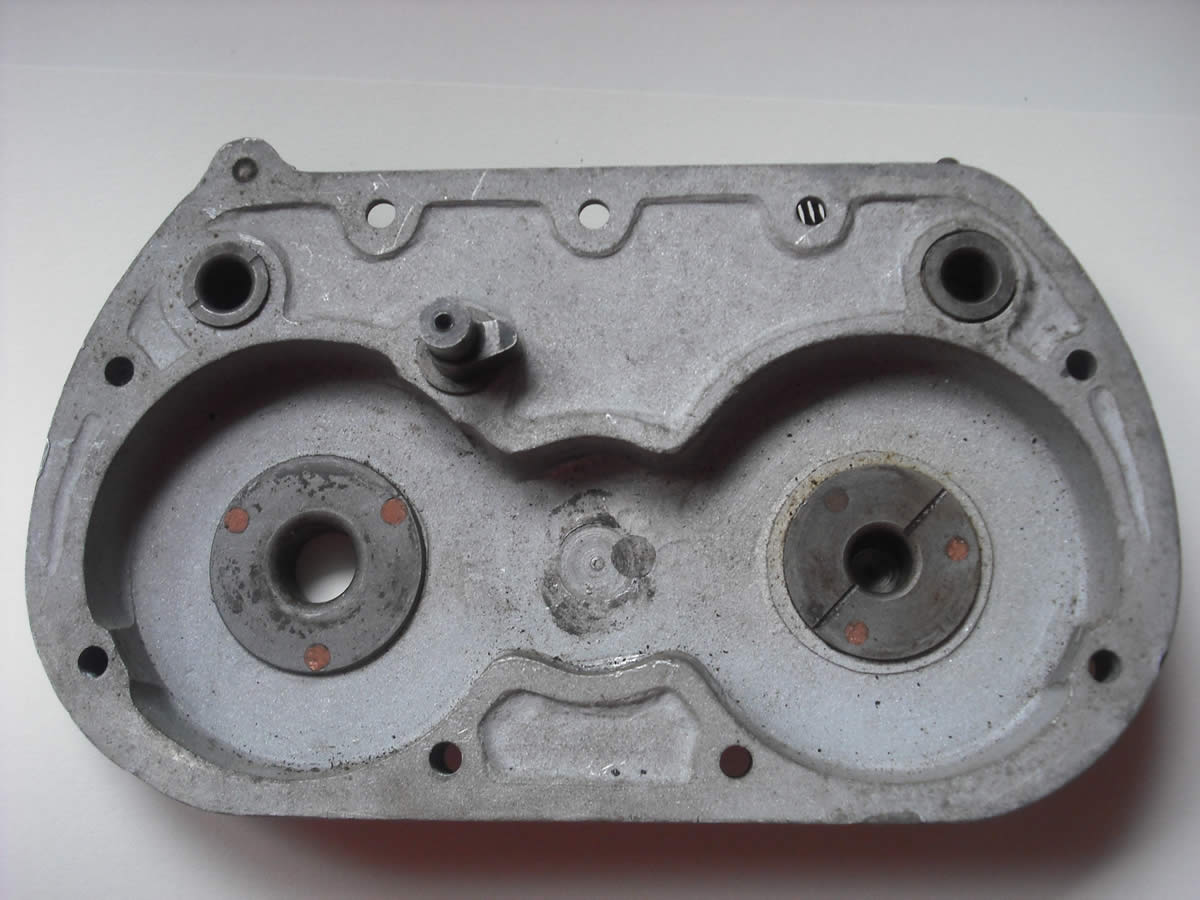
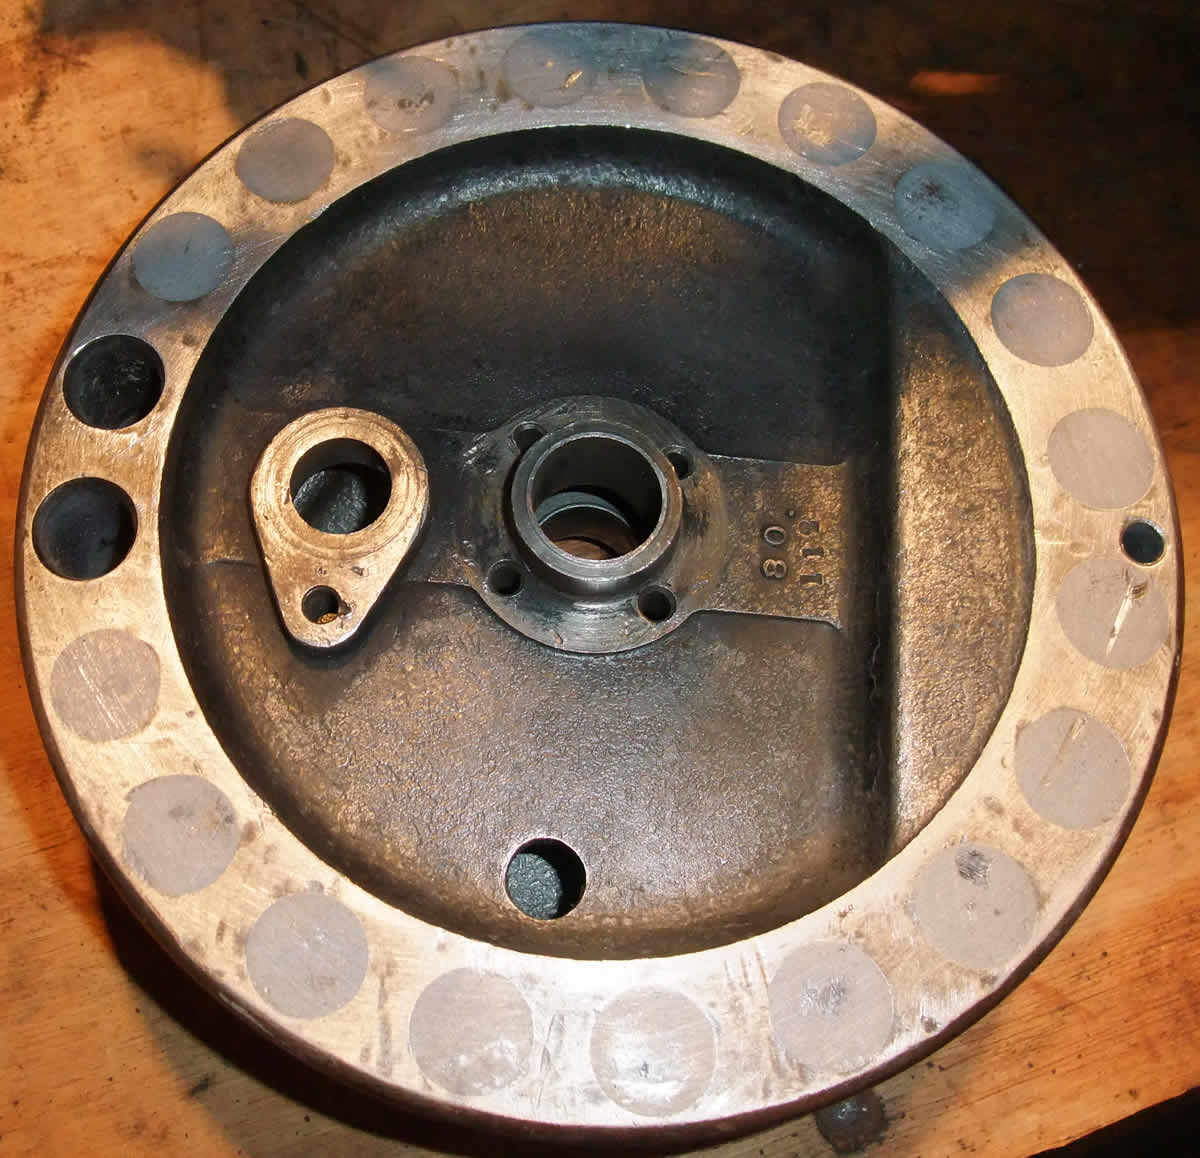
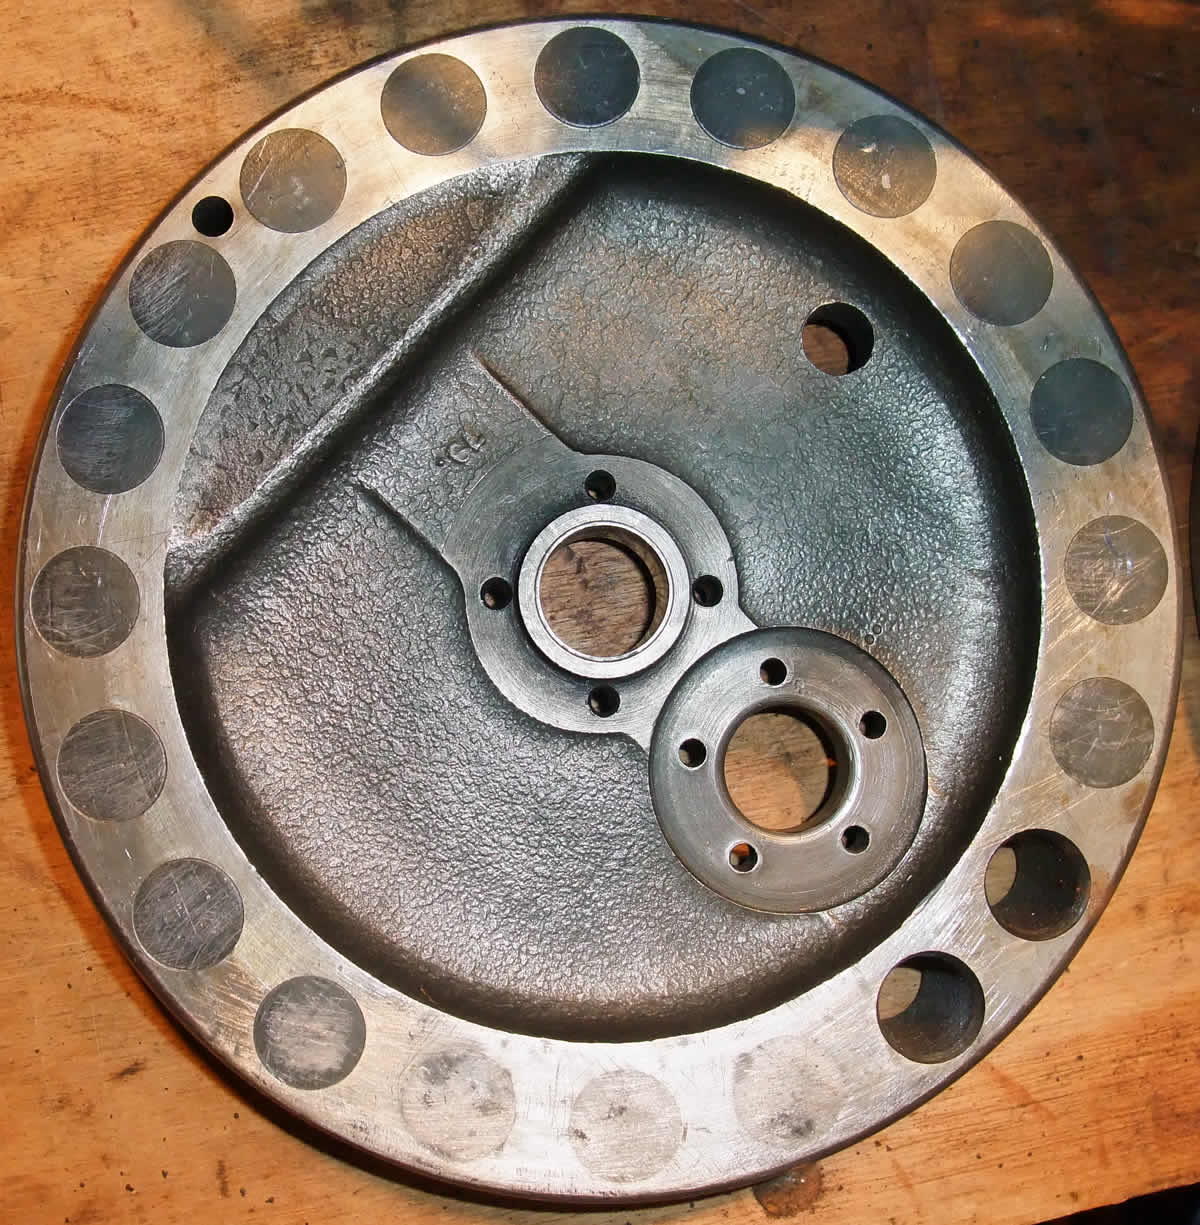
I was also asked what a timing case should look like as a fellow owner had oil leaking out of his. The pictures below are from a 1914 Triumph and show the bushes that the cam wheels run in etc.
February 5th 2012
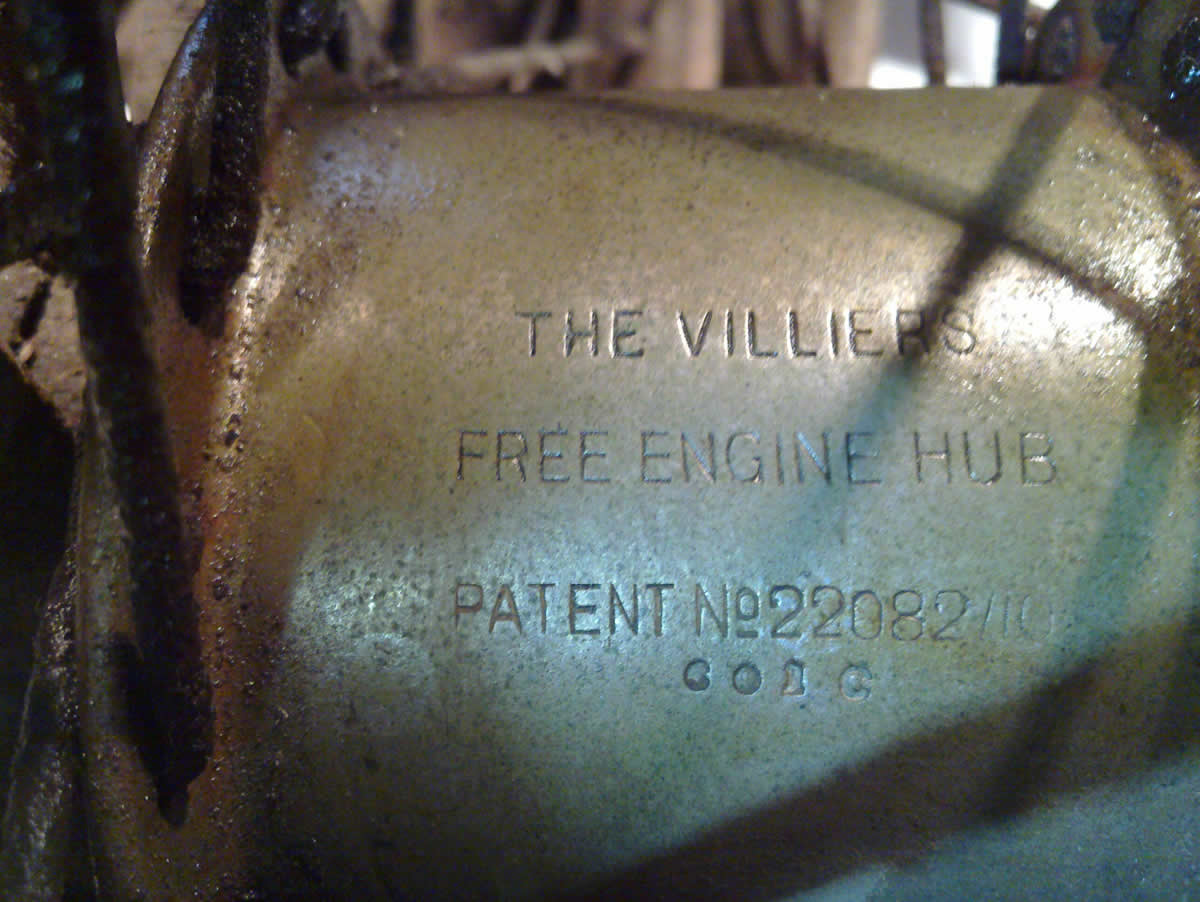
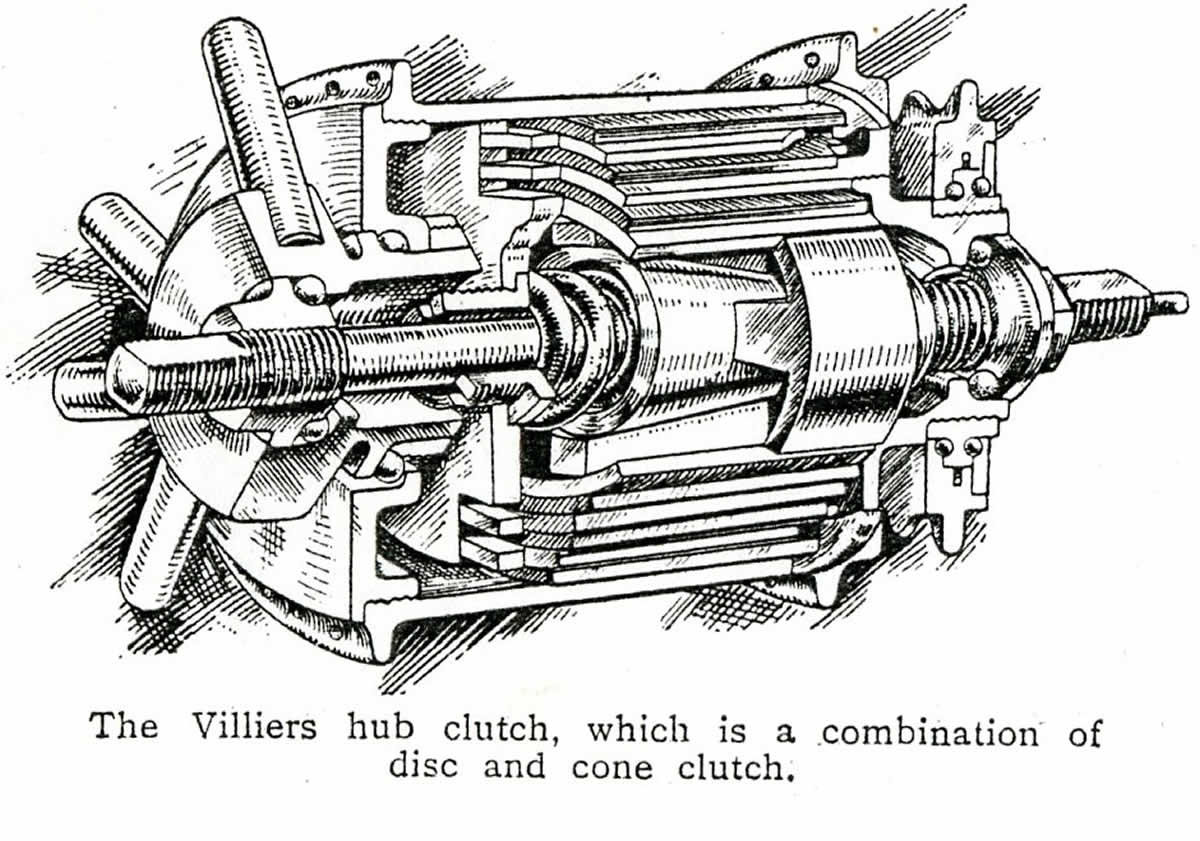
Today I drove into London to collect a Villiers Free Engine Hub. It is a clutch in a rear hub and whilst I am not exactly sure of when it was made yet, it is almost certainly of veteran era. It was discovered in a shed in Australia and very kindly flown to the UK in someones luggage. I am not sure what condition it is in and will need to soak it in penetrating oil for some time before I start to try and dismantle it. I also need to find some further information on how it works, manuals and ideally someone who has a working one in use to have a look at.
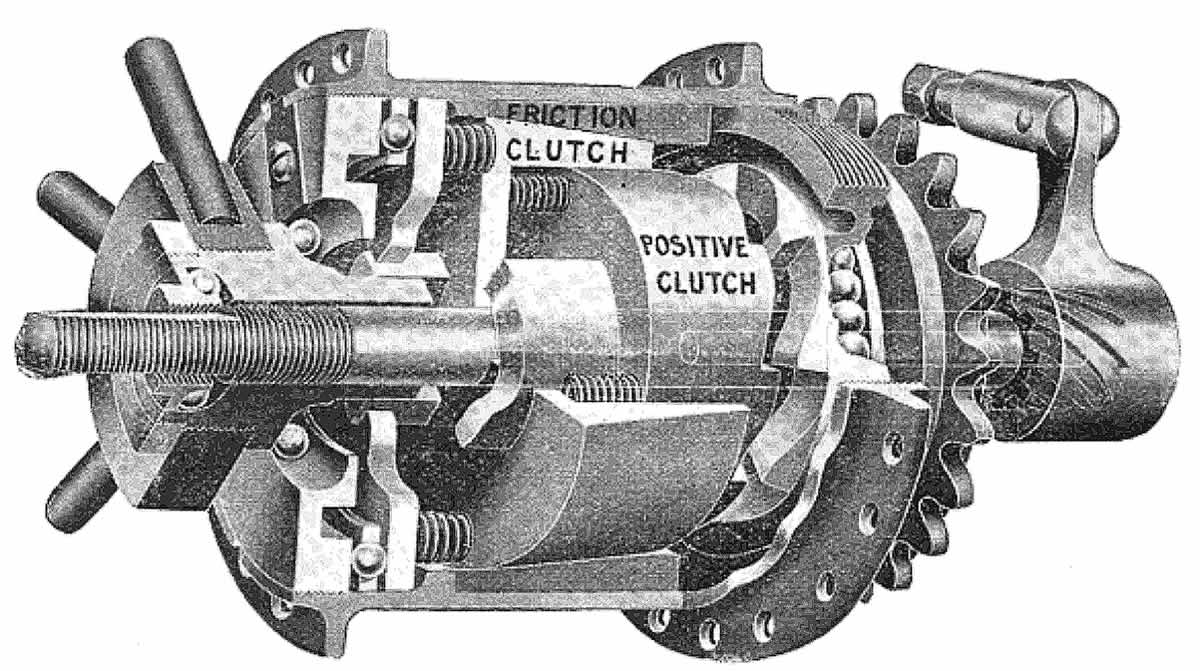
So far I have found this cut away drawing in an old motorcycle book which looks like my one.
I have also found this (below) from The MotorCycle February 23rd 1911 which shows completely different internals.
In another old motor book I have found a third design for the internals of a Villiers free engine or hub clutch, see below.
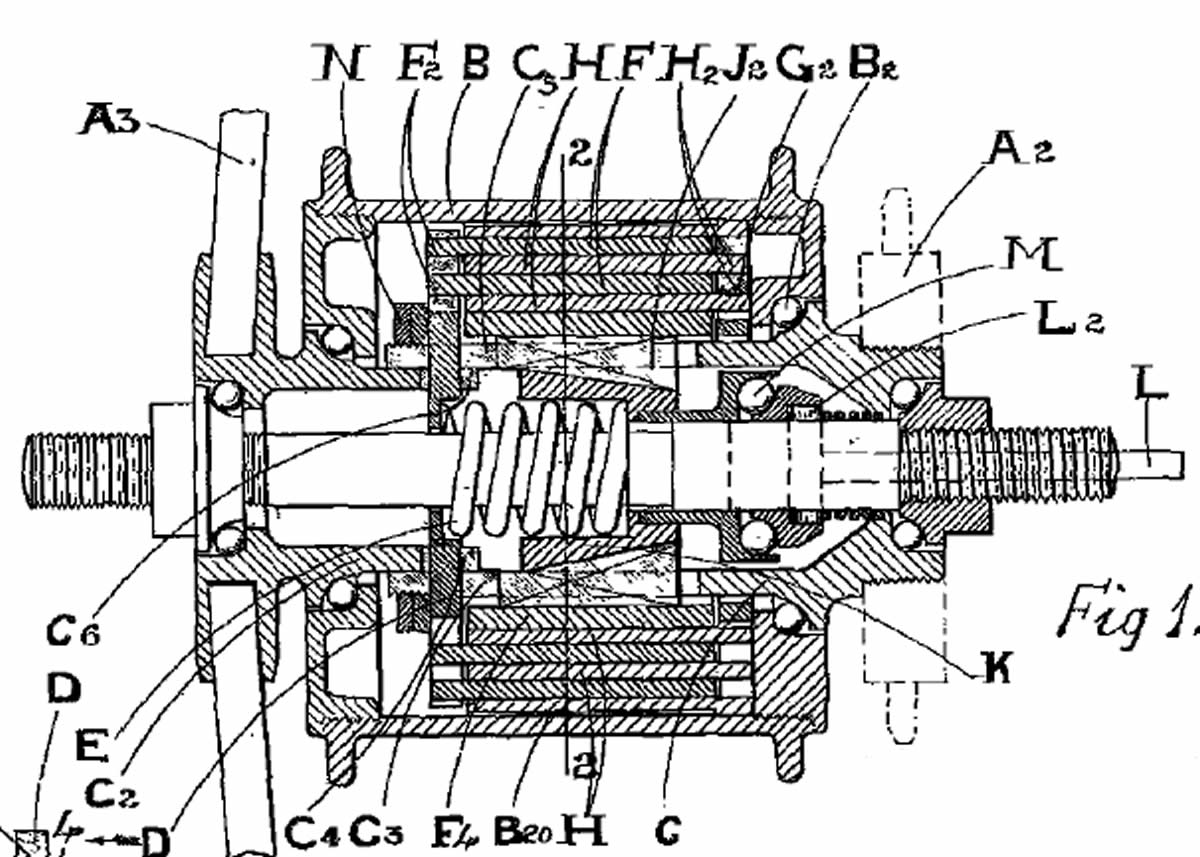
And after emailing the Patent Office, they have found the patent and description and drawings of my actual hub and it is below - looks a little complex!
If anyone has any information on one of these hubs or know someone who uses one, then please do get in touch.
February 7th 2012
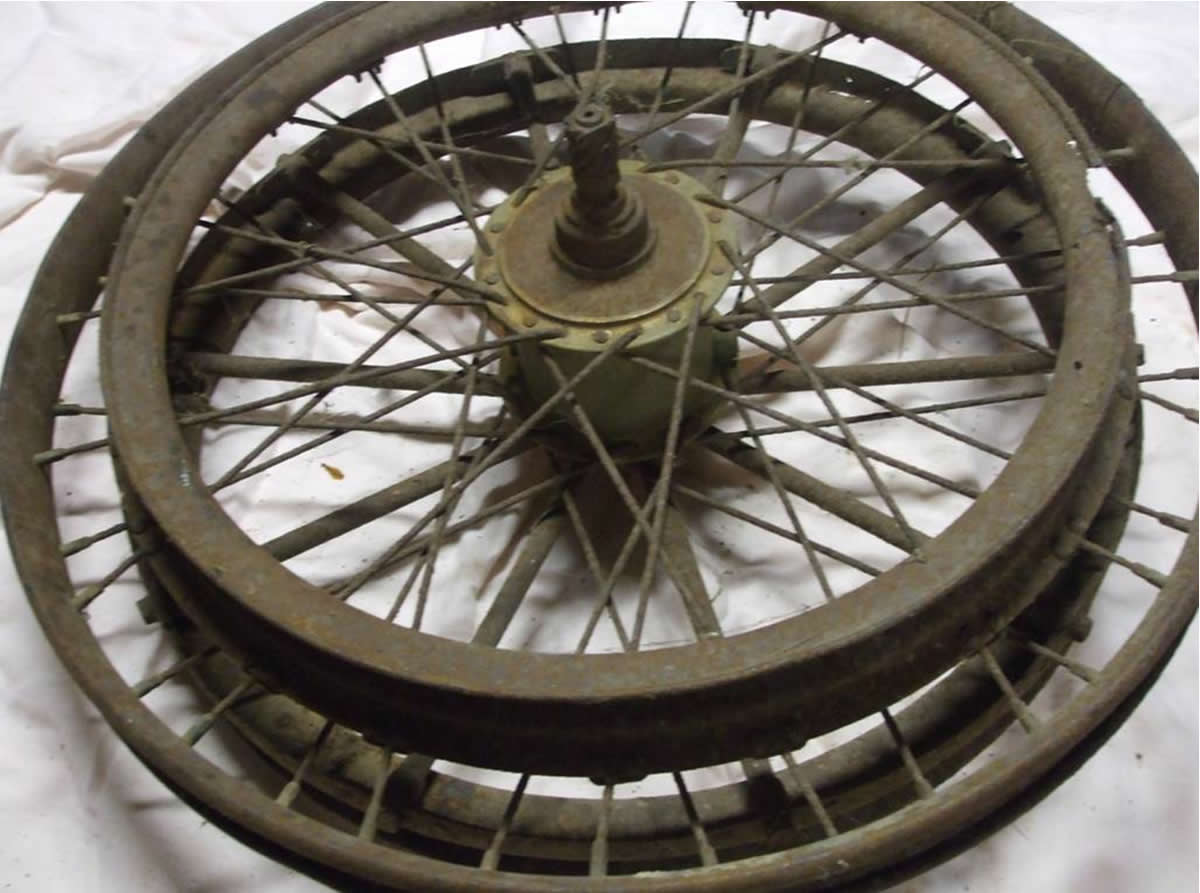
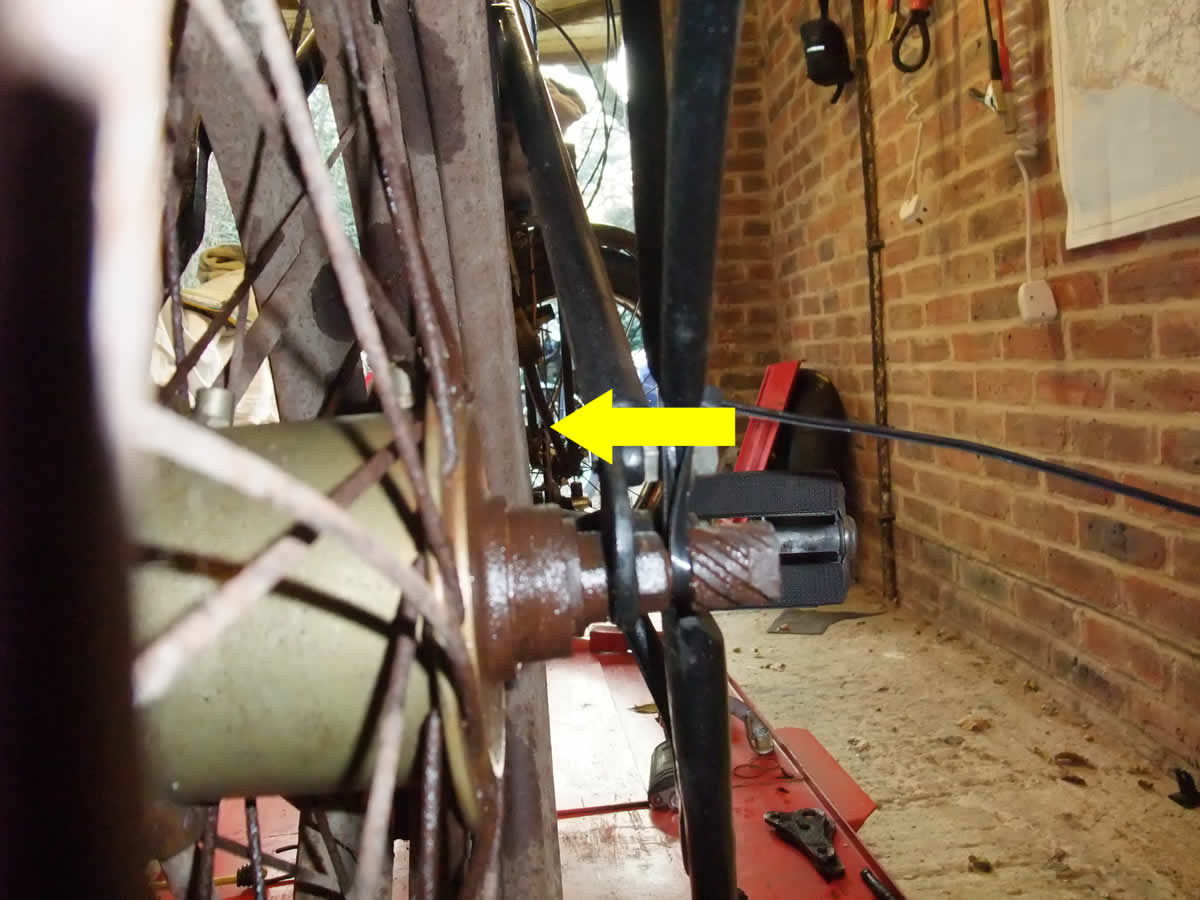
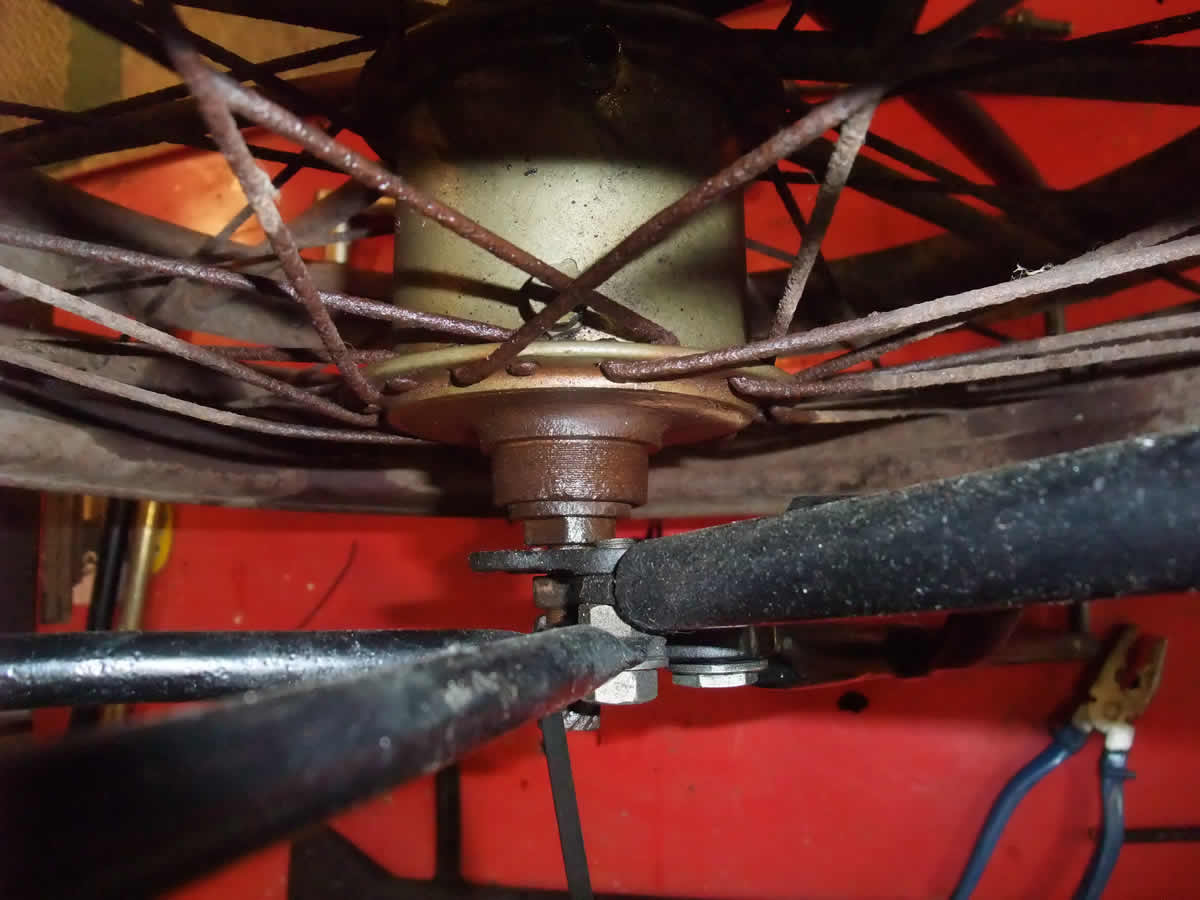
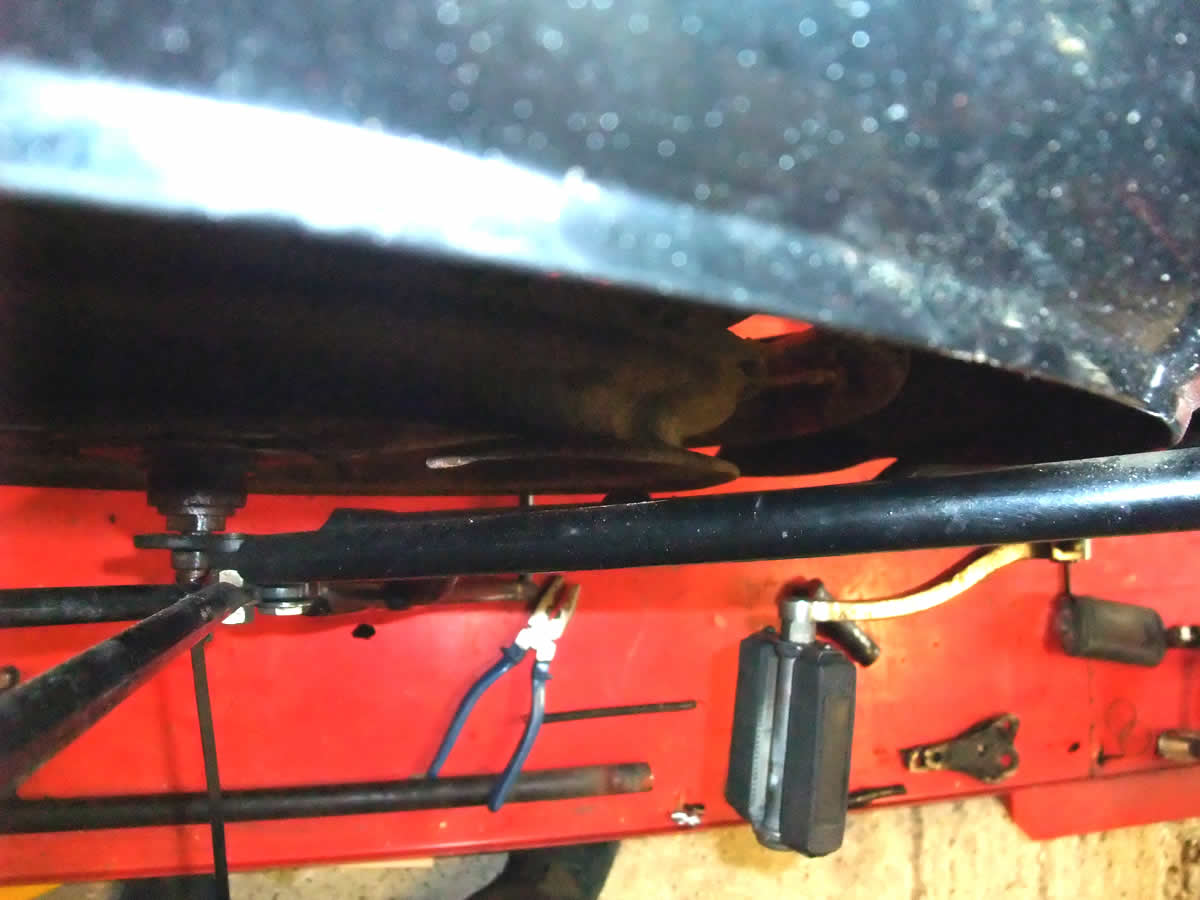
Today I was curious to see if the wheel assembly would fit in my bike as it could be from anything and apparently not everything will fit in a Triumph rear fork. So I put the bike up on the bench and took out the rear wheel. Normally when you take a rear wheel out it comes out either side of the rear mudguard. On mine it would not and I had to lift the rear of the bike 60cm into the air with one hand whilst pulling the wheel out with the other whilst trying to stop it falling over. All done and the whole Villiers wheel assembly went in easier as no tyre to get in the way. I used cable ties to hold the wheel in the fork ends and it spun around without touching anything. The drive belt seems in the right position and whilst the wheel does not have a chain/freewheel fitted it seems to be in alignment with the front sprocket - so all looks good. The pics below show the wheel roughly fitted from various angles and nothing fouled so maybe it had come from a Triumph or something with a similar setup. Or of course I could be spouting rubbish as I am new to this and no doubt a helpful expert will point out a few things I did not think of?
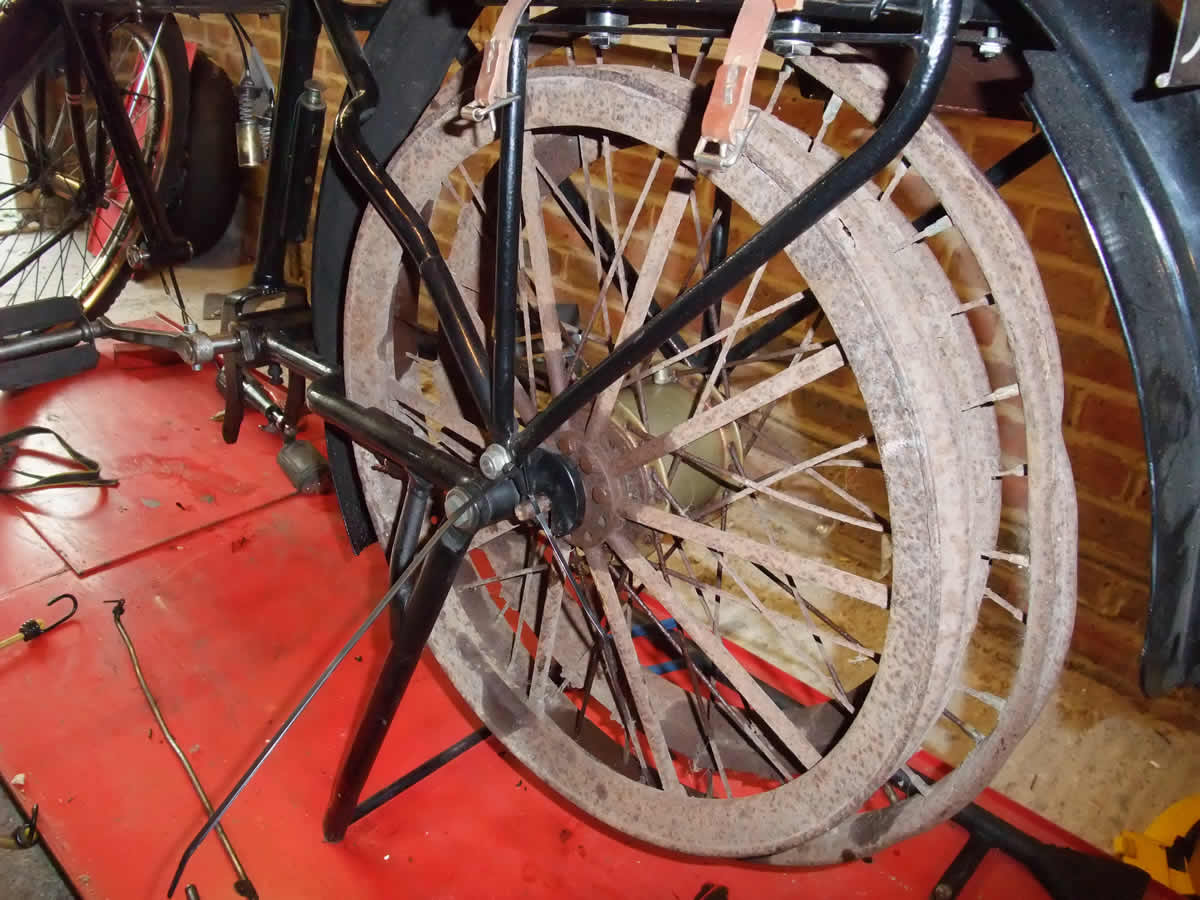
The picture below highlights the front sprocket, so alignment looks ok.
So if I do manage to get it to work and rebuild it into a new wheel with new drive rim and a secondary braking rim (not a 5 minute job!) then I should be able to have a clutch hub.
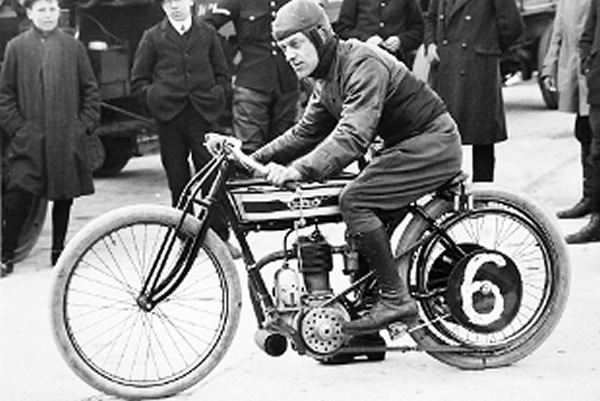
I have done some further research on my hub and have discovered that it was designed and patented by George Enoch Stanley. George was a very well known tuner and rider in the veteran era and held a number of records at Brooklands on his own tuned bikes. He was known as The Wizzard. He started on Premier, then moved to Singer and finally to Triumph in 1914. Pictured below is The Wizzard on a Singer. He has just set a new record of 67 miles in an hour on his 500cc machine. It is 12th october 1912. By 1914 he had a Triumph doing 78mph!
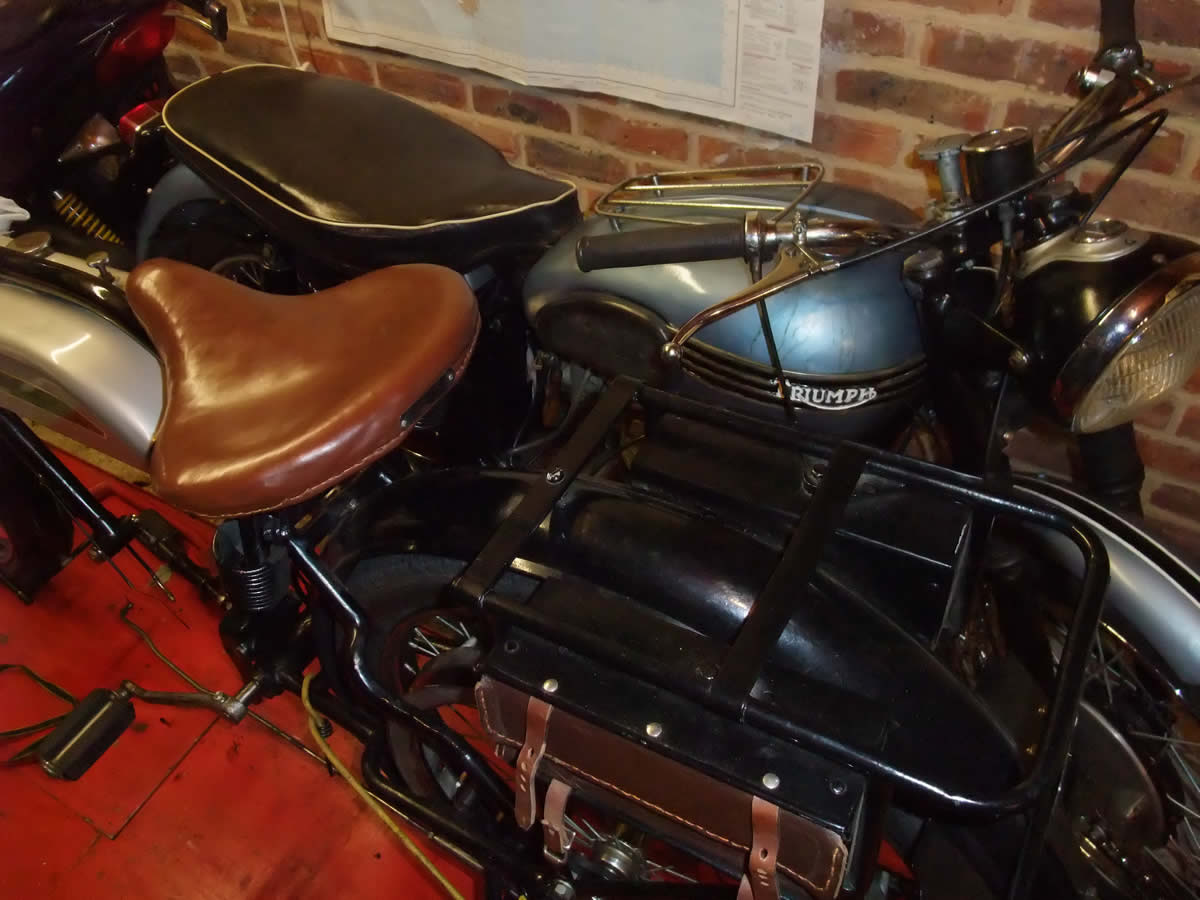
Below tucked up next to a 40 year old newer Triumph - a 54 T110.
February 10th 2012
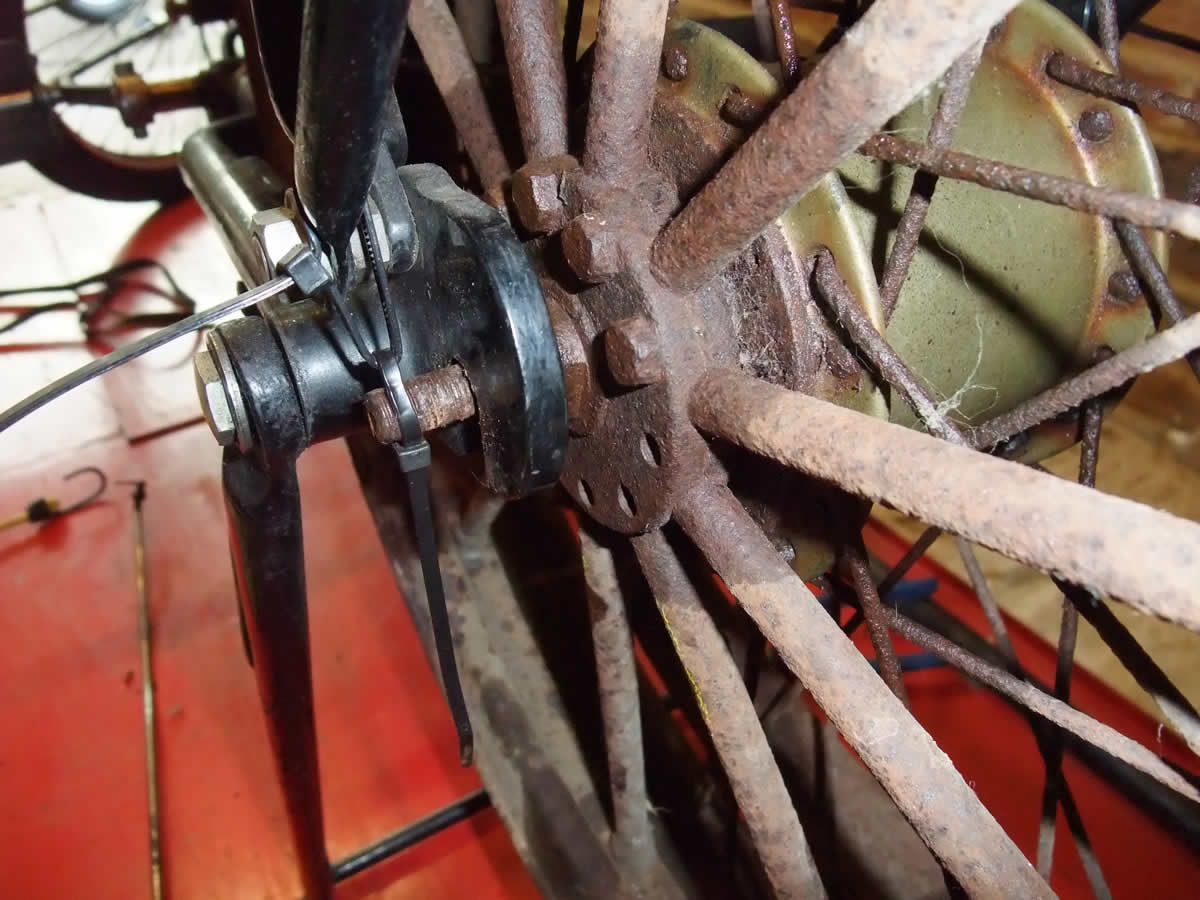
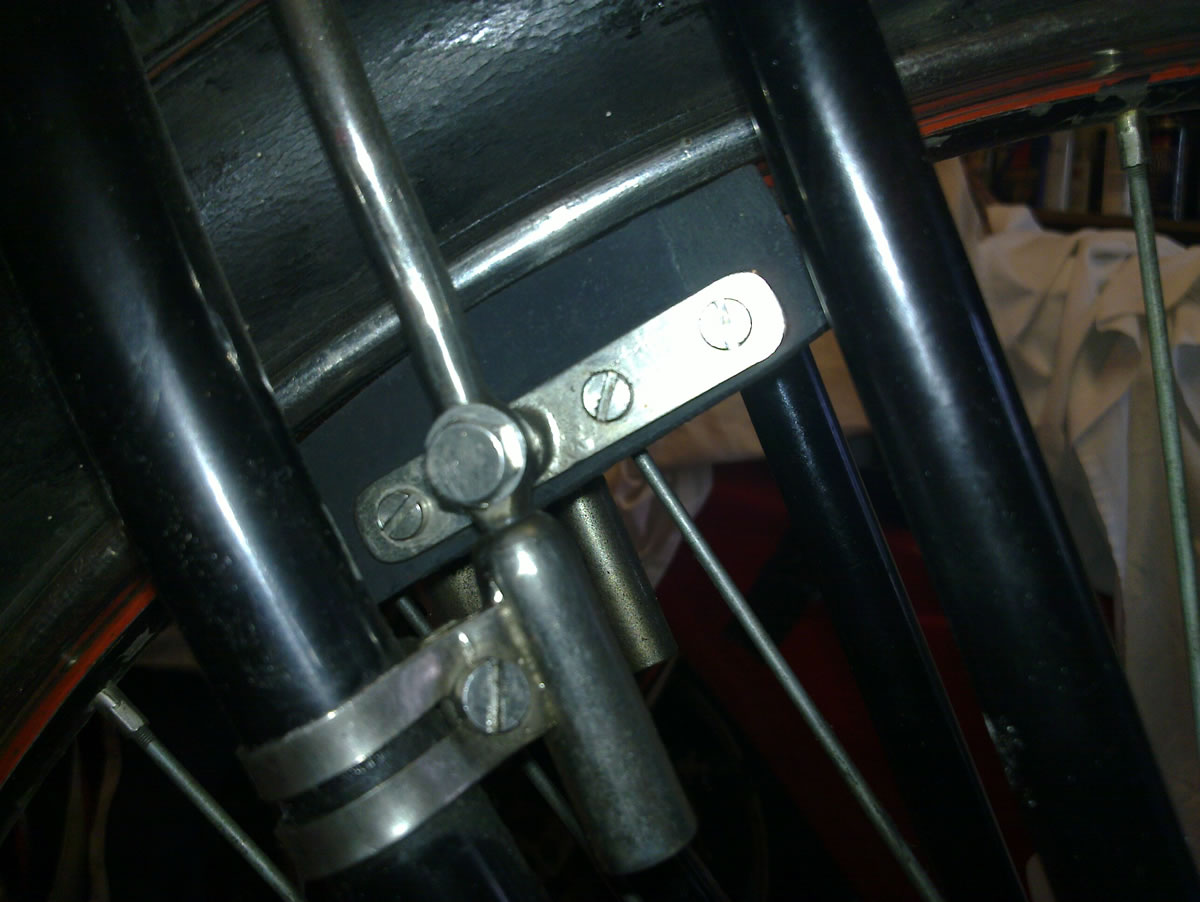
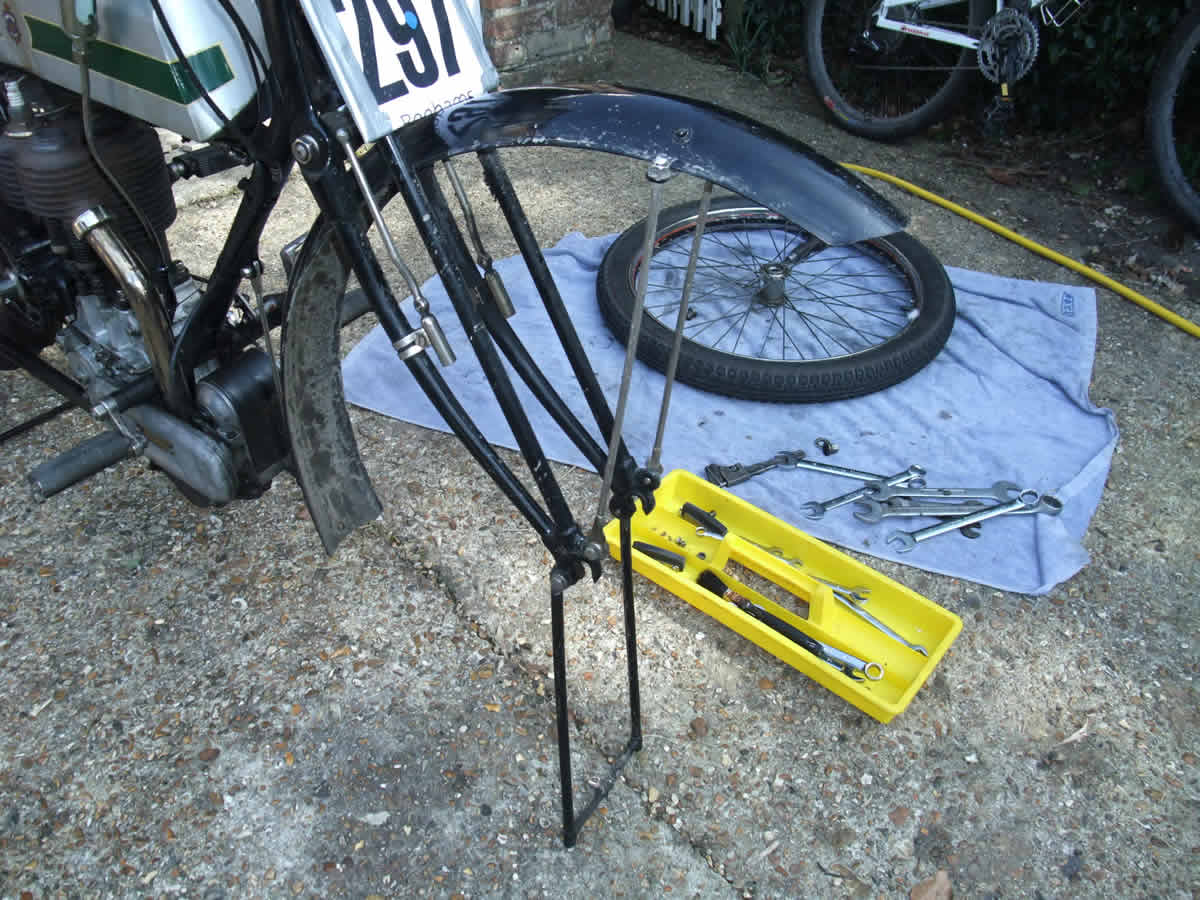
Today I decided to take out the front wheel as I had noticed that the valve was not straight and seemed to indicate that the tyre/tube had moved and when it does this it can pull out the valve and you have an instant puncture - not amusing. The front wheel has its own little stand which hinges down to hold the wheel clear of the ground - which is nice touch. I had to remove the brake blocks to give enough room to get the wheel out and other than that it came out easily. I can see why people talk about keeping the tyre pressures high as having deflated the tyre you can see its is only the pressure of the tube that keeps the tyre in the rim. Tube sorted I checked the wheel bearings and they were notchy and gritty so removed the spindle to check the wheel bearings. They are not captive so I was careful to catch them all from each side and keep them separate in case they were different. I cleaned them off and cleaned out the bearing faces and caps and regreased it all and put it back together. Luckily it was only just above freezing in my garage so the grease was thick and sticky and held all the bearings in place whilst it put it back together and tightened up the bearings. This will bed down and need rechecking/tightening after a few miles - but cleaned out and with new grease it felt smooth and healthy. The dust caps are rudiemntary so it will need to be checked regularly. With the wheel back in I refitted the brake blocks and fitted them roughly and then applied the brake to get them to center on the rim and nipped up the bolts. I fiddled about with them for a while as the way they mount seems to stop them from fitting squarely aligned on the rim. I even took them off and adjusted them slightly with a heavy file/rasp but could not get it to align perfectly. I remember doing this with old bicycle brake to get the most from them, but as it stands the alignment of block to rim is only about 70% ideal. If I want to improve it further I will have to make some bits to improve matters. The rubber material also looks quite hard and when I was in a mountain bike shop a while ago I noticed that you can get brake block (for mountain bikes) in high tech super grippy materials for gripping wet bike rims - so wonder if braking matters would improve with 21st century materials. And yes I know it would not be original but the front brake at the moment is almost useless. 100 years ago they only had to be concerned about outbraking horses! but now if I can improve it and keep it looking original - then I will try. Only other job today was to drain the oil from the oil tank as I am told that I should be running SAE50 and need to empty what is currently in it. A plastic tube and lots of sucking and eventually it started to flow down on its own.
Below is the front brake in all its high tech glory.
February 23rd 2012
My engine is now home and looking fantastic. Ian has done a superb job of restoring it. It almost looks too good to put back in the frame.
Below are two flywheels, the top one is for a 1910/11 engine and the lower one is a 1914 - can you spot the diference?
The 1910/11 flywheel should have all of its holes filled with lead to be correct.
February 25th 2012
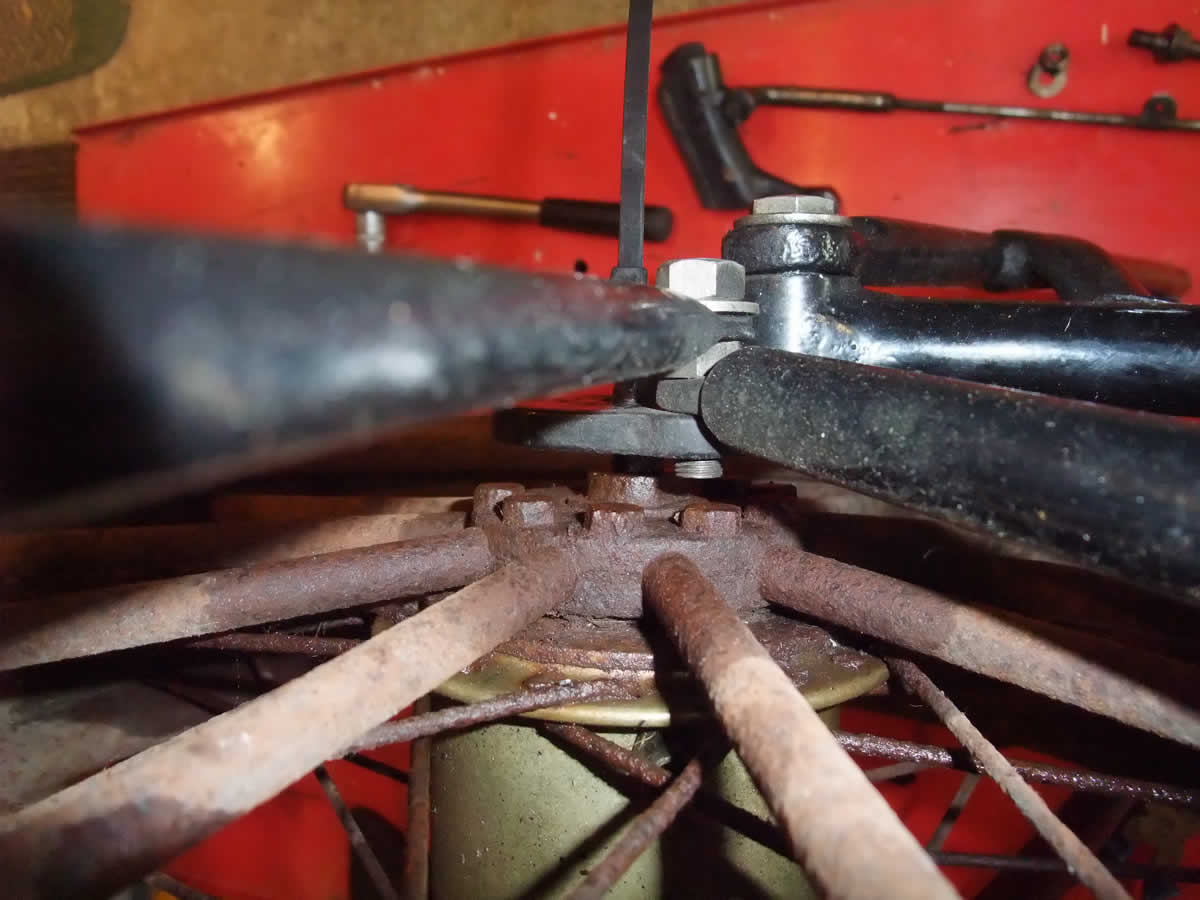
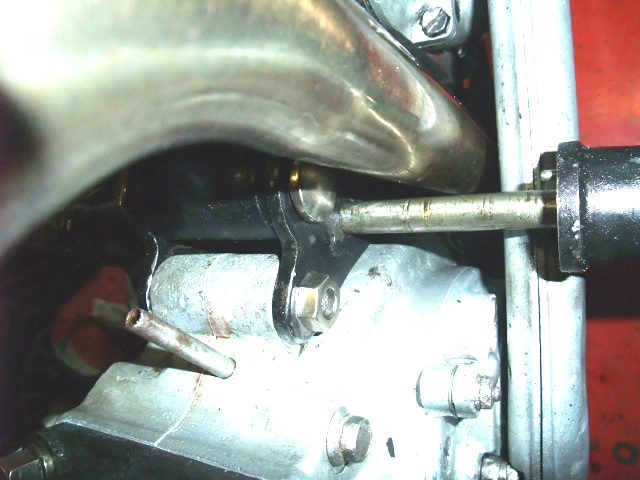
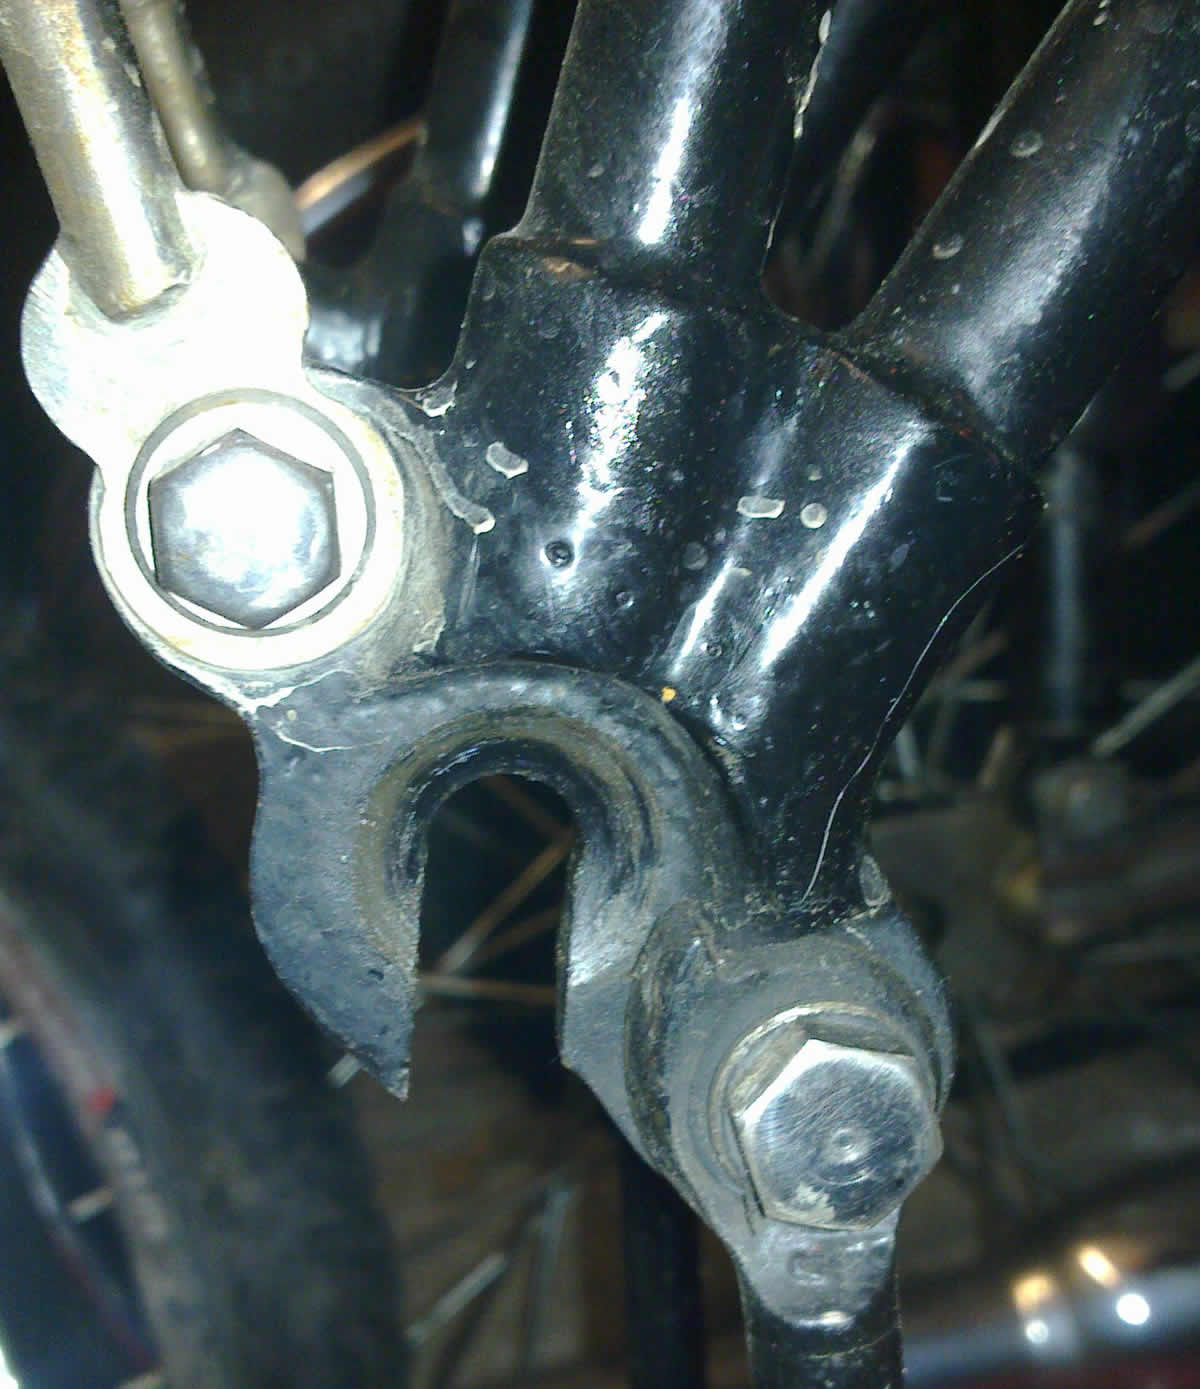
I did a 550 mile roundtrip to collect my engine from Ian a couple of days ago and today was the first chance to put the engine in. It all went smoothly and I had the engine in and out a couple of times to get the mounting bolts in the correct way around. Everything seemed to fit back together easily and it was only the last component that had me stumped. The front of the engine attaches to the front frame downtube via two metal plates and 3 bolts. Two bolts go through the plates and through the engine and the other is a larger bolt and bolts to the front frame downtube. All of this fitted fine. In the middle of this bracket/plate is a further hole that a long bolt passess through to hold the fotrests and rear brake pedal. This bolt went through the hole OK, but on each side of it sits a long tapered mount for the footrests and on the right/timing side of the engine this now fouled the exhaust downpipe.
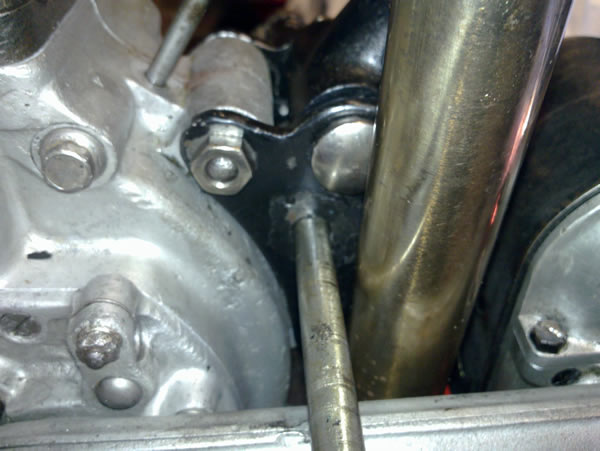

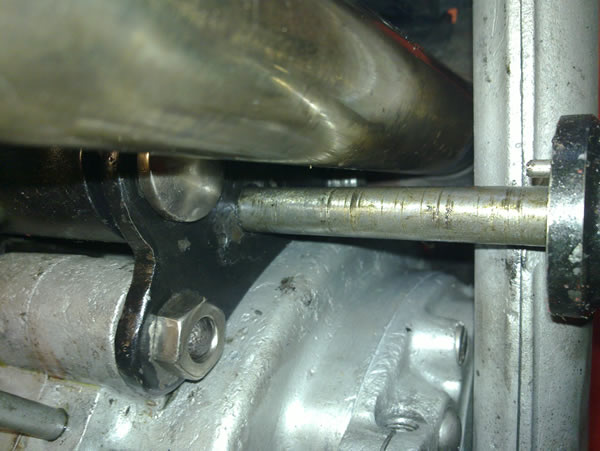
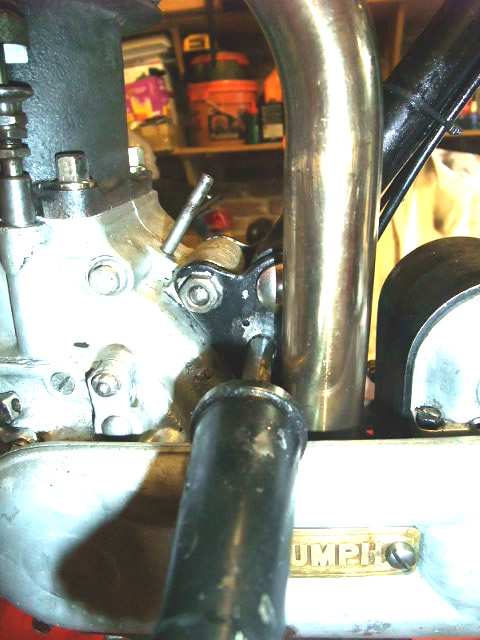
The black item on the right of the picture below should slide up the cadmium coloured bolt and butt up against the metal plate, but is fouled by the exhaust. As Ian had assembled the engine/exhaust/mag and had mentioned that he had mounted the exhaust properly I am a little baffled. I can only assume at this stage that the engine mounting brackets were made to match the previous position of the exhaust. I am going to try and have a look at some original ones to see if they match mine. They are not too complicated to make, I will just need to source some thick steel plate.
1st March 2012
The above issued was solved (for now) by simply removing some medal from the large tapered spacer so that it cleared the exhaust and timing case.Its a substantial peice of steel and takes little loading so will do for now and when i have time I will cut some new engine plates.
This afternoon/evening I have burned up a few hundred calories trying to pedal the beastie into life. To start with the carb flooded and I stripped it down to try and see why. The gauze filter at the top of the float bowl was clogged with muck and it was slightly dirty inside, but nothing to explain the flooding. The float floated and did not have a hole/leak and when the needle in the float rested in the fuel inlet it was air tight, so seemingly nothing wrong with it. The main jet was clear and there is not much more to this carb. I put it back together and refitted it and started a pedalling marathon – must have done about half a mile! and not a single encouraging noise. Petrol was getting into the motor and I had a big fat spark so I started to wonder if the timing was out. Not easy to check in a simple back to basics approach as I took the plug out and slowly turned over the engine to see where it sparked. When you turn the engine over slowly it does not spark and it seems to need pedalling speed for the mag to give a fat spark and at those speeds the engine has whizzed around after the spark so not easy to work out if it occurred in the right spot. As Ian had timed it, I kept thinking it must be right. I tried other plugs and the same result. Then the carb decided to flood again for no obvious reason and fuel ran out of the exhaust. Removed the plug and turned off the fuel and off with the carb again and stripped it and again nothing obviously wrong. For it to flood the float needle can’t be stopping the flow of fuel, but when I try it on the bench all is well. Anyway back on with the carb and further pedalling to no avail, though this time I did get a backfire which made me wonder about timing again. Now the light is fading and any minutes now She Who Must Be Obeyed will appear and summon me for dinner. It was time for an alternative approach. I have a can of magical very high octane stuff that I used to need to start a highly tuned modern race bike on a cold day. A few minutes rummaging and I found the can and removed the plug and squirted a little into the engine. Plug back in and back to pedalling and within a second the engine had fired up and ran for a few seconds. I turned the fuel on and tried again on petrol and with a little further adjustment of levers it fired up and ran although it sounded rough and seemed to be running rich by the smell from the exhaust. I let it run for a couple of minutes and tried adjusting the levers to see if it would run sweetly, but it still seemed a little unhappy. I let it cool for a while and then tried starting it by just pushing the pedal down a quarter turn and it fired up straight away, but still was not right. I stripped the carb again and still can’t see anything wrong with it, but the problem would seem to point to the carb. Confusing as it is so simple compared to modern carbs. I had given it oil and drained the sump to see how much I had inside and it was about a teacup’s worth – so spot on. I then put in four shots of oil and will drain it again tomorrow to see if that gives me a teacup of oil as I need to be 100% sure of the lubrication.
Tomorrow I plan to look afresh at the carb and try and work out what is going on as I need to get it running properly so that I can get some miles on it.
March 8th 2012 - 13 miles
Finally after much tinkering and fiddling about it seems to be running much better and we are ready for a ride. 13 miles of small country lanes are desptached in fine form and all seems well. The levers now operate in different places so I am learning this again.
March 10th 2012 - 30 miles
Another unseasonably sunny day and I head out for a longer ride. After about 10 miles I am heading north out of Petworth and a Model T pulls out in front of me about 1/4 mile ahead and visions of my first thing to overtake start to form up in my mind. I am running it in still and need to keep to 1800 rpm. I know the gearing as its fixed and have my mobile phone on the handlebars running as a GPS speedo and 29mph is 1800rpm. After just five miles! I have closed on the Model T but dont have enough power to overtake. I head off on some smaller roads at lower speeds and eventually pull into the TVR garage in Fernhurst to let both of us cool down and have a cup of tea as I know the people who work at the garage. The final few miles are very relaxing heading down small and very pretty country lanes. I arrive home and have done 30 miles. I feel quite tired. I have stopped a few times determined to master the pedalling it away technique and after a few very wobbly attempts finally get the hang of it. Still a bit wobbly but a good start. I even used the pedals to keep it moving in very slow traffic so the horrors of riding in thick traffic are subsiding.
After arriving home and a mug of tea I checked it over and found a few jobs to do so went out for a blast on a Ducati instead - lots of power, gears and brakes! but somehow not the charm of riding the Triumph. One of the jobs was the fuel tap. No petrol was coming out of it so I drained the tank and flushed out a little bit of gunge and then cleaned out the simple valve which was clogged with gunge. All reassembled and she fired up and ran very sweetly, but light fading so no chance for a ride.
March 12th 2012 - 20 miles
Another fine day and popped out for 20 miles of fine Sussex lanes. No issues until I arrived home and noticed the cotter pin had almost fallen out of the right side pedal. The thread had become a bit chewed up so I will need to get another one before I head out again. Not sure how it came loose as it had a spring washer under it. When I put the engine back in the frame I started using thread lock on everything and will use it on the new pins. I have now managed over 120 miles on it since I bought it and I am starting to feel more at home on it.
March 14th 2012 - 26 miles
Another unseasonably fine day and shame to waste it. Each time I ride it now I am getting more confident at pulling away from a standstill using the pedals, still a little wobbly but getting better. In traffic the key seems to be to build up a buffer of empty road ahead and then letting it almost stop and then let out the decompressor for a few chuffs and then coast and so on until the traffic is cleared or you need to stop. I have now just about got the hang of moving my feet to the pedals whilst it is still just moving and giving a few turns, which is just enough to get the engine to fire and chuff away.I am still using an egg cup of Castrol R per gallon of petrol to help with running it and also as I like the smell. I am probably over oiling the engine via the pump as I seem to be getting through oil quite quickly, but I figure too much is better than too little. On light loads it is dripping about once every 2 seconds and once every second with a bit more load. As I approach hills I open up the drip feed to give it more oil and then adjust it back afterwards. I get 5ish drips of oil under the engine when I park it now so it is marking its territory. My boots remain oil free so I am keeping clean. I drained the sump to ensure no debris from running it was trapped and also to ensure it had enough in it. It had about 1.5 egg cups of oil so about right. I am trying to keep the engine running cool by using the minimum air opening and for most riding it can stay in one position and be ridden on the throttle. It only needs opening if I need to move the throttle up to anywhere near where the air lever is set. It makes you think about the technicalities of what has to happen in my carb to get the optimum petrol air mix for every circumstance. The air and throttle slides in the carb are both normal round slides. The air one is nearest the engine, the main jet is behind it and the throttle behind that. It is an enjoyable task to try and get the perfect blend of petrol and air for every moment. The magneto advance/retard seems to make very little difference to how the engine runs, but maybe I am still too new to this to notice yet. The lever moves the magneto through its full range of movement so maybe any changes are too little for me to notice. Starting it from cold can now be done with a quarter turn of the pedals and it jumps into life. Later in the day I was out in the car and stopped to talk to a Moto Guzzi rider and he had seen me ride through out High Street earlier and said it sounded really nice. I had not really thought about how it sounded before, but it is a lovely gentle soft deep thump and chuff to it.
As the Pioneer is this Sunday and I will be doing c130 miles in a day I have started to think about what else I need to take with me. It looks set to be cold when I set off at dawn and probably foggy so I have bought some bicycle lights for it so that people can see me in the gloom of the morning. I have also bought an ancient battered small suitcase from a local junk shop to maybe attach to the rear carrier to carry extra stuff. I will take my spare drive belt and some oil and probably a little spare petrol. Modern petrol pump nozzles are larger than the opening on my tank so a funnel will also be a good idea.
When I topped the tank back up it took about 1.6ltr so it seems to be doing about 74mpg. On February 22nd 1913 a Mr H H Ragless won a fuel consumption contest on his Triumph and averaged a splendid 267mpg! He managed this in Australia so I assume long flat roads and the gearing changed so that it was running barely above tickover, but even so road tests and books of the time refer to c100mpg in normal use. As most rider back then seem to be 12st in weight (all the seats seem to be rated so...) and as I weigh 30% more than this I should be able to get to 85/90mpg? What are other Veteran Triumph riders getting ?
March 18th 2012 - The Pioneer Run - 130+ Miles!
My plan was to ride to the Pioneer, ride down to Brighton and then ride home and do a total of ver 130 miles.
You can how I got on on here - Pioneer Run 2012 page
March 25th 2012
After the Pioneer the front wheel had moved slightly and was rubbing on the inside of the fork leg. It was a fine sunny day so I wheeled the bike outside and used the bikes own front stand to raise the wheel off the ground. Some play/movement was apparent in the wheel bearings so it was out with the wheel. I hoped I just needed to tighten up the bearing to fix it. You need to remove the brake blocks to get the wheel out.
With the wheel out the bearings sounded and felt rough so I put the wheel over a big old (empty!) cat litter tray and undid the bearing to ensure I caught all the ball bearings. Lots of grease was still on the bearings so it took a little prodding to get all the bearings to fall out. I then cleaned it all out with petrol to get it all clean before planning to put itall back together. This plan stopped when I had a good look at the bearing faces - they looked very rough and pitted. I have been riding it like this and I imagine its been like this for a while so its sort of useable, but I am not keen on how it looks and feels. I am used to modern bikes with sealed bearings and the slightest play with them and I replace them.
Below is the bearing assembly which is very simple.
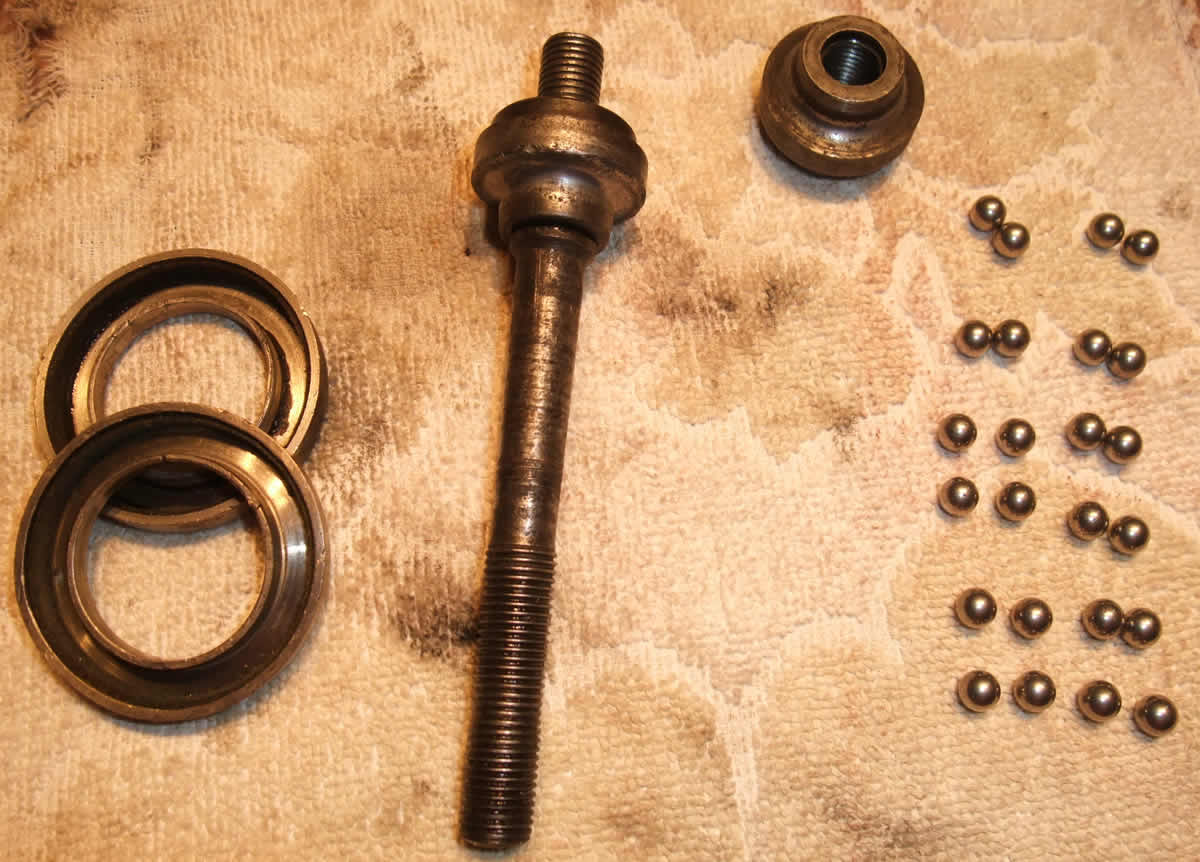
In the picture below you can see that this does not look to be in ideal/useable? condition.
The ball bearings sit between the bearing face above and the one below - neither is exactly in new condition.
I am not exactly sure what my best option is to fix this. Thinking like a someone from 2012 - I would just go and buy another one - but where from? or perhaps change the open unsealed bearings for modern sealed ones. Thinking like someone from 1912 I am sure they would have either remade a set or maybe just refaced the bearing surface. I wont be riding the bike until I sort this out.
26th March 2012
As I live out in the wilds of Sussex, my local supplier of bearings is not on my doorstep and so off to Brammer's in Guildford. They have some new linked V belt for me called NutLink - are they trying to say something about people that use this? They are also a retailer for bearings so I have taken the wheel and spindle etc to get new bearings. I aim to have my bike as original as possible but will put in new sealed bearings as the current ones, apart from being worn out are also open to the elements and will always wear out quickly. The outside diameter for the bearing is 36mm (I dont think my hub is original) and after an epic search through their stock they tell me that no one makes a ball bearing with a 36mm OD. Odd but thats what they tell me.
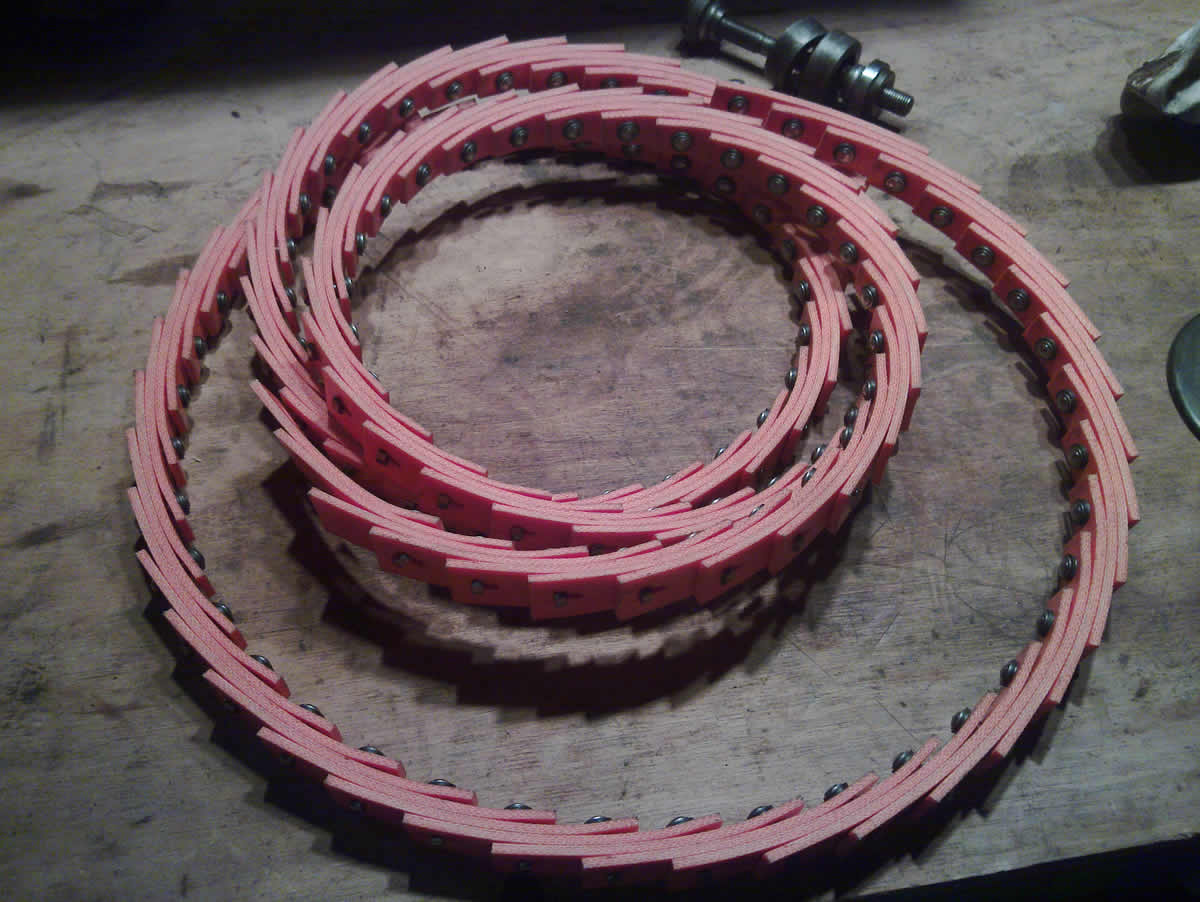
The new Brammer supplied Nutlink belt in all its bright glory. You should be able to get it from any industrial supplies seller. They also gave me a can of anti slip spray, that increases power transfer by 50% ... so it says on the can. This new belt looks identicle to my current belt apart from being a brighter colour. I expect it will stretch a fair bit when I first use it so I aim to "hang" it for a while with some weight on it before I fit it.
I now have to try and sort out my wheel bearing issues before I can ride again.
27th March 2012
Over my breakfast tea a search of the web came up with a sealed ball bearing race with a 36mm diameter. The vendor is a company called Trend that makes power routers and they have a bearing with a 36mm outside diameter and a 12mm inside diameter is listed as a spare for one of their machines. I remember my father telling me about bearings and the key things other than size are RPM ratings to ensure it can run at the required speed. As the Trend bearing is listed for a slotting system that barely moves (RPM wise) I needed to double check as their web site said little more than its size. A call to Trends technical support line was a refreshingly helpful experience as the chap I spoke to went off into their warehouse to get one of these bearings and check its RPM rating as his computer told him little more than its dimensions. The results is that it rated to a sustained 28,000 RPM and then considering the wheel size, means that the bike would need to be doing over 2,000 MPH before it reached its design limits - so I think it will be fine!
In the movie of the 1961 Pioneer Run a garage is featured as a stopping point and this place is still a garage today and indeed is a bike shop with engineering facilities so I am going to take my wheel and bearings over to them and they will make a new spindle to suit the bearings.
29th March 2012
Drove over to this engineering company to see about fixing my hub/bearings and sadly it was not the easy fix I envisaged. I had popped into a a friends on the way over to borrow a couple of bits to show what needed making but sadly to no avail as making all the bits would be hundreds of pounds and still not an ideal solution - so Plan A scuppered. Plan B turned out to seem do'able as the same friend had a new Ian Jennings made (and hence superbly made) front hub that is fitted with sealed bearings - but this would require lacing into a rim etc and probably some weeks more off the road.
31st March 2012
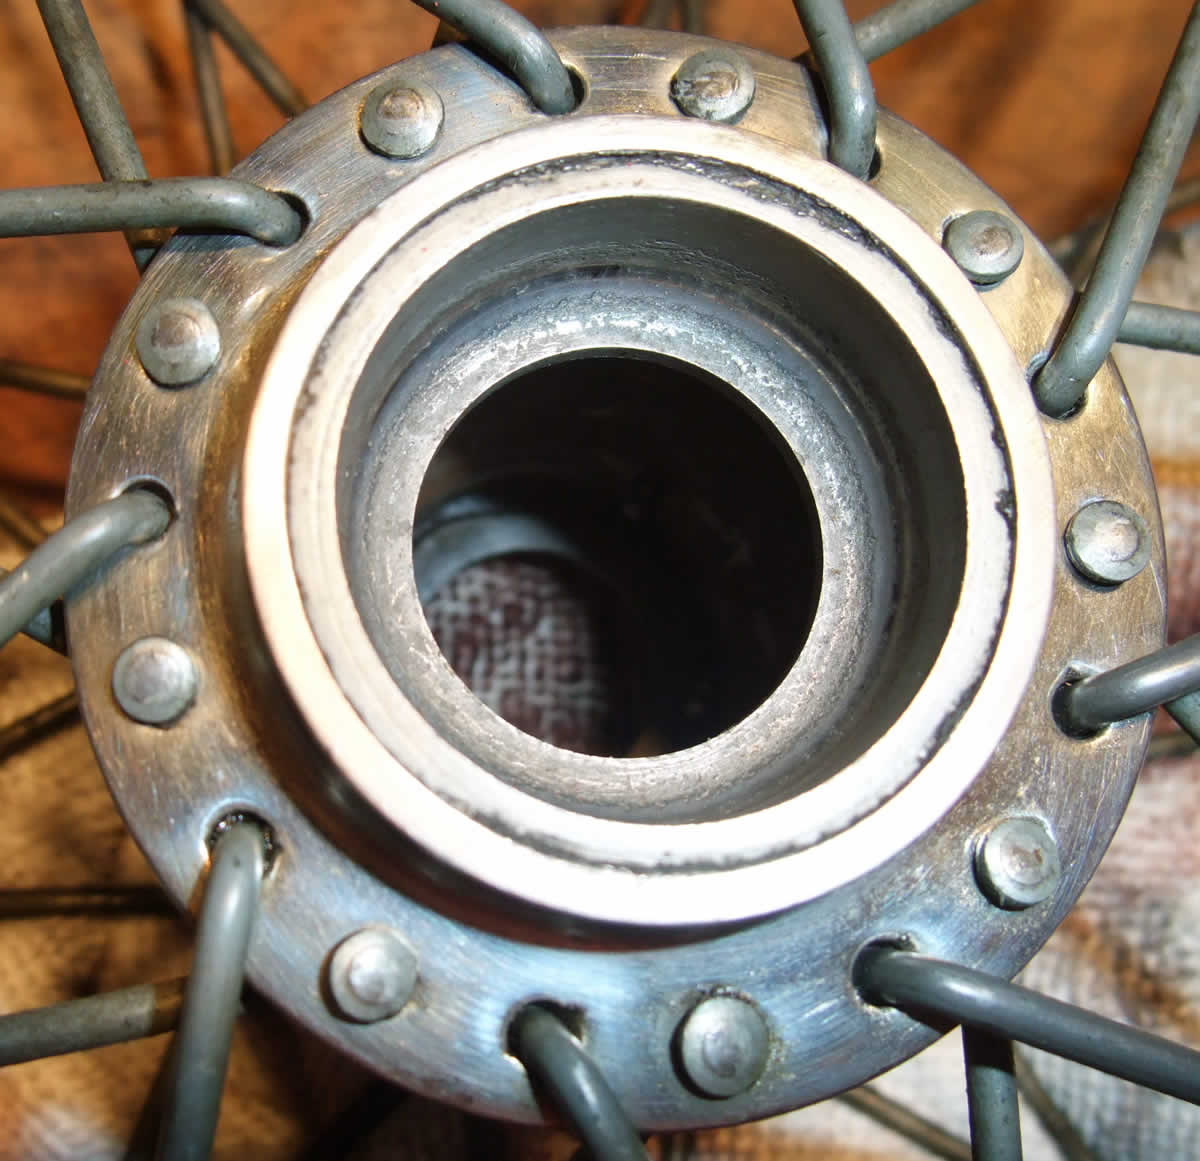
Plan C - having been collecting veteran Triumphs for decades the same friend (Chris) thought he might have some cup and cone bearings to suit my hub and so I popped over to see him. As I am English I often take cake when I visit (to go with the tea) and was surprised to hear it was his birthday when I arrived - giving up time on his birthday to help a friend fix his bike is generousity indeed. The people I have encountered since I bought my veteran are some of the nicest and most genuinely nice people I have met - seems ancient bikes either brings out the best in people or only interests very nice people. Some of the Ego's I have met from riding Ducatis are best unmentioned... After several hours of fettling and tinkering in Chris's veteran Triumph workshops (and a beer and lunch - very good service!) I had a new set of near 100 year old cup/cones and bearings installed and ready for use. Whilst these bearings have a simple metal dust cover to keep the muck out of the balls, I would expect that I would need to strip and clean/regrease them every few hundred miles. In their era with grit covered roads I would imagine that stripping your wheels to clean and regrease the bearings must have been a regular task.
April 1st 2012 - 20 miles
With the wheel refitted it is time for a test run on another unseasonably sunny spring day. As I set off I see a near neighbour tinkering with his pre war Aston and toot as I pass. I never knew that such an exotic car was so close by and its only because he saw me on the Triumph that we have since said hello. The Goodwood race track is just 10 minutes away from me and they are having a Sunday Breakfast Club gathering and the roads are full of fast cars/bikes being used as intended so I skip the main roads and take to the little roads. I have mounted my phone on the bars and it has a GPS speedometer so I can see how fast I am going. Barely any throttle (perhaps 1/10th) gives me 28mph and I see 37mph briefly on the flat with the engine not even flat out, before I drop back to slower speeds. If I change the pulley gearing I think we can crack 50mph! A few months ago I sent off an entry for Brighton Speed Trials and await to see if we will be allowed to run. I have competed in modern cars and bikes and it is an excellent day out and it would be perfect to let a near century old bike run - only time will tell.
This is a video of my 421bhp car running at Brighton Speed Trials - http://www.youtube.com/watch?v=9c5jaNDnG5g
And from inside the car you can see the speedo climb to c110mph in 9 seconds - http://www.youtube.com/watch?v=LHSZPXQN6r0
A little quicker than the Triumph, but the Triumph is more fun.
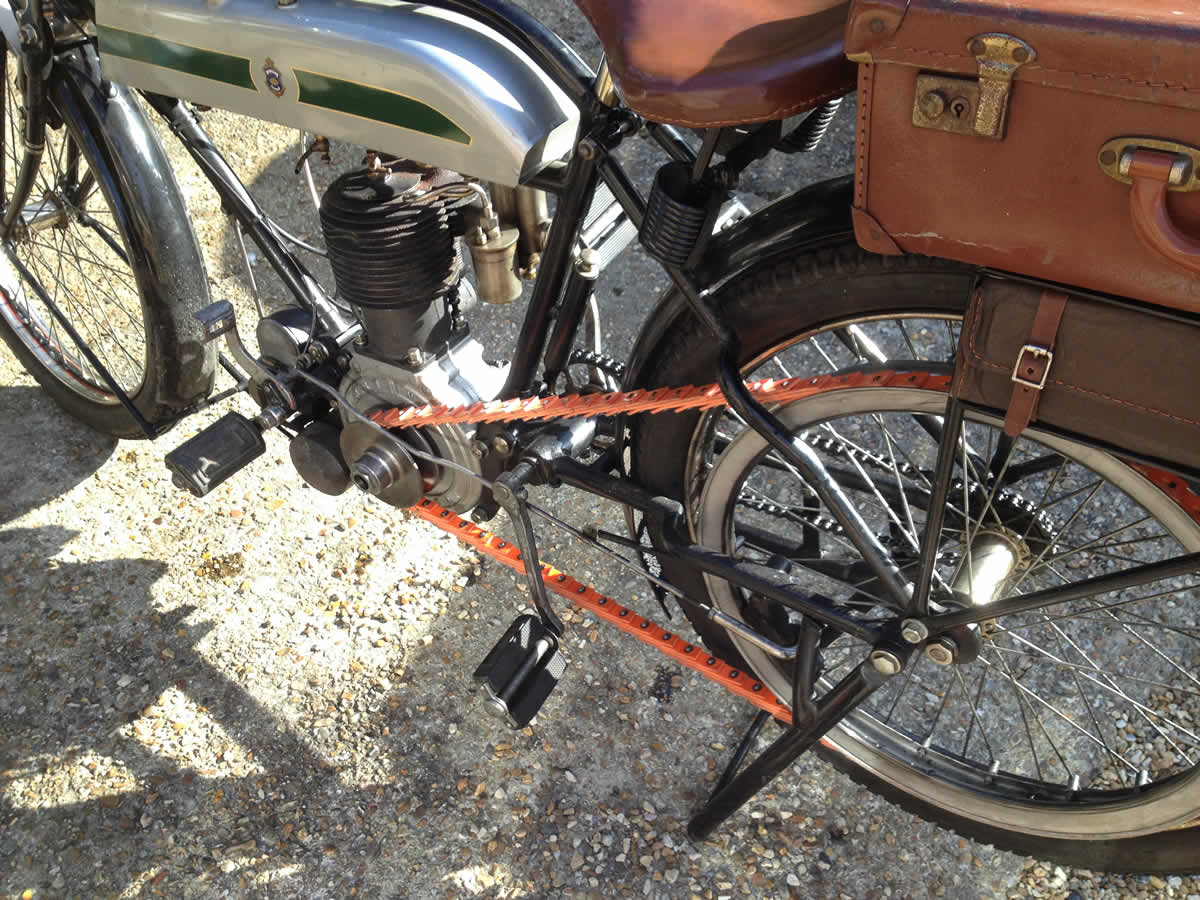
After about 10 miles into my ride the belt starts slipping going up a hill and I look down to see that a couple of the belt links have pulled out so we turn around and head for home. We have an exciting moment approachng a T junction as the rear brake is nicely lubricated with oil and we have a interesting moment but end up chuffing accross a luckily empty junction and onwards to home. I remove and clean the belt and degrease the brake at home whilst having a calming post ride tea. When I check the belt a few more links are looking past their best so I measure and fit the new belt - bright orange so more 2012 than 1912, but it will hopefully keep us going. I expect the new belt will stretch and need links taking out in its first miles and then hopefuly settle down.
A very nice friendly chap I met at The Pioneer has told me that he has just put a new solid (linkless) belt on a veteran Triumph and all for just £25. A bargain and available from these people -
http://www.arrowrugby.com/price_list/price_list.pdf
I also have a solid belt. As the cords run length ways in these belts they are prone to pull out any joining links. If you get a belt with ridges on its inner endge then you can create a joining link that bolts through the belt AND locks over the serrations and this seems to hold it together OK. The solid belt does however give a less smooth ride as it has less give in it than a linked belt. The link that joins my solid belt is pictured below.
I adjust the saddle height and run a spanner over various nuts and bolts and then fire it up again to let it gently run with the new belt. Whilst I am doing this I get a call from a old gent that has had a 20's Triumph in his shed for decades and wants a new home for it. He is not sure of how much it is worth and neither am I but if he sends me a few pictures I can ask about and put it on the veteran motorcycles for sale page I have created. If you are looking for an unrestored 20's Triumph then pop back to these pages and I will publish the pictures.
My local pub is having a party tonight and I was going to head up on the Triumph, but the light is fading now so I put it away and take the TVR.
I am looking for a set of period gas/acetylene lights - expecially a Lucas 'King of the Road' No. 458 - as thats is what my Grandfather used and as a lifelong veteran Triumph owner and early Triumph dealer - I must assume that he knew what was best! So if you have such a thing and would consider parting with it, then please do get in touch. After decades of Ducati's feeble attempts at illumination I might be surprised by how bright these ancient gas lights are.
An finally ... On May 6th 2012 the VMCC are having their nationwide founders day Relay Rally. I fancy doing Midhurst to Stone Henge and back via Goodwood - so c150miles - anyone fancy joining me on an old bike?
3rd April 2012
Looking at all the lovely comfy looking period saddles and then at a friends beatiful period Brooks saddle, got me hankering after a proper saddle for my bike. Not being an expert on veteran saddles (or anything veteran yet..) I have lashed out £40 on a tatty Brooks B90. The leather has had it, but the chassis of the saddle looks OK and it may be the basis for something. So far my research seems to show that the B90 dates from 1901 to 1904 when they seem to have been fitted to motorcycles and the posher bicycles. I have also acquired most of a spare carb just like the one currently fitted. It is missing slides, but if I cant find any old ones, they look quite simple to make up.

A little more investigation about my Brooks saddle with the kind help of friends with copies of period Brooks literature and I now know the following. My Brooks B90 saddle was originally intended for a bicycle although some very early motorcycles (1901 on) seem to have used the available saddles - with only bicycle saddles available. In 1908 Brooks listed the B90 at 11 shillings and 6 pence for an enamel finish or 14 shillings for a nickel finish at the Size 1 model. They produced three sizes and for different rider weights so your saddle would be quite suited to you. Brooks also produced a B90M model by 1912 specifically for motorcycles. It seems to look very much like a B90 Size 3 bicycle saddle but with the lower part of the metalwork being cut from sheet metal rather than from steel rod. Brooks also made a B90MP with the "P" indicating that the seat was Padded. Brooks produced quite a variety of motorcycles saddles in the veteran era. As I learn about this subject, it seems that they produced saddle designs that allowed for easy pedalling and ones that were less suited to pedalling but were more comfortable. So in the era you might have chosen your model of Brooks saddle based upon whether you had a bike that was pedalled a great deal or had the luxury of power/a clutch and suitability for pedalling was a lesser concern over comfort.
April 4th
Whilst my bike is now back on the road I have order some new hubs - front and rear and will also get some rims etc and get a new pair of wheels built up as I dont want to be off the road again due to wheel/bearings issues.
April 6th
A friend popped around on a bike he had just bought - A Ducati 1098R. A 180bhp beast that you can buy secondhand for about the same price as a good veteran Triumph. So choose your weapon - do you want to experience fear and excitement with 180hp and brakes or 4hp and almost no brakes!
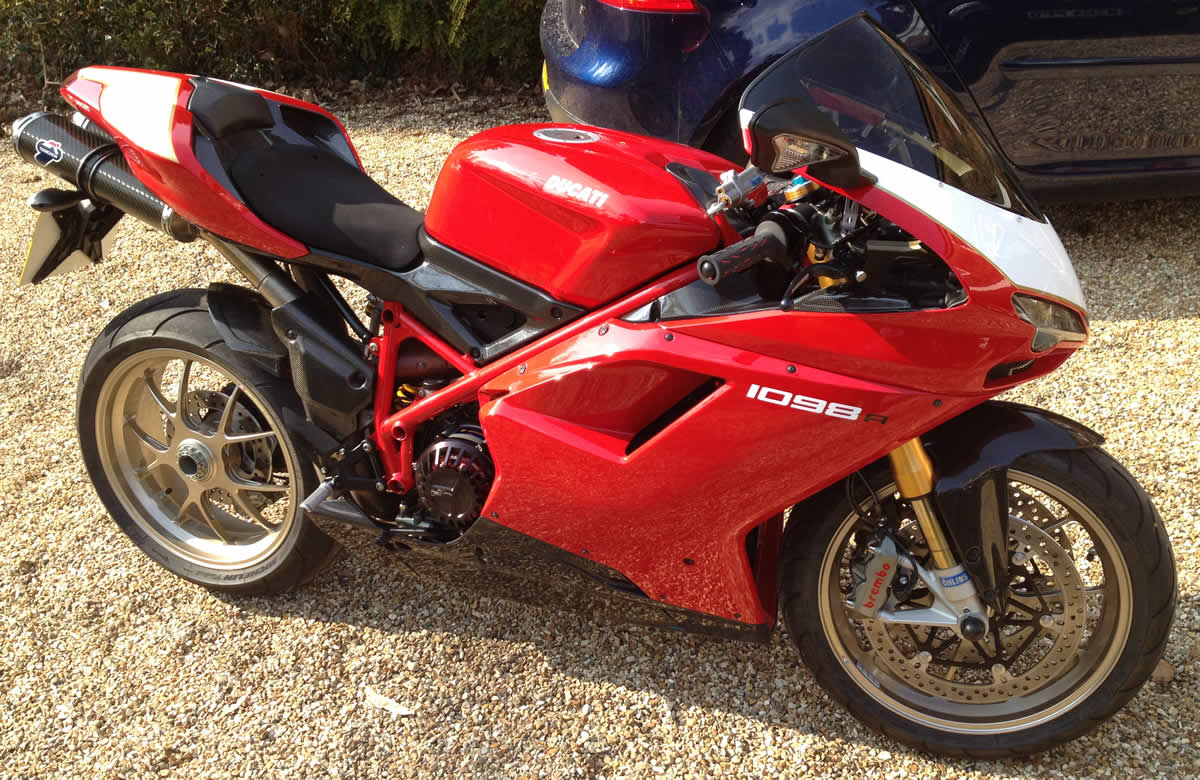
April 8th 2012 - 20 miles
Popped out to test the new belt today and did about 20 miles running around the Sussex Downs. The new belt is noticeably harsher that the old belt and I suspect this is due to the fact that the old belt would slip very slightly on each pulse of the engine when you start off and the new belt does not, so it feels harsher. At the end of the ride it was feeling smoother and the belt did not seem to have become any looser - so no stretch yet. Engine running very nicely and went up a big hill with only a mild slowing in pace. The picture below was taken between Redford and Woolbeding. FYI a good cafe in the old Post Office in Redford, details here.
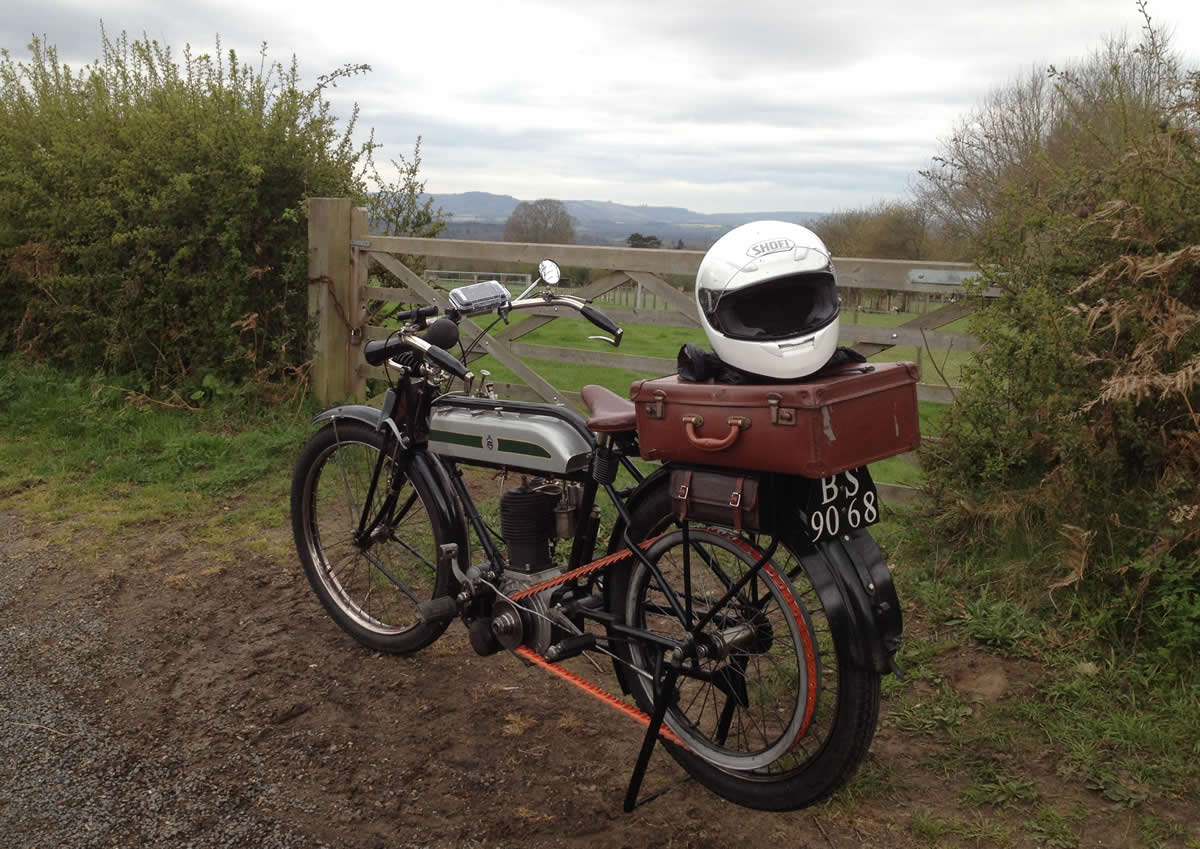
April 10th 2012 - 51 miles
It was time for the bikes annual MoT test and as I have been taking my bikes to the same garage for 30 years we set off at 10.35am for an MoT scheduled for 12.30. I set off so early as it is 24 miles away and I needed to allow for any misbehavior. I was baulked on the approach to one hill and did not get a run up at it and ended up having to push the last 20m, but apart from that it was an easy and pleasant trip and we arrived at 11.30am - so an average of 26 mph. I was early for the MoT and had a tea whilst I waited and chatted with an old chap that used to run the garage and used to ride a 1911 Rover. He thought I was giving it too much oil by the amount over the rear wheel and maybe I am being too generous. It passed its MoT and on the brake tester the front brake applied 20kg of force and the rear 50kg. They weighed it at 97kg or 214lbs. So if it has 4hp then we have a riderless power to weight ratio of c40hp per metric tonne.
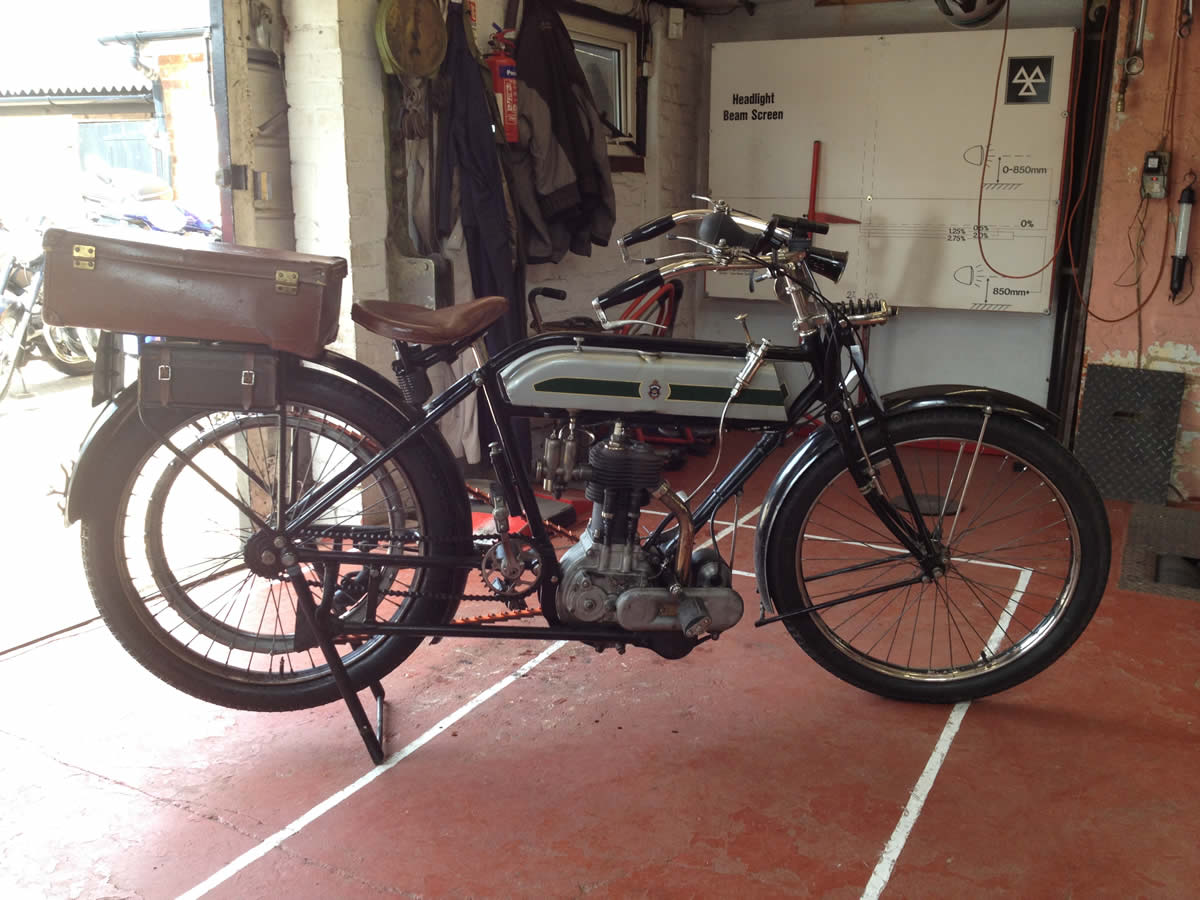
The ride home was pleasant as I took some small country lanes that I have not ridden since I was a kid. Very quiet and in keeping with the roads of a century ago. The only moment was caused by human nature. A very attractive women was jogging towards me with a most amply filled T-shirt and the battle of gravity and motion going on inside her T-shirt was most distracting and I only just noticed in time, that the car in front had slowed alarmingly for no apparent reason and I had to use the brakes quite hard for real. It stopped quite quickly and I was glad I had wiped the rear rim with a petroly rage before leaving the MoT - it does help the brake noticeably. The bike was running very nicely and stormed up the big hill next to Henley on the A286 and on to home. If the bike gets a good runup at a hill then its seems to be able to climb any hill in the area. When climbing hills I open up the oiler to give it a constant feed whilst it is under load.
The new belt has now done c70 miles and shows no sign of stretching so far. It is lost most of the sharpness at take off that it had on its very first ride so maybe it now slips very slightly under the initial engine pulses when you set off.
April 11th 2012
Took a Ducati for an MoT today at the same place and it took 35 minutes to do the same trip, so the Triumph will only be c15 minutes behind. Checked the Triumph over and found that the exhaust retaining nut had come loose, other than that no issues. Measured up the existing wheels and placed an order for a new set of rims from www.richards-bros.com, they have been sellings wheels and rims since 1937 so know what they are doing. Once again I was realised I knew nothing about the exact spec my wheels should have and thanks to Ian J. I now know and its below so that any other novices after wheels know what they are looking for.
Front Wheel Rim
Beaded edge rim 26 x 2 1/2 x 2 ¼ Westwood pattern B1
36 hole, No dimpling
Polished ready for plating
FYI: 12 gauge spokes, 200 size nipples, Spokes cross 4 times.
Rear Wheel Rim
Beaded edge rim 26 x 2 1/2 x 2 ¼ Westwood pattern B1
40 hole, No dimpling, spokes cross 4 times.
Polished ready for plating
FYI: 12 gauge spokes, 200 size nipples, Spokes cross 4 times.
I carry a puncture kit and a modern bike pump, but in my quest to return to originality have been looking a proper pump. So far the pump has eluded me but I did manage to get a set of clips for holding the pump to the frame.
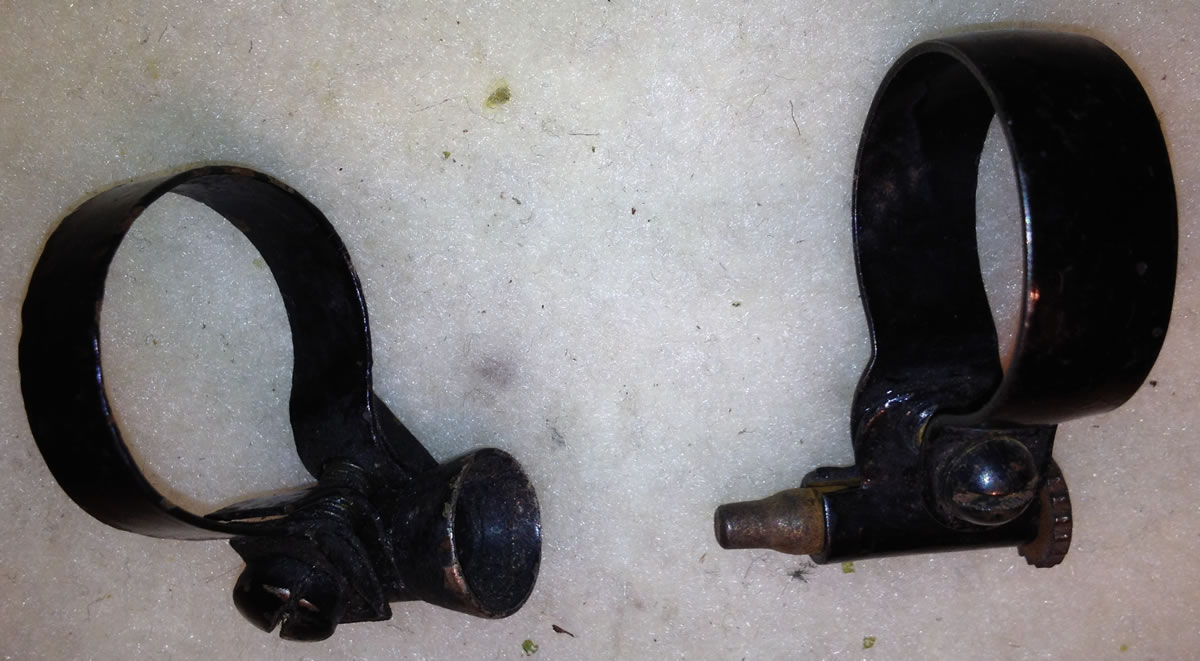
Christmas has also come a little early as a visitor to these pages noticed I was after a period light and ended up sending me a "new" one that has sat in his shed for 50+ years. It is unused and like new. I have taken it apart to see how it works and now just need to mount it and get some Calcium Carbide to fire it up. I am very keen to see how much light it can produce. Thanks Les!
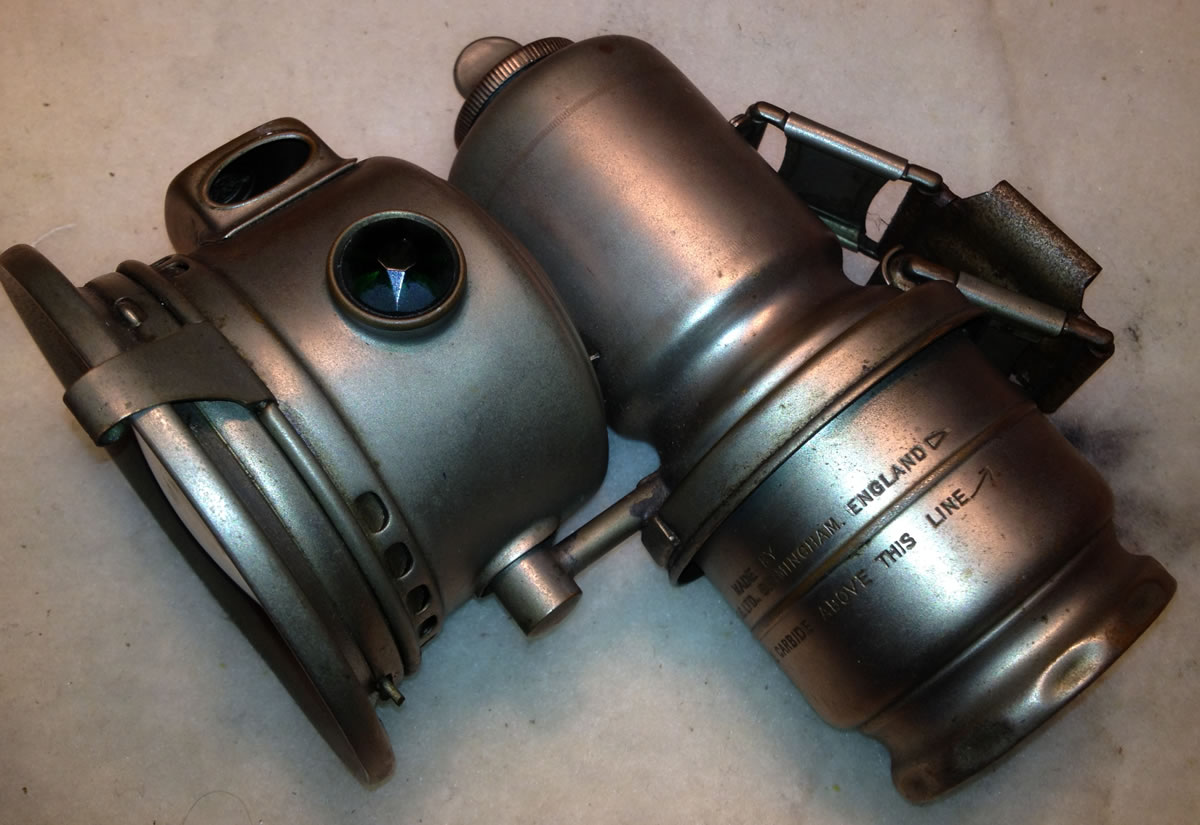
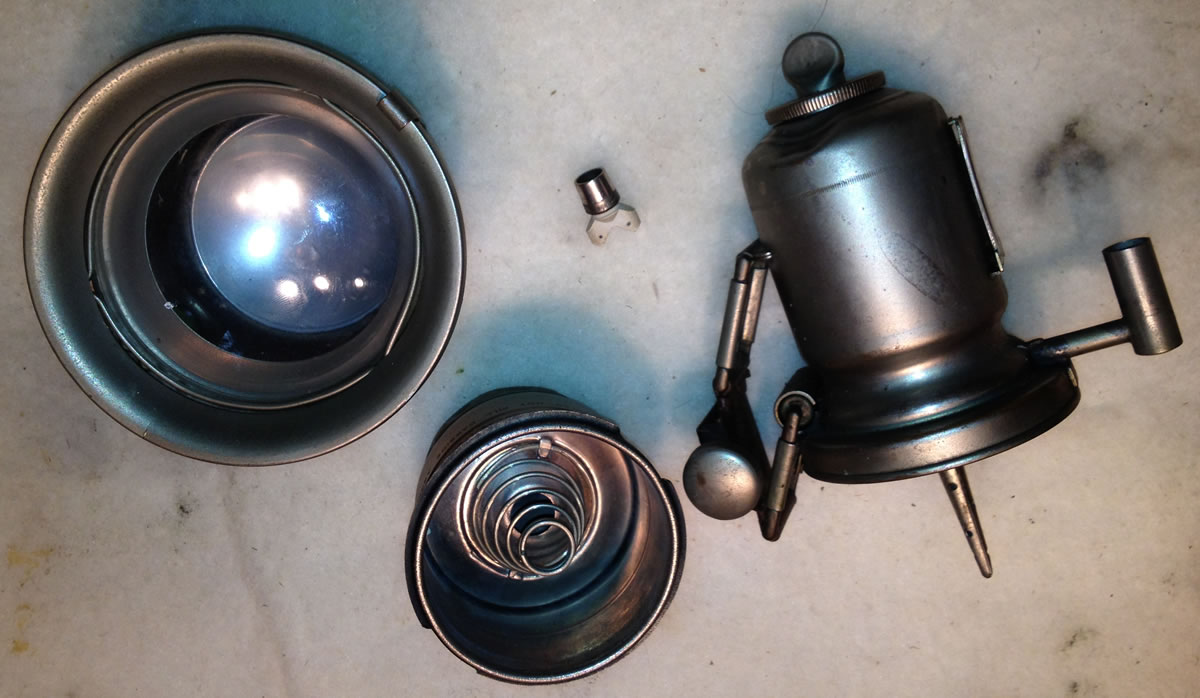
April 21st 2012 - 25 miles
The weather have been very damp and it was only today I managed to get out for a ride. I did a 25 miles roundtrip to drop off a copy of the 1961 Pioneer Run movie and managed to dodge the showers. The chap wanted the movie as it featured a Wooler and he is most certainly the world's expert on Woolers, but he also had a very lovely veteran Royal Ruby. It is in very fine condition and he had redesigned the front brake so that it actually does some braking. I am now thinking again of looking at a similar update and he tells me that a Rudge Multi had a similar setup so I need to find some pictures of these to further my research. He very kindly gave me a huge chunk of rubber so that I can be self sufficient in brake rubber for many years.
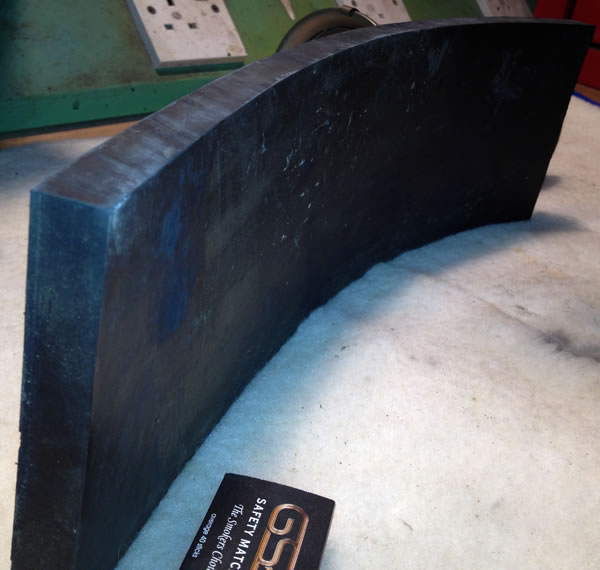
April 26th 2012
The inclement weather continues so no riding. I did buy a spare Bosch ZE1 Magneto on ebay for £55. It seems complete and may even spark. All of the nuts and screwdriver slot heads are clean and unburred, so it does not seem to have been abused. I need to see how to attach the HT lead and will try it. Apart from buying it as a spare I was also keen to have one to take apart and see how it works so if/when my one gives trouble on the road - I might have an idea what is wrong and how I could fix it. Even if it does spark I will look at finding a man who knows about them to rebuild it. It looks identical to my existing one, but carries a later serial which seems to say it was made in 1915. If it was made in 1915 it surprises me that it has Made in Germany written on it in English.
As you no doubt realise I am no expert on veteran matters yet, but I think ZE1 means Z=closed magnet, E=spindle height is 45mm and 1=for 1 cylinder. All corrections and additions to this are very welcome!
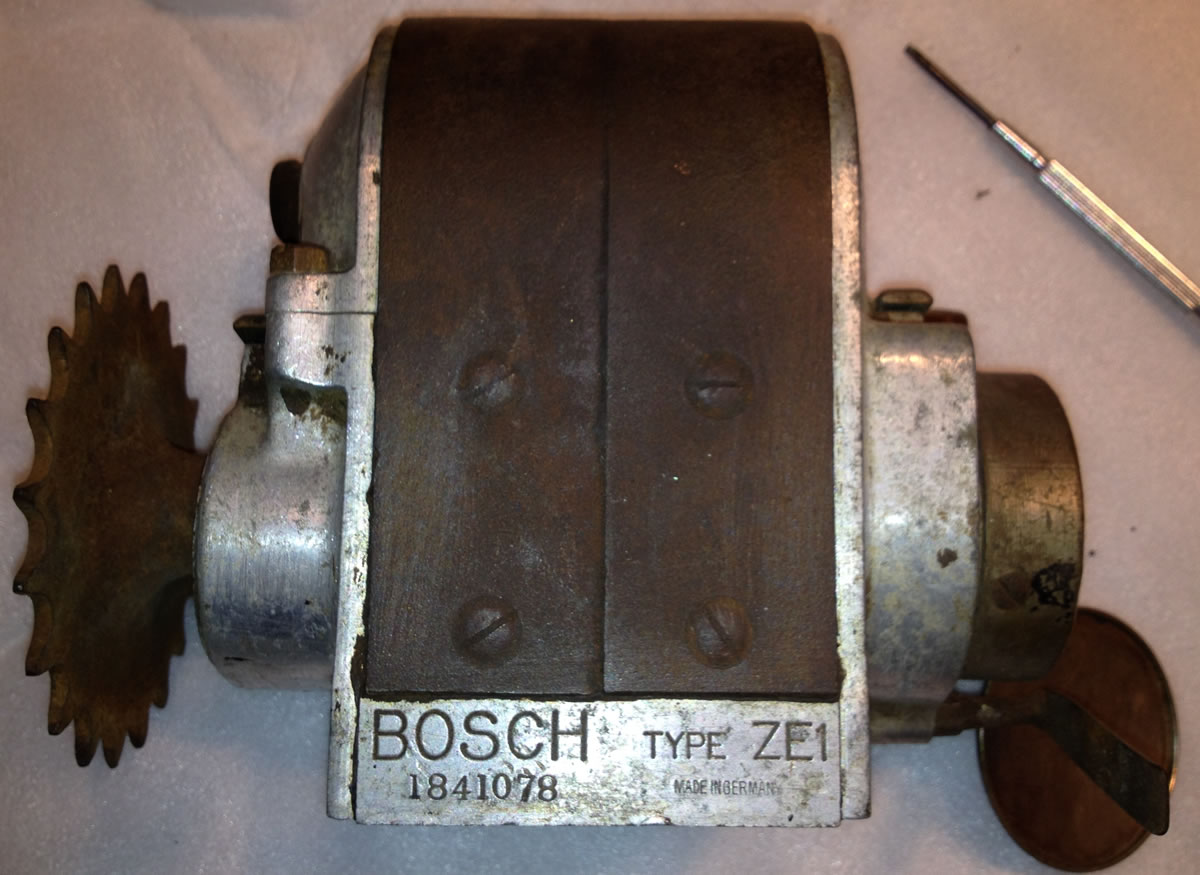

Bosch Magneto's - anpther topic I know almost nothing about, so I have started on a Bosch Magneto page, see Bosch Magnetos
May 12th 2012 - 32 miles
After the drought of the previous months and the subsequent hosepipe ban came the wettest April in many years and hence not much riding in the last few weeks. Sadly I did not get out on May 6th as when I got up I discovered that my year old hound - a German Wirehaired Pointer had hurt himself on his walk and had to go to the vets and was not a well chap for the day. His injury, had it been an inch further back would have resulted in the loss of a testicle. Losing one of those on a walk would have classed the walk as his worst! He is now almost recovered fully.
I did get out today for a good run and after 15 miles of heading west the machine slowly spluttered to a halt, slowing all the signs of running out of petrol. A quick glance in the tank slowed that it still held some, so a likely blockage in the carb was the cause. With the fuel still on I tickled it and no fuel came out and indeed the tickler did not touch the float that should have been nicely bobbing on its little sea of petrol. As I was not in a good place to stop, I turned around and headed downhill and she picked up and ran and spluttered for half a mile before giving up the ghost completely. In its last moments of movement a friend in a car stopped alongside and pulled over into the same field gateway. He races sidecar MotoX and knew it must be me as as he put it - who else would be daft enough to be out riding such an ancient machine. Before I set to explore the problem I parked it up and had a smoke as hot engines and spilling petrol do not make good companions. It was a beautiful spot to expire with the Downs on one side and bright verdant fields and trees all around.
Out came the tools and the nuts holding the top and bottom fuel pipe unions were loosened and the pipe gently moved out of the way of the top of the float bowl. Where the fuel enters the top of the float bowl is a small gauze filter and this was thoroughly clogged with debris. With this cleaned out and all put back together it fired up first go and idled happily. The next 15 miles it ran very sweatly and indeed I gave it full "bat" as they used to say in the era and with a GPS speedo onboard we passed 40mph with ease at 2,500 rpm and stayed at this great speed for a few seconds before dropping back to our normal 28mph canter. The way it went to 40 and without everything opened full would seem to indicate that with a shift in gearing we can top 50.
I was perversely pleased about the breakdown. I should explain. When I was 16 and started riding on the road in 1981 I had a series of reliable machines that did not breakdown and when eventually over the years more modern things did expire, the result was normally terminal - broken cam belts/dead ECU's etc. Accordingly and following its demise last year I had formed a view in my mind that any stoppage would prove final. So it proved very heartening to breakdown, identify and fix the problem and arrive home under my own steam. I feel a bit more like a proper veteran rider now. No doubt if I had chosen unreliable machines as a teenager I would have experienced a whole lot more breakdowns and fixes and would just take a unscheduled stop as part of the riding experience. I am almost hoping for further misbehavior so I can tinker at the roadside, perhaps I should add a small stove to the kit to brew tea whilst I tinker.
May 13th 2012 - 30 miles
As a precaution I took the carb apart and we had some more debris in the filter, which I cleaned out. When I checked in the tank it seems to have small flakes peeling off the interior of the tank - nothing major but little bits can be seen. This is probably the ethanol in modern petrol eating away at the coating of the inside of the tank. Not much I can do about it for now so I will just keep an eye on it. The tank was also empty with perhaps a couple of tablespoons of petrol dampening the bottom of the tank so yesterday I must have arrived home on fumes.
A good check over and the usual cleaning of the rear brake rim and a gallon of petrol and we set off again for a gentle late afternoon ride down some of the quieter local lanes. With so much recent rain and now a blazing blue sky, I doubt if the county will look more green and lush and rich. We scampered along for a gentle 30 miles and headed back home whilst it was still fully light. Gently chuffing along deserted lanes with lovely old buildings passing every few minutes and the occasional darting deer or fox to see made it a lovely mellow outing. Most of it was really quintessential Sussex countryside with small valleys, woodlands and fields full of pampered horses and the occasional real farm animal, so fine indeed that it should be walked to fully appreciate it - but today we are motoring down these gravel covered car width tracks. I wonder how many other veteran bikes are being ridden on the planet today, hopefully a few are chuffing about. The new drive belt has now done 160 miles and not stretched so hopefully it will carry us many miles.
May 18th 2012
I sent off my completed entry form for Brighton Speed Trials today, so hopefully they will let me run. I have also sent off to run it at another VMCC sprint at Wroughton on June 10th.
May 19th 2012 - 20 miles
Checked the machine over and nothing was loose or needed adjusting! It fired up immediately and let it warm up for a couple of minutes and then set off for a canter down the lanes. Its a sunny day so the A roads are busy with fast bikes as the roads around me are some of the best and people come from miles to exercise their superbikes. I suspect bikers have been using the roads in the same manner for some time as in 1914 the council of the next town east - Petworth tried to enforce a very low speed limit to deter all the speeders. In 1914 you would be hard pressed to buy something that would top 70mph, but I suppose in the last days of the horse it was seen as excessive speed. I head for the smaller lanes. After passing through Elsted (very nice pub with fantastic views of the Downs) I stopped to take the picture below and a chap on a bicycle stopped out of curiousity and a few minutes of converstaion ensued. He could not quite take in that it had no gears or a clutch and so having tried to explain matters without success I set off.
Below is a view of the South Downs from the Elsted Road and I suspect it has not changed much since the Triumph was made.
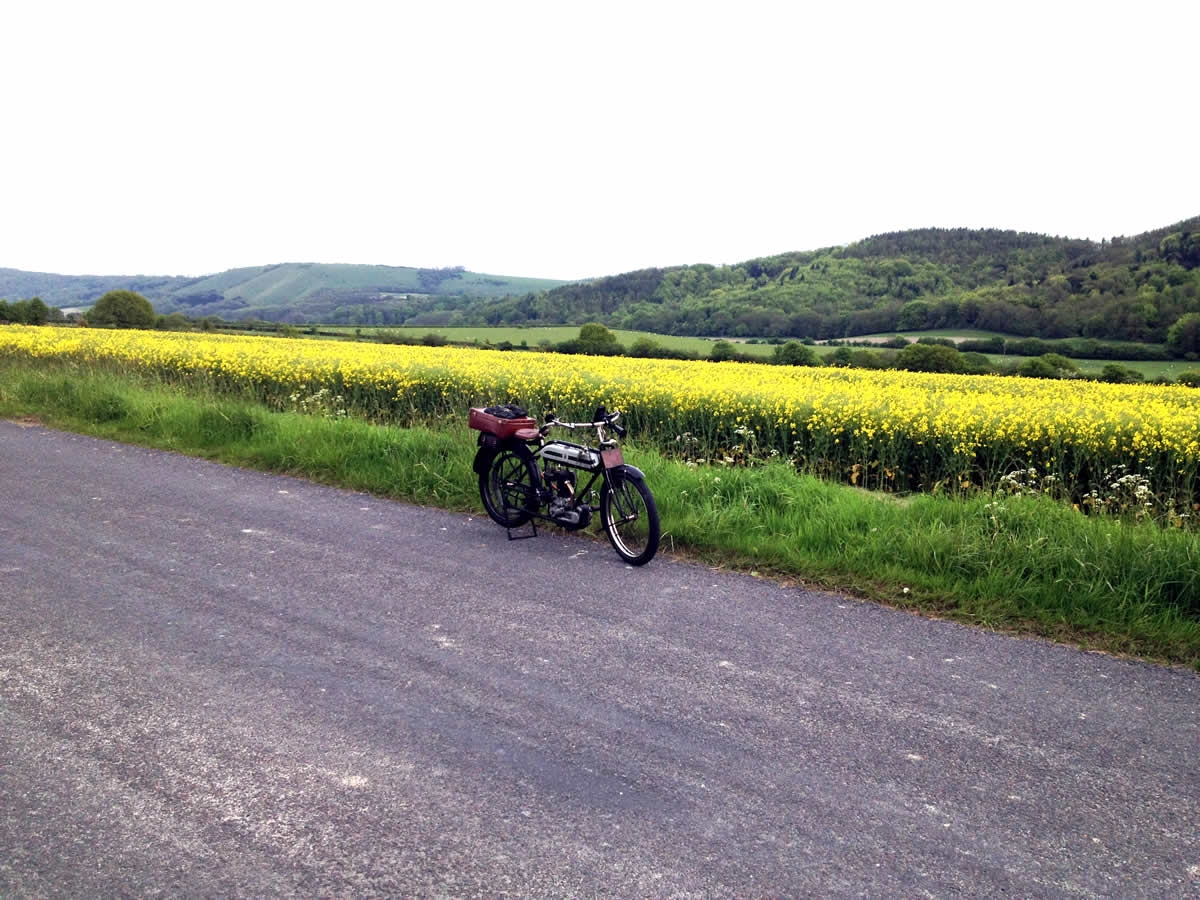
Just south of Harting on the B2146 the road climbs steeply up onto the downs and the sudden increase in gradient (even with a good charged runup) had stopped me the last time I had ventured that way. Today I was going to try and conquer the hill. As I approached it a large herd of racing cylists were chasing up it and a motorcyle was acting as a back marker. As I was "charging" the hill I sailed past the motorcycle and but sadly the same sudden steep section sapped the energy and was too much and we chuffed to a halt some way short of the top. It was so steep that we started rolling backwards and the front brake (instinctively grabbed) did little to slow it and we gently glided into the grass at the edge. I was laughing at this when a the motorcyclist I had just passed pulled alongside to ask if all was well. Yes all was well just the normal antics of a single geared bike and a too steep hill. He seemed reluctant to leave me as we was certain I had broken down, but I turned the bike around and it immediately fired up heading downhill and indeed gathered pace rather quickly with gravity on its side. We headed off for flatter lands with our tale between our legs. We will try the hill again another day. The little lanes were empty and nothing stopped our progress and we took the air. Lots of wild garlic on the hedges and its lovely smell wafted over us and I began to feel hungry. FYI wild garlic is delicious - you eat the leaves or flowers and it tastes of a wild garlicy rocket flavour.
When almost home I caught up an old Dear driving so slowly that I was able to keep up and even had to throttle back at one point as she pulled away so slowly. Maybe she was 98 years old also and just travelling at 1914 speeds. I enter the driveway to my house with a little more gusto than previously and still have enough speed that I need to drag both feet on the gravel and use the brakes and decompressor to avoid running into the hedge. We are home and I take tea and sit outside and appreciate the view.

May 23rd 2012 - 20 miles
With the temperature outside the house topping 26 celcius it seemed a shame not to get out on the bike. A quick check revealed the exhaust clamp ring to be a triffle lose which took a moment to tighten and then it fired up immediately and I let it warm for a minute. You could see the warm weather had made the oil less viscous as on setting "2" it poured through. Down the road and out onto the Sussex lanes and stopped at a good old pub for a pint. It seemed to create much interest, even people with no interest in bikes wanted to hear about it. With the pint quickly downed - it was a hot day - we continued the trip and headed back home for dinner. Another lovely ride out and again pulling well up hills even on such a hot day and indeed it didn't seem to show any signs of suffering from the heat. Todays ride took me past 500 miles on it this year, so at the current rate I should be able to do a few thousand miles this year.
May 27th 2012 - 78 miles
Another scorching day and out for a trip about the Home Counties. After a quick check over with no issues we set off heading west and the bike was in fine fettle and seemed to appreciate the warm weather. I did wonder if the 27/80 temperatures would lead it to overheat but apart from the oil being much more viscous it seemed to have no other impact. I had set out to do a c20 miles loop but the bike seemed to be thriving and it was a stunning day so we just kept going and ended up on the outskirts of Winchester and then turned for home. We stopped on the way back at the biker’s cafe at West Meon for a cold drink and the old thing gathered much interest from those on modern machinery. Of we set again heading east and headed along one of the few bits of main road of the trip, the A272 which is well covered in fine bends and accordingly is a popular place to unleash a superbike. We tootled along it at around 30mph which is a pleasant pace to take in all the scenery. Just before Langrish is a nice tight twisty downhill section and it was here that the Triumph claimed its first scalp. Ahead were a couple of lumbering Harleys and as we had gravity on our side and they seemed to panic at the sight of a bend and slowed to an unnecessary crawl we victoriously swept past the Harleys with a very Triumphal smile inside my helmet.
We bypassed Petersfield by taking to the A3 for a mile and then off again onto small lanes. Almost all the lanes are lined with trees and accordingly we mostly rode in the cool of the shade. We headed to South Harting to have another go at the hill that has so far stopped us before the top. This time we charged the hill as usual and we brought to a stop this time by the belt as it started to slip around the engine pulley. Tail between legs and we headed for home and it was not long before we were having a tea and sitting appreciating the machine.
A quick check over revealed a few items needing attention. The drive belt was well tensioned, but was well oiled and this would explain the slipping. The belt easily came off and was degreased in hot soapy water and hung up to dry. I also degreased the rear wheel and rear pulley. The alloy casing over the timing chain seemed a little lose and so was the exhaust nut so further tinkering will be required.
I have concluded that I am over oiling the bike and will use a little less in future.
June 2nd 2012 - 18 miles
I tightened up the chain cover at its front mounting and all was set for a ride. My oldest friend popped round and so I set off on the Triumph with him following in the TVR out to a quiet lane. We have been mates since we were 4 years old and both started playing with bikes early. We pulled over in a quiet car park and I gave him a run through of how to ride it. With a little push Simon was off on the Triumph and soon got the hang of it with me following in the TVR. The Triumph makes a nice noise that you can hear over the burble of the V8 and the bike scappered along at up to 40mph. Back at the car park Simon seems to have enjoyed his ride and whilst we chatted a few people stopped to chat including a fine looking woman on an equally fine horse. It is the only bike I have owned that attracts such friendly interest from non bikers. I jumped on the bike to bring it home and a few minutes later we were back home without incident.
June 5th 2012
Today I was the designated driver carting around my beloved and some of her girly friends. Between pubs we called around at a friends and whilst they were despatching wine at a rapid rate I sat in comfy archair with a coffee I picked up an old book full of pictures of Midhurst of a century ago. Midhurst has not changed that much in 100+ years. In the book was the following picture of a Midhurst gathering which must be very early into the last century. The bike looks very clean and shiny with just a little mud splattered on the front fork.
I am fairly sure (99%) that the bike is a Quadrant. It looks to be an early one as it has cycle type forks and no number plate, so c1901 to c1904. It must be pre January 1904 as the The Motor Car Act 1903 came into action on January 1st 1904 and required all vehicles to be registered and have number plates fitted front and rear and this bike does not have a plate fitted.
Any Quadrant experts care to tell me more? Update. The VMCC's Quadrant expert has very kindly confirmed that this is a 1903 Quadrant - thanks Eddie.
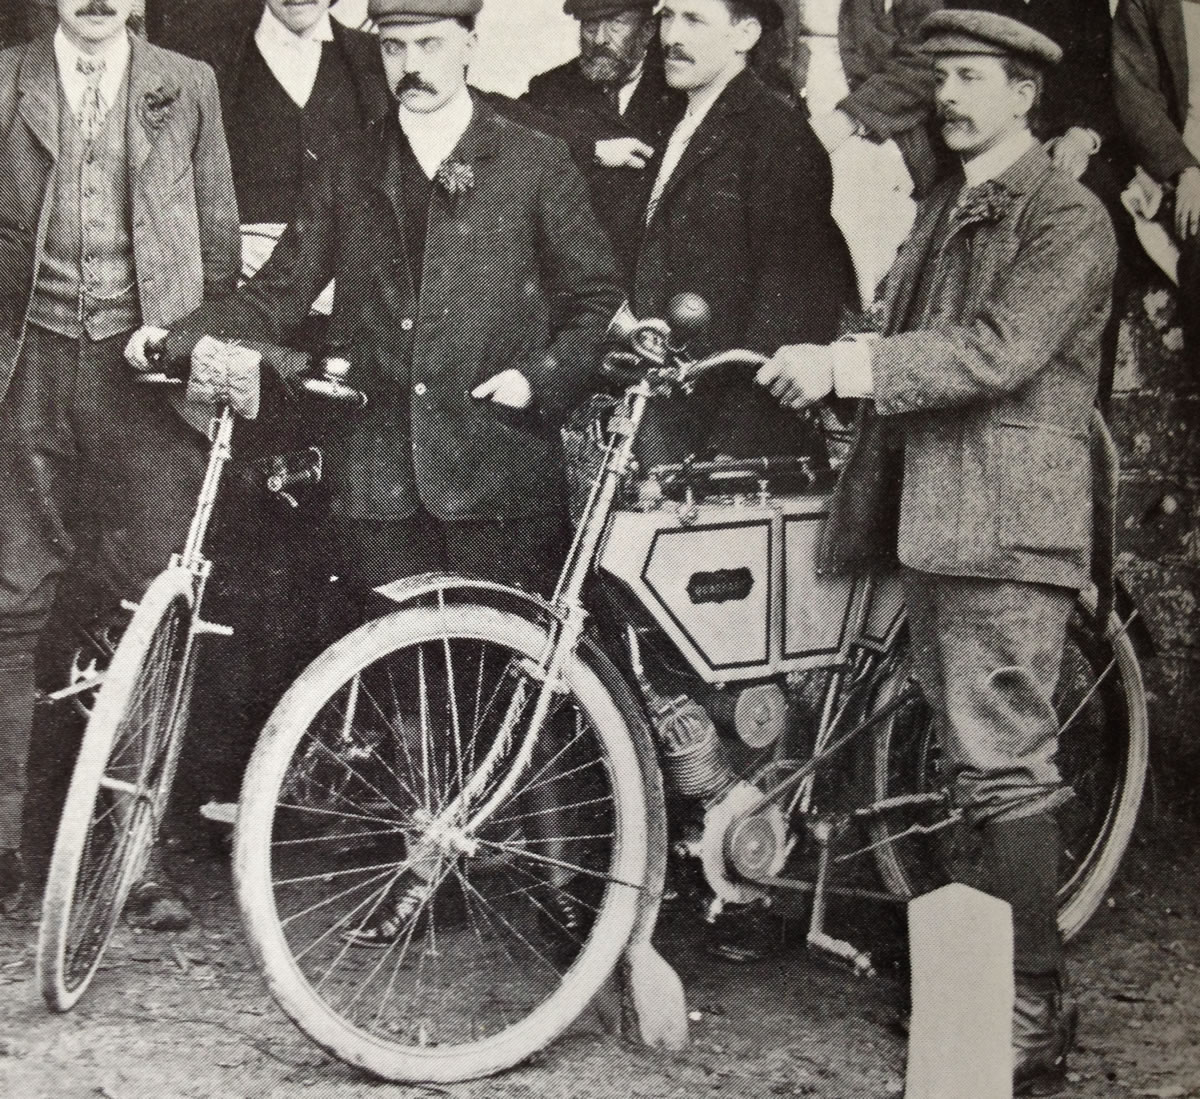
The picture above was taken in Midhurst in 1903 and maybe the bike is still in a local barn! Having done a little digging in the County archives there were two Midhurst residents that had Quadrants at this time. I can see them racing each other along the A272. So the above chap is either Harold Edward Pescod (age 21) or William Ernest Port (age 31).
The 1901 census shows Harold E Pescod at 18 years old living in Midhurst as a Grocers assistant - he must have been well paid or had the bike bought for him.
The same census shows us that William Port is a Butcher in nearby Petersfield.
In the 1911 census both are still alive and living in Midhurst, so their Quadrants have not killed them!
A William Port is also listed a plumber in Midhurst in 1911 renting out boates for the river/canal and seems to have been doing so since at least 1908. In 1912 his boathouse burned down.
My research revealed that the local area was thick with Quadrants at the time, so maybe a local dealer existed as they seem to be the main make in use 1903 to 1905 in the Midhurst region. In the same period only one Triumph was registered and that down in Littlehampton. Seems that a Quadrant was definately the machine to have.
Whilst we cannot be sure where these Midhurst Quadrants were purchased, it seems likely that the local cycle dealer could have been involved and this would have been Holdens of West Street, Midhurst. Below is their advert from 1897.
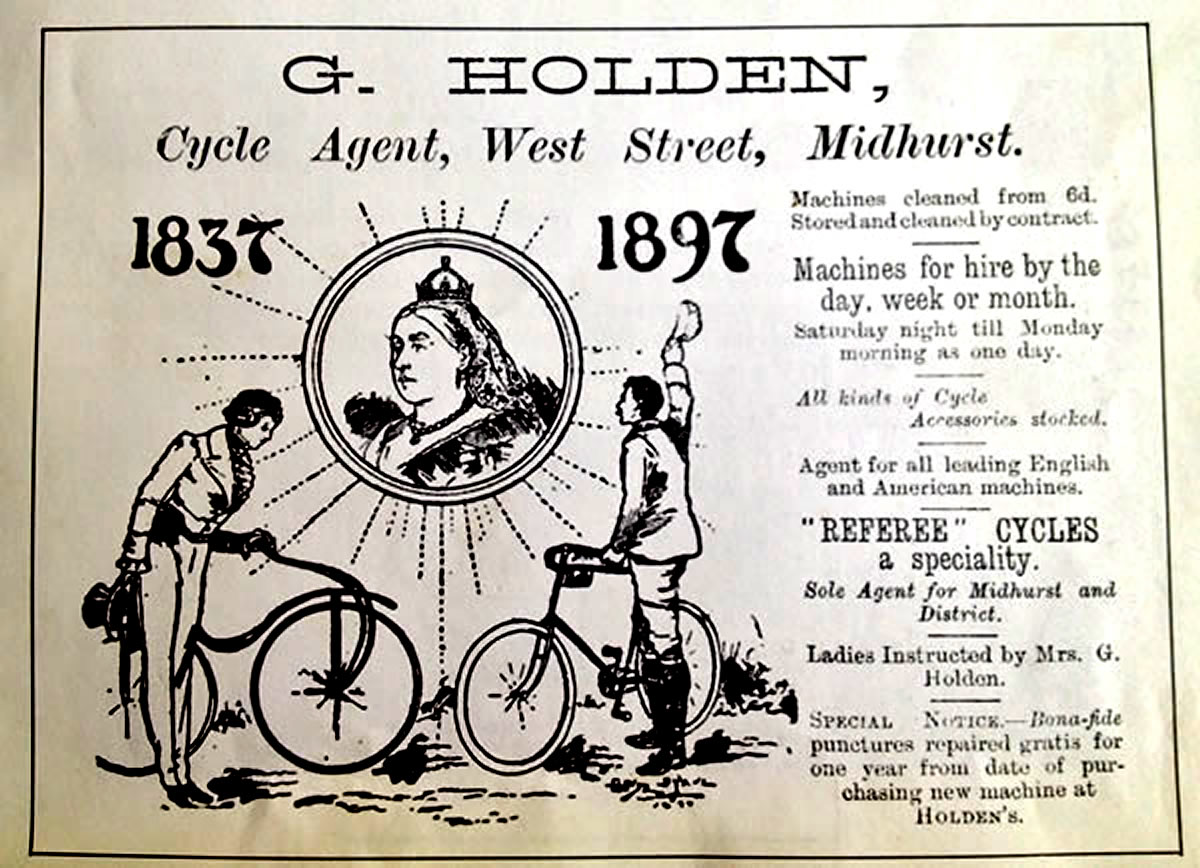
In 1903 Tom Silver rode a bike like this or maybe exactly the same from Lands End to John O'Groats (890 miles) in just 64 hours and 29 minutes. This is an average of c14mph and if you assume that he must have stopped for a sleep etc then the bike must have been able to average 20mph+ when running. The roads at the time were dirt, almost no road signs existed and you had to buy petrol in small bottles in chemists or specialy order it. It must have been quite reliable to manage such a feat. All the more remarkable as a few days before he had ridden up from Lands End and almost reached John O'Groats but had crashed on the "boulder strewn roads" and injured himself and had to stop for a few days to recover.
It was an epic trip and the final words should be those of Mr Silver himself - "Finally, I reached Land's End at 4.29 on the afternoon of Saturday, June 20th, and very thankful I was to receive the assistance of Mr Urry, the official time-keeper, in effecting a dismount." Below is Tom Silver pictured on the left with a 1903 Quadrant and our Midhurst man on the right.
Eddie also sent me the extraordinary account of Tom Silver's 1903 6,000 mile ride across Africa on an identicle machine. A 6,000 mile off road ride across Africa now would be a serious undertaking on a modern machine, so clearly Mr Silver and his Quadrant were tough characters indeed to have managed it almost 110 years ago.
The bikes look to be the same in all aspects, so perhaps the same model year or maybe even the same bike?

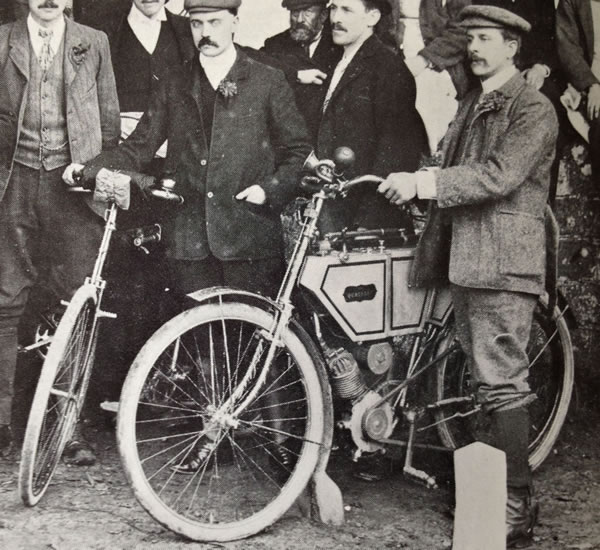
The bike was fitted with a surface carburetter and the exhaust can be seen under it so that it warms up the petrol! Ixion described the Quadrant in c1903 as being unusually reliable and able "romp" up hills.
In 1903 a Mr Candler wrote that his (1903) Quadrant was reliable over 2,000 miles and that it would average 25 mph over good hilly roads, though he seems to have never run it flat out as he says "never yet dared to let it go for all it was worth!".
You can read a full period 1903 road test of various 1903 machines on Leon Mitchells excellent site here.
Anyway its fascinating to see that c110 years ago another Midhurst local was riding around here on the same roads. Perhaps the Midhurst chap was impressed by Mr Silvers and the Quadrants record and thats why he bought it? The Quadrant seems to have been THE bike to have in 1903.
9th June 2012
Have just added pictures of a Triumph Model H For Sale in Hampshire to our For Sale page.
Happy to add any bikes/bits for sale at no charge.

For more pictures of this Triumph Model H for sale see: http://www.go-faster.com/VeteranMotorcycleForSale.html
10th June 2012
Over my breakfast tea this morning I read Albert Catt’s account of his 1910 6 day ride, where he managed to do a total of 1,882 miles and most of it in heavy rain, snow and sleet. Naturally he did this in November just to ensure the weather was truly grim. I decided that the next time it rained that I should not hide away in the dry but take the bike out and ride it anyway.
Before I could ride it a few things to check and sort out. The tyre pressures were down to 30psi and were topped up to 40psi. I topped up the oil tank and popped a little more petrol in as some of it seems to have leaked away from the union with the petrol pipe and tank. This was checked and slightly tightened - I don’t suppose petrol needs much of a gap to get past. The exhaust nut was loose again and the last few times I have tightened it by feel to the point where to go any further might strip the thread. I am gentle tightening it but you do develop a feel for how much to tighten things before they shear. I had read from Ixion (I think) of riders using "white lead" to stop bolts coming loose, but a search on this seemed to show that White Lead was a product primarily created to make a white colour when painting and was a powder, rather than a sticky substance. Maybe white lead also meant something more like solder in the veteran era, as I could imagine using a touch of liquid molten solder on a thread to take up vibration. As a veteran era precedent existed for thread lock, I applied a little Loctite to it and see if that will keep it from coming loose again.
A good check over showed nothing else loose and we were ready for a ride. When I bought my Nutlink belt I was given a can of anti belt slip spray and gave the belt a spray with it as the engine warmed up ticking over.
It was spitting nicely with rain as we departed and headed off down the Sussex lanes and via a long route to my local pub. Now I have not taken the Triumph to this pub before as it is on a steep hill (with fantastic views) and I think the steepness of the road down to it would exceed the brakes ability to stop me. Accordingly I approached the pub from below and charged the narrow lane up to it in fine style and it was doing very well until the extra steep section just outside the pub when gravity overcame horsepower and my ability and we stopped at the entrance to the car park. A quick push and we were parked up with a drink in hand.
The Triumph is just visible in the middle of the picture and my local pub has recently been voted Pub of the Year and indeed it is the quintessential English country pub. It is worth a visit if you are ever out this way, see http://www.dukeofcumberland.com
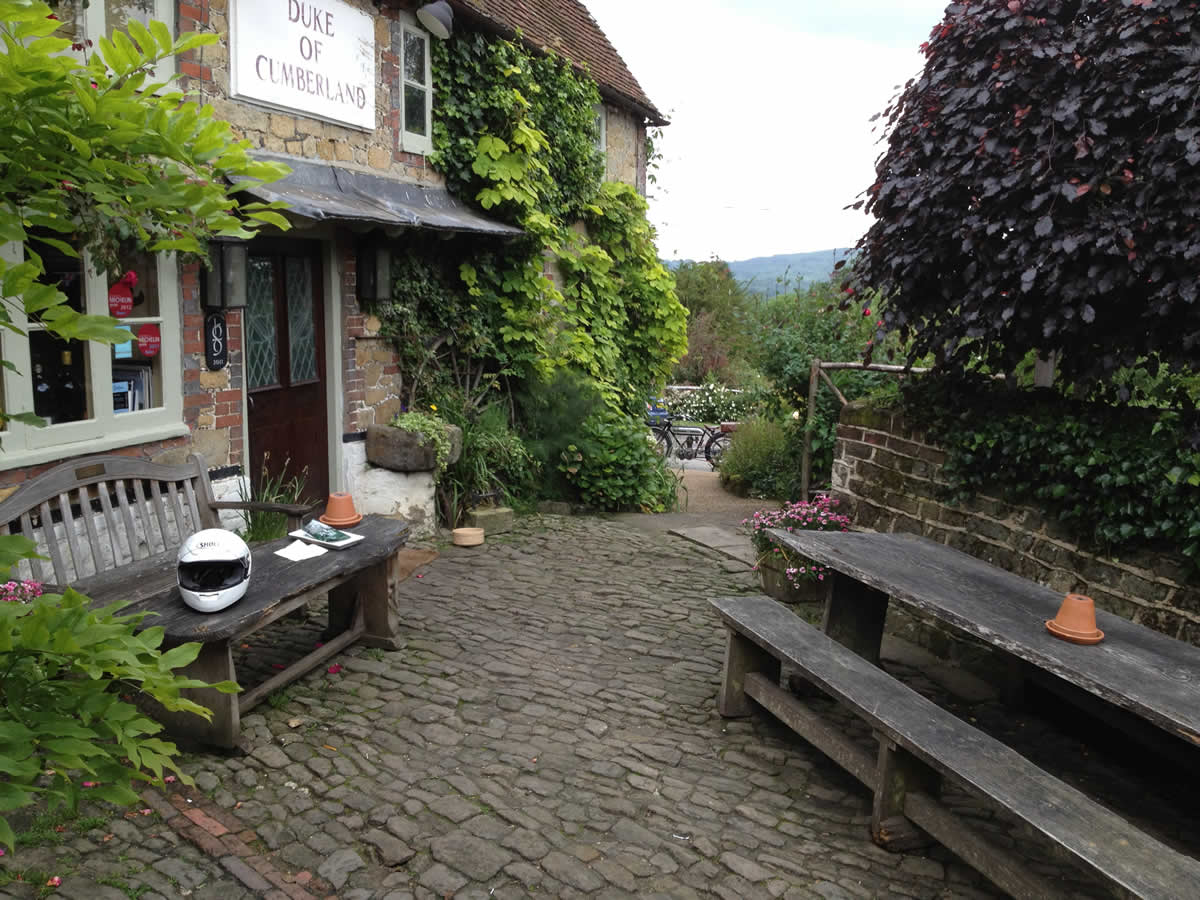
Drink disposed of and bike cooled nicely, down the hill we went with the brake just slowing us on the steepest part of the hill. It is a heart in the mouth moment finding out if the brakes will slow you or whether you will just rush down the hill out of control. It was raining properly now and instead of taking the quick route home we took the long way round and we had no issues. The belt did not slip and no water found its way into the electric (singular – as it only has one wire – the HT lead to the plug!). With gentle rain splattering all over me and the machine I suspect the engine is being pleasantly cooled by the water and we chuff up and down the small hills at the back of the Downs and onwards to home. A new slight clatter of something loose has started in the last couple of miles of the ride, so that will need looking for when I next check it over.
24th June 2012 - 42 miles
The developing clatter from the last ride turned out to be the front stand bolt coming lose and apart from that a few pounds of air in the rear tyre and we were ready for a ride on another sunny warm day. In fearless mode I braved the local high street and stopped in the middle to get cash as Tara had emptied my wallett earlier and I feel odd heading out without real money. The High Street traffic caused no issues and we headed out down the lanes eastward and then north, heading nowhere in particular and just taking the easiest or most interesting turning at each junction. On one occasion with the road heading uphill and a very narrow lane on the right I realised that I would not be able to make this turn safely as if anything was coming and considering the speed I needed to carry to make the turn - I would have not been able to stop. So we headed up past the juction and a killed the motor and turned around and let gravity do its best to start us and we then took a leisurly left into the lane which was a safer bet. This approach is a natural way to ride such a machine as you have to think diferently about turns and routes - makes it all the more enjoyable. The countryside is still very green - helped by last weeks record rainfall and floods and is indeed a very fine place to be motoring along. My heading nowhere imparticular plan continues and we keep roughly in a box bounded by Haslemere, Chiddinfold and Petworth. Normally when I head out I have a destination in mind, but today its just a gentle amble and I am guided by how the road and how the junctions take us - very relaxing. Most of the trip we are just chuffing along about 20mph and taking the scenery and smells and when a sudden steep hill (in veteren terms) appears I get to try a technique I have read in an ancient article. If I had a few more revs the hill would not be an issue and so with a small stream running down the road I ride into it and water splashes everywhere and makes the belt slip and the revs climb for a few seconds and give us just enough extra RPM to clear the hill as the warming belt clears the water and grips again. After an hour or so thoughts of a pint start to grow until when I see a sign for Lurgashall where I know the village pub will be open, we head for it. The Noahs Ark pub ( http://www.noahsarkinn.co.uk/ ) is another classic county pub on the edge of the village cricket green and indeed as we arrive gentlemen are in whites on the green, ladies are respectfully awaiting at the clubhouse for the return of their hero and small flocks of kids are racing each other around the outside of the green on bicycles. Take away the small herd of Range Rovers that are parked up and the scene has not changed for a century. We huff to a stop and get a pint. Like many country pubs it has become a gastro pub, though it still stocks a fine selection of ales and pubs now only seem to survive if they also sell a menu that a century ago would have only been found in Paris. A good place to stop for a pint on a sunny day, though with main courses at £15 a pop a bit pricey for pub lunch - though it does all look very proper.
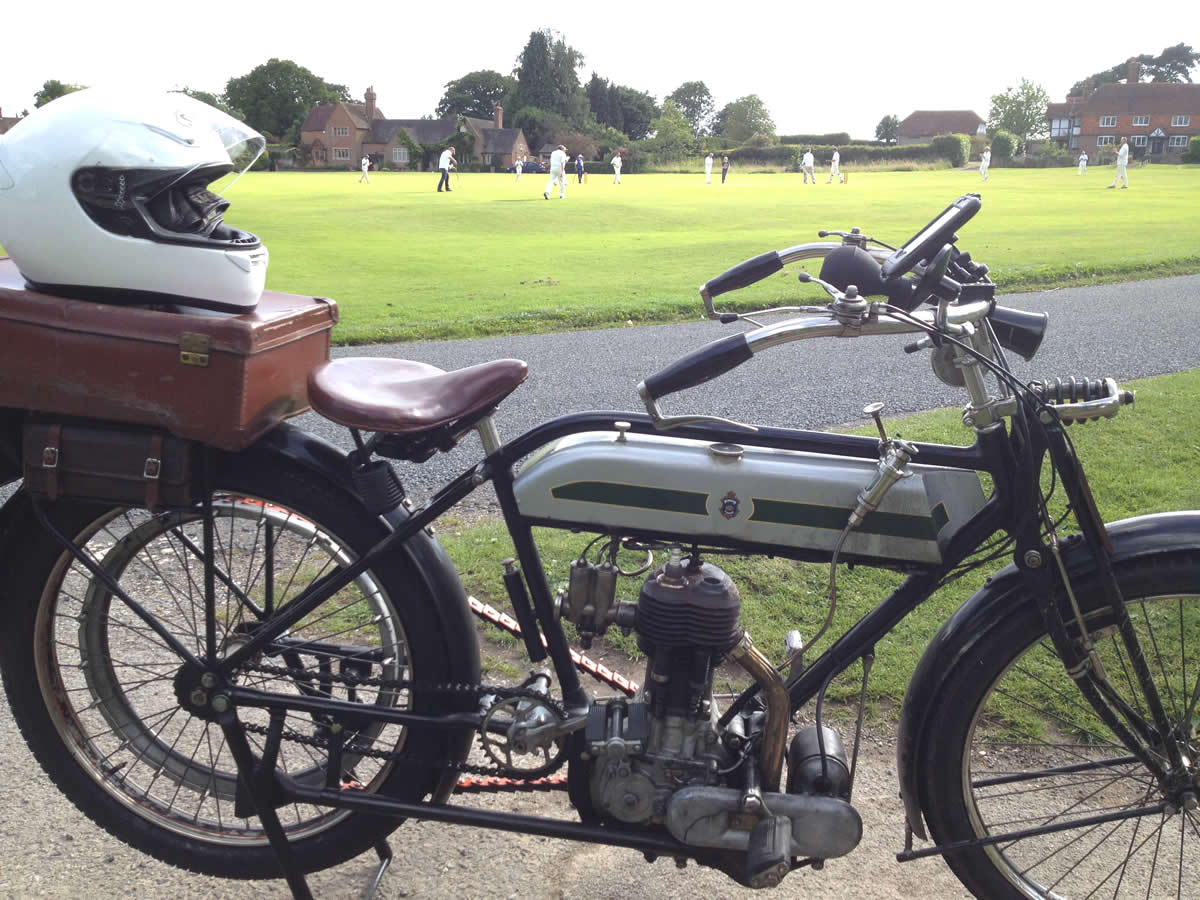
Departing, I start my ancient friend on its stand and let it warm for a minute as the crowds attention is now on this noisy relic and we do not want an embarrassing departure. With the engine stopped and stand clipped away we are ready for the off and couple of little lads stand ready to race me away on their little cycles. They gain the first few yards before the motor catches and we overtake them with a parp on the horn and then head for home. We chuff slowly through the village of Lodsworth and receice a few friendly nods from locals tending to their gardens and then down to the T junction with the main road (A272 - a fine place to exercise a modern superbike). A right turn is what I want to do, but its uphill and so we take a left downhill and head along for a while and do a U turn and head back towards Midhurst. We need to up our speeds for the main road and we do not seem to have quite the normal uumpph and struggle slightly up the hill, maybe its my imagination, but after 600+ miles of riding it I know it better and it does seem a little down on power. If they get too hot then the piston/barrell expansion can rob it of some compression and maybe thats it, but I do not think its too hot so will have a look over it when I get home. The ride along the twisties past the golf course gives fine views of the old castle in the valley below and South Downs beyond. I pull into the petrol station and bump into some friends riding a modern machine of lesser make! As with most modern riders they cant quite take in that I have no gears, clutch, brakes etc., and after a quick chat they are off. The uphill Midhurst High Street is cleared and we are soon home and parked up with mug of tea in hand. A checkover reveals that the exhaust valve clearance has tighted to nothing so I suspect the valve is not closing fully and hence the little loss of performance. When you only have 5-6ish hp (not exactly sure how much it makes), the loss of a pony or two is noticeable. Before adjustable tappetts came along I would be taking a file to the valve to shorten it, but I have adjustable ones on my machine so it should just be a matter of wielding some spanners. As the engine had new valves, I hope that it is just caused by everything just bedding down. No time to check now as I have another task to do.
England are playing Italy in the Euro football championships later and when England play about 20 million English drivers retire from the road to watch from the pub or sofa and our roads become gloriously empty. Shame to miss this rare opportunity and accordingly the Ducati awaits some exercise.
And finally for today, I had always been a bit confused by the hp rating as it applied to veteran bikes. Why were all 500cc bikes rated at 3.5hp when surely some must have been more and some less. Well in the early days the capacity of the engine was not considered as important as the theoretical hp it would make and so a series of hp ratings started at the begining of the century. They were 250cc=1.5hp, 350cc=2.75hp, 500cc=3.5hp, 750cc=7-9hp and then somehow they had 2,500cc engines at 12-20hp. Now before you all shout that no veteran bikes were 2,500cc, a very few special racers were and scary looking beasts they were indeed.
Below is a 1909 NLG JAP monster with a 2,714cc JAP engine with a bore/stroke of 120mmx120mm. The chap sitting on it is its builder and rider, an apparently fearless Mr Will Cook. I suspect the picture was taken before his first go on it as he looks quite calm and relaxed and I would imagine that he might be in a diferent state after unleashing a few minutes later on the Brooklands track.
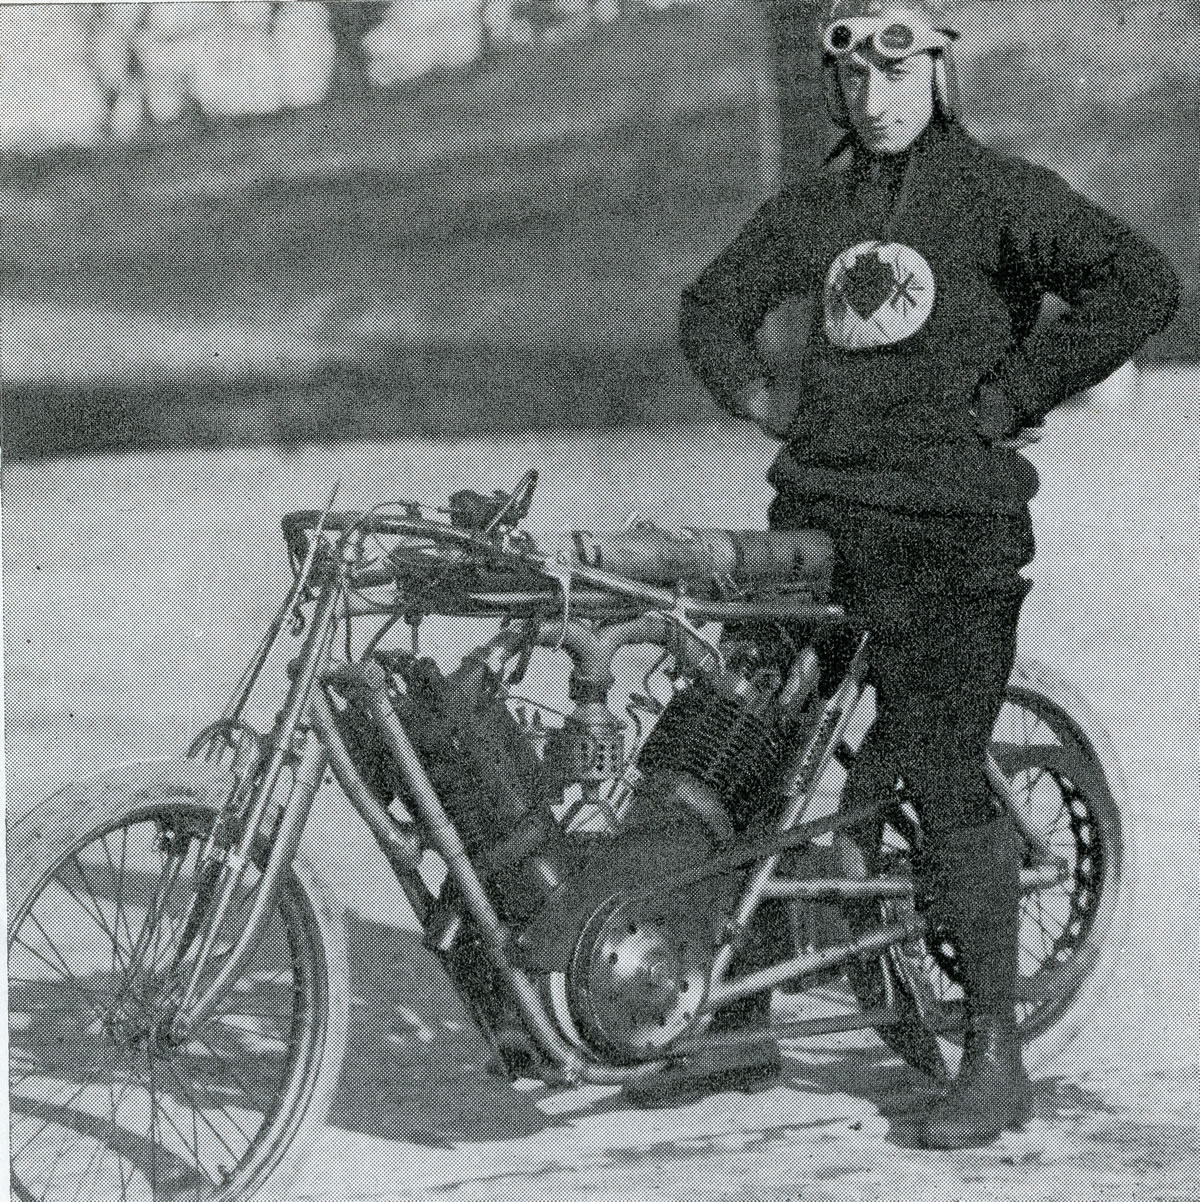
27th June 2012
With the engine cold, the exhaust valve still had no free clearance so it needed adjusting. My Ducati's are very complicated to adjust valves with shims, 4 valves per head, desmo valve gear and everything almost impossible to get at with the engine in the frame, so it was refreshing to do the Triumphs. The tappet comes up from the cam follower and has an adjustable end that then presses upon the bottom of the valve stem. Simply undo the locking nut B and then turn A until the correct clearance is achieved and then tighten up B again. The spanner size was between 12 and 13mm so I assumed half inch. All of my half inch spanners were slightly too tight so after a good search for a spanner that fitted with no luck it was time to create one. I took my most battered half inch spanner and a few minutes with a file and it was a perfect fit. After that it just took a few seconds to adjust the clearance and we were done. The modified spanner has now joined the toolkit for any future roadside valve adjustments.
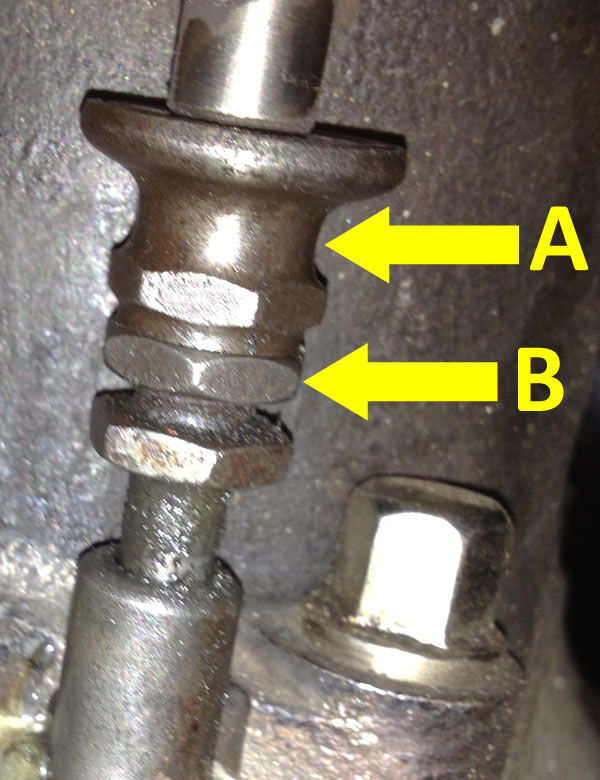
July 8th 2012 - 60 nautical miles
With severe weather warnings and floods plaguing the UK it seemed an ideal English summer’s day to take the Triumph out for a spin. With the valve clearances adjusted already we were set to go, though I removed the fuel pipe to check for any muck and found nothing so put it all back together and we were ready to brave the summer weather.
Sadly most veteran bikes rarely venture out and even less when the weather is grim. My only excuse for taking the bike out today, apart from insanity, is that reading the adventures of the riders of a century ago inspires me to use it in all weathers. The riders of the era seemed to be a hardier breed than today and were not put off in the slightest by grim weather; indeed some riders seemed to relish it.
So with the rain lashing down I turned on the fuel and tickled the carburettor until fuel ran out and with the levers set a swift push on a pedal and it chuffs into life and then settles to a warming tick over for a minute. I then kill the motor with the decompressor and secure the stand and push it to the end of the drive. Rain has already found its way into my gloves – lovely and we have not left home yet. A gentle push and we are off down the lane and head out into the Sussex, Surrey and Hampshire countryside. The rain certainly falls into the biblical category and really stings the face even at just 30mph and for the first few minutes I wonder if the magneto will succumb to the deluge and give up. The magneto is a period German Bosch unit and just shrugs off the water and we keep going. With the valve clearance adjustment we seem to be back to the normal healthy power output and power up and down the local hills as we snake our way westward towards Winchester. I didn’t really have a destination or route in mind and just picked whichever turn takes looks best and was possible to make. Turning left was popular, though with a bit of juggling we managed a few right turns and was only forced to stop twice. Once when we came up a hill with a sharp T junction at the top and no way to see if the road was clear and we had to stop. The second stop was another T junction when I had to stop to see if the road was clear. Apart from these I was pleased with my progress and after an hour and a half it was time to turn and head for home. The rain was now intermittent and even bits of blue sky were spotted briefly through the gloom. Water had now trickled into every place that a motorcyclist expects to find it, but as it was a warm day it was not too unpleasant. The roads I choose were mostly B roads so empty of traffic, soaking wet and nicely covered in mud and muck. With numerous mini streams flowing onto the lanes the engine had a near constant supply of cooling water splashing over it and this seemed to keep it cool and in very frisky condition. It easily powers up any hill we encounter. When I first started riding it I was a little concerned about what would happen if it couldn’t get up a hill – this because I was thinking like a 21st century rider and have now adapted to an early 20th century riders mindset. The more I read about the adventures of riding over a century ago, the more I appreciate that routes of the era were defined by the lack of hill climbing ability and by the riding style required when you have no gears or clutch. So now I don’t worry about not making a hill as if it stops me then I can just turn around roll down it and start it down the hill and try another route or have another go at the hill. You just need a more relaxed approach to the journey and not get too attached to a particular route.
The most exciting part of the journey is approaching and is both caused and cured by the weather and I am now in the same proverbial boat as Moses as both of us have been saved by a flood though no Romans were chasing me at the time. I have just climbed a long steep hill and given the engine plenty of oil and as I crest the hill at a fair speed, a stream is running off the fields onto the whole width of the road, its yellow in colour as its dragging sand or clay or something with it. I splash into it and as the hill steepens even with an almost closed throttle, gravity is still accelerating us down the hill. When the brake is wet it takes a few rotations of the rim to clear the water and for it to start to work but on this occasion nothing happens and despite all my efforts being applied to the brake pedal we still seem to be accelerating. The decompressor is pulled and the hill humorously steepens to counter this and we seem to be gathering speed and on a runaway machine – I have heard the expression “my heart was in my mouth” and indeed I do have this unnerving odd sensation as I start to consider running it into a ditch as the road ahead steepens further and a left turn looms with no clear view of what awaits beyond it. Perhaps it’s better to run into a ditch here than maybe face an oncoming car in a few seconds. The mind works very quickly when faced with peril and I seem to whizz though numerous scenarios with all options of stuffing it into the hedge abandoned as I don’t want to damage the bike!
We charge the bend and my left foot comes off the brake pedal ready to maybe control a slide and we take the corner at speed and the bike squirms and slithers about as it crosses the mud and ahead the road is almost completely flooded as it’s the bottom of the hill and all the flood water is gathering. Only the middle of the lane is visible through a few inches of water and the sides are deep in yellow water, instinctively I point us at the drier bit and then at the last moment swerve us into the deeper water and as we enter it murky water sprays everywhere and for a second or two I can see nothing, maybe I have closed my eyes or maybe it’s just the spray but the drag of the deep water has done the trick and has really slowed us down. We are still just moving and miraculously the engine is still running as sweetly as ever and I open the throttle and we gently climb the hill ahead. I time it so that we just stall to a stop on the top of the hill as I don’t want a repeat performance on this hill as I have concluded that my brake must have failed in some way. I just sit on the bike for a few seconds with my heart thumping away and then get off to see what has broken. If ever there was a moment to savour a cigarette then this is it and thankfully my Zippo sparks into life and I enjoy a Marlborough moment.
The last time I really frightened myself on a bike like this was on a Ducati on a Swiss mountain road near Davos, when I misread a bend and only just avoided plunging off the side of a mountain – I would have had a few seconds of free fall contemplation before impact!
The Triumphs brake mechanism is all still as it should be and is just covered in yellow mud. When I start to check it over I can feel that the yellow mud has the consistency of slippery wet clay and the back of the bike is coated in it. I conclude that when riding in the clay filled water that flowed down the hill it had the perfect slimy consistency to render the brake continually useless. The constant supply/spray of it seemed to be enough to stop the meagre brake from clearing the small braking surface. I clean the clay away with fingers, sticks and leaves and wash some of it away with the nearby brimming puddles until the brake rim is clear of it. With the bike on the stand I fire it up and try the brake and in a few rotations it has cleared itself and starts to drag the engine to a stall so my brake is working again.
The rain has stopped and all around the birds start singing and it suddenly seems a lovely tranquil place. Another smoke seems appropriate to take in the atmosphere. A cup of tea would go down a treat, maybe a thermos needs to be added to the riding kit. In period accounts they seemed to favour a glass of hot Brandy in such circumstances. On go the soggy gloves and we set off again for home at a reduced pace with a careful eye looking for any further zero friction brake lubricants. The next few hills are crested at a more gentle pace in case some more further brake disabling floods are awaiting me, but the rain has now died out and three hours after setting off we arrive back home. The bike gets hosed off whilst the kettle boils and then I sit with a mug of tea and appreciate the fine machine. I am not sure exactly how many miles I have covered today as the route was a bit random, but it must be a good 60 miles. The bike ran perfectly and the failure of the brake was just a weird fluke, though still a bit alarming and another experience to add to and watch out for on future rides.
Below is the fine English summer weather in all its glory.

July 22nd 2012 - 28 miles
The sky was an unusual colour - Blue and an unfamiliar orange object was glowing in the sky. Turned out that it was just a sunny summers day. Headed off to Stedham for a Sunbeam MCC ride which is only a few miles away. Stopped at the pub for coffee at 10.30 and bumped into a few people I had exchanged emails with but had never met including Baz. A good group of friendly people. A mix of modern and old cars and bikes were parked outside the pub. The official route took in some scenic A roads and I took the little roads as I try and avoid A roads as they are not so much fun on a veteran. I seemed to arrive first at the Hollycombe Steam Museum and looked around a fine display of machines even more ancient than the Triumph. If ever you are starting to think that your shed full of old bikes is starting to become a tad obsessive, then take a trip to Hollycombe. Here you will see that a few small bikes is a minor hobby compared to huge Traction engines the size of houses!
Below is something that is slower, oilier and even older than the Triumph - impressive bit of kit though.
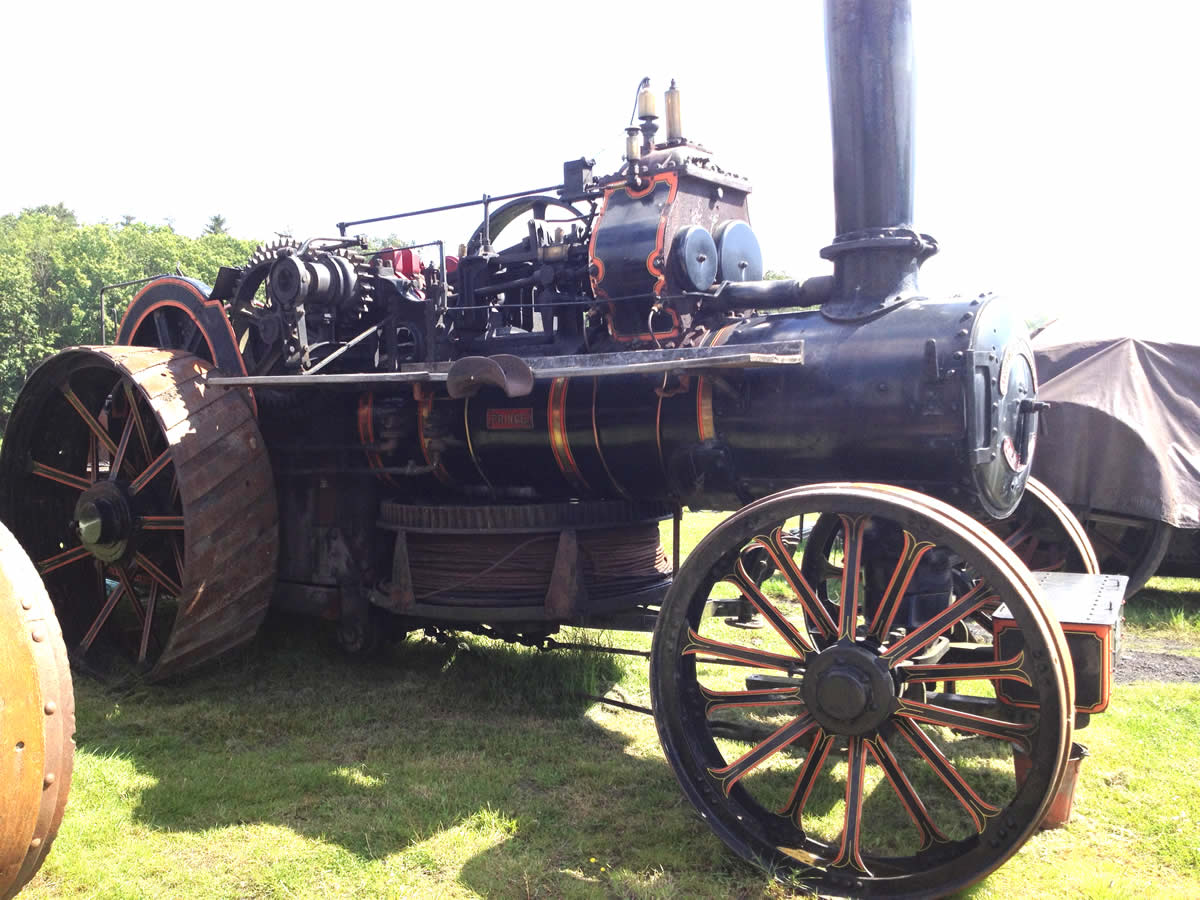
After a look around I headed off to the pub for a pint via the local lanes. The Duke of Cumberland was the destination and it sits on a hillside and the last time it had got us to the steepest part and almost into the car park under power. This time as we approached the final few yards up the steepest part of the hill the belt started slipping but still drove us forward and with the slip not getting any worse, it acted sort of like a slipping clutch and we chuffed into the car park. A quick inspection showed an oily belt was the reason for the slip. Pint consumed were headed back down the hill and home via Fernhurst and Redford. A bicycle event was in progress as the roads were full of fit young ladies in skin tight outfits. As they were travelling almost as fast as the Triumph and an overtake could take a minute I had plenty of time to take in the view.
I was baulked at the left turn onto the A272 and so took the slightly downhill right option and head back down to Stedham for an easy U turn and home, still in glorious sunshine.
The belt was removed and degreased and hung up to dry. The front wheel was loose and needed the spindle nuts tightening. The priming tap was slightly loose and needed tightening. I also needed to adjust the decompressor and then checked every nut and bolt and even gave it a quick clean. Overall maintenance time seems to be about a quarter of riding time. It was a pleasant day to be riding it and to sit and tinker.
Many thanks to Neil for organising the Sunbeam MCC event.
26th July 2012 - 25 miles
A very hot day and a friend pops around on a very fine Vincent Rapide to sample the Triumph. I ride it out to quiet lane and give him a quick talk through the controls and off he sets. I get to ride his Vincent - something I have wanted to do since I was a kid. The Vincent is lovely. After 10 miles or so we stop and sadly the Vincent wont start and after much kicking a recovery truck is called out. Later turns out the battery has gone flat. The Triumph fires up and brings me home.
4th August 2012 - 25 miles
Another toasty day and my cousin Steve pops around on a modern machine and I take the Triumph out to a lane to let him have a go. A couple of minutes of instructions and I push him off for a tootle down the lanes. He enjoys the ride and we have another convert to the pleasures of riding a veteran Triumph. I rode it the last bit home and noticed the belt slipping slightly under load on uphill sections. When we arrived home I checked the belt and it was not overly oily and perhaps a little slack, so off it came and I took a link out - the first one in almost 500 miles on the belt.
12th August 2012 - 48 miles
Today is the 50th Graham Walker Run. It starts at Bealieu Motor Museum in The New Forest and then does a c40 mile loop back to the start. I live about 50 miles from the start so I going to ride to and from the event. The bike is thoroughly checked over and off we set at 9am on another sunny morning. We head West along the A272 at a steady 30mph with herds of Superbikes screaming past at three, four or more times my speed. I am taking in the views and enjoying just gently chuffing along. We pass Petersfield and continue along the A272 until we reach West Meon and a take a left onto the A32. Near this junction is a "bikers" cafe and I get a few waves as I chug past going uphill. The engine is running very well and makes light work of the hills as we we glide gently through the pleasant green land. We have worked out a route that will suit the Triumph and should get us there in about two hours riding. This road follows the course of a small river with ponds and flooded areas growing watercress and probably a good spot to get a good trout. We continue until we reach Corhampton and take the right turn onto the slightly smaller country roads of the B3035. As this is about halfway I had planned to have a quick stop and check all was well. When I pull the decompressor to stop the engine the lever moves without any resistance and the engine continues to run normally. I close all the levers and we gently coast to a stop. The decompressor cable has snapped and not at either end as I am carrying screw on nipples to hopefully fix such failures. With the cable broken in the middle, neither half is long enough to reach from the lever to the mechanism so I am scuppered. Perhaps if I was a bit more switched on mechanically or had more spares I might have been able to fix it at the roadside. You need the decompressor to start the engine and to stop it so I may not be going any further. I reluctantly decide that it will be foolhardy to try and continue on to the Run as I have many traffic filled roads and junctions ahead and I am not even sure if I can start it. I turn it around and after an epic push the motor catches and we chuff off for home. Without the decompressor I have to slow it entirely with the throttle and still instinctively keep pulling the broken decompressor lever each time I need to slow. The traffic is kind to me at the junctions and I avoid having to stop and we are soon back on the A272 and heading East and home. Each approaching junction is even more of a challenge than usual and after passing Petersfield I have only two hurdles to stop be getting home. At Trotton is a narrow bridge over the river Rother with traffic lights and a red light will force me to stop. I approach very slowly and get a red light but approaching the lights at not much more than walking pace works and the lights change and just clear the bridge. The final challenge will be the right turn into my lane. The gaps in the traffic are well judged and we make my lane under power and arrive back home just after 11am. I have nothing to fix it at home and after a coffee decide that I still want to go to the Run, so pull out a Ducati and blast down to Bealieu. The Ducati makes short work of the trip and we arrive soon after noon. It is a really lovely gathering of many fine machines in a great setting with a great leisurely atmosphere. Most of the bikes are in fine oily used condition and I get to meet and chat to a few more people, including a fellow owner of a 1914 Triumph. Hopefully I will make it next year.
Below is a pic of the Ducati. It is a 1992 SP4. In 1992 it was the quickest machine you could buy and Ducati won a series of World Superbike championships with similar bikes. Since I bought the Triumph I have hardly ridden it, so with the downside of the broken cable came the upside of giving the Ducati a good blast.

I took a couple of short videos at this fine event. The first one is a lovely 1902 Clement-Garrard with a rider in suitable attire, see - 1902 Clement-Garrard Video
The second video is of Noel Whittall setting off on his 1918 Triumph. Noel is famous for his epic trips on ancient Triumphs and for his excellent book "A Stupid Thing to Do!: A Meander Up and Down England and Scotland by an Old Bloke on an Even Older Bike" available at Amazon here.
You can see the video here.
August 13th 2012
In the post this morning arrived a letter confirming the Triumphs entry into Brighton Speed Trials and its competition debut! Saturday 8th September 2012 will see the Triumph smoking down the quarter mile!
August 2012 - about 120 miles
Numerous rides in the month to nowhere in particular, most little 20 to 30 mile jaunts down the local lanes. The only notable outing did not go to plan. I had more hassle from my repaired decompressor cable. This time the nipple on the lower end of the cable pulled out of the mechanism. As the mechanism seems to be solidly made, an attempt to close the gap by squeezing it shut with pliers got me nowhere. I needed to fit a larger nipple or made the nipple larger (all this talk of nipples will be cause Google to send me some unwanted and confused visitors!). I managed to start it (just) without the decompressor working with a physical effort that should have got me at least a Bronze medal and stopped at the next petrol station as I am keen to learn how to fix it when it misbehaves. The modern petrol station has twenty types of coffee, but not much to help with a mechanical issue. Then a moment of inspiration and I buy a pack of bullet type electrical connectors. Foolishly I have left all my tools at home and just have a Leatherman type multitool on me. I cut off the part of the bullet connecter that you would connect to a wire and hang onto the little hollow bullet shaped bit. I then get a blade into the join that runs the length of the bullet and widen it. With a little fiddling this now fits over the nipple and it is now much fatter and does not pull out of the mechanism. A roadside repair that my father would have approved of. We are off in a few minutes and stop for a celebratory pint on the way home.
September 2012 - the first week - c35 miles
Out on the Triumph every day testing something. Lots of short rides of under 10 miles.
September 8th 2012 - 4 miles total
Today is the Triumphs race debut at Brighton Speed Trials!
I have created a page all about my adventures, see Brighton Speed Trials 2012
I keep a log of my miles and at Brighton I passed the 1,000th mile I have ridden it since I bought it.
September and October 2012 - c80 miles
I managed a few small trips out after Brighton and after one run I was checking things over and discovered that the handlebars were about to come away in my hands. Where the bar mounts to the stem the braze had failed and was an accident waiting to happen. I stripped everything from the bars and off they went to my local engineer, where for £5 they were fixed.
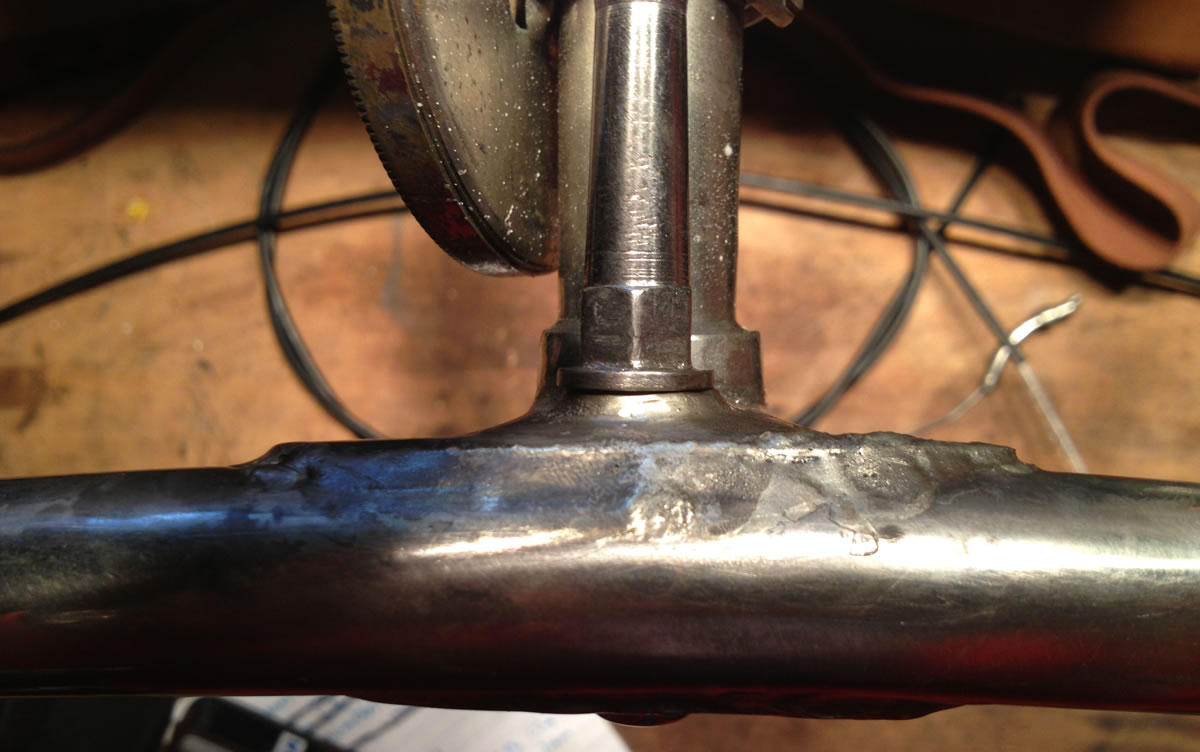
The bodged up decompressor cable had to come apart so I decided it was time to make up a proper new cable. As I didnt have any material to make up cables, I had to order up various ingredients to make one.
I bought most of the cable parts from a British company that has been around for as long as I can remember - Venhills. They supplied all of the cables (inner and outer) and cable ends and nipples. I had to buy the solder, flux and solder bath from other places. My father had showed me how to make up cables when I was a youngster, so I knew how to do it properly and it was then just a matter of measuring cable runs and cutting cables to the correct length. On the Triumph the nipple of the handlebar end wont pass right through the bars so the first task was to add the nipple at this end to the cable inner/wire. Degrease the end of the cable and then open up the strands (bird caging) to ideally ballon the cable end into a mini ballon shape so that it will press against the nipple and when the bird cage/ballon is full of solid solder it will not be able to pull through the nipple. Clean the cable end again and push the nipple gentle up against the birdcaged end and dip into flux for a final clean. Trying to melt enough solder in one go with a soldering iron is unlikely so for not much money (about £12) I bought a electrically heated solder bath into which you put solid solder and it melts it down, so that you end up with a pot of melted solder. Dip the nipple and cable end into this solder bath and the whole thing is covered in solder and once removed the solder cools and hardens very quickly. Let it completely cool and then inspect it, clean off any excess solder and test its strength. If all is well then make up the outer cable to suitable lengths and feed the cable down from the handlebars to the decompressor arm. It was an enjoyable task.
November 2012 - c40 miles
The weather has not been on my side much for riding the Triumph, but I have managed a few short rides out in the damp and gloom. On each ride it has behaved itself and no issues or fixes required! I have reread an old book of my grandfathers from 1911 which had a few hints for riding these machines and aim to try them all out and report back.
December 2012 -
When I first started riding my Triumph, I read some period accounts of the yoke/bracket around the front suspension spring breaking with disasterous results.
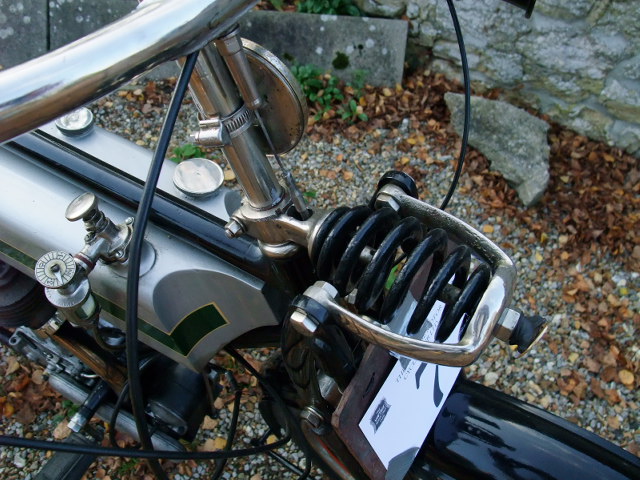
In The Great War, despatch riders would fit a leather belt around the fork and frame/handlebar stem so that if the yoke failed, disaster would be averted. I had not fitted such a belt as it seemed only under extreme offroad WW1 despatching that a spring might fail. Well a friend in South Africa had his yoke fail recently and so I am going to add a belt. Having looked all around our house, I do not have a suitable belt so I need to buy one. In the era it would have been an easy visit to a local saddler to get a belt and I shall be doing the same. Luckily I live in horsey part of Sussex and I have had a few local saddlers suggested to me. I will get one made up.
January 2013
The 1st of January started with a blue sky and with a hint of hangover the Triumph was pulled from its resting place in the garage and checked over. A bit of air in the tyres and it was ready for a ride. My leathers seem to have shrunk so some more healthy eating may be required after the food and booze frenzy of the last couple of weeks.
A traditional New Years Day gathering of old machines (mostly cars) takes place every year at a local pub, so it was only a 6 mile hop to the pub and the cold fresh air blowing in the face did a good job of blowing out the cobwebs.
Apart from the Triumph, there was a very nice 20's Sunbeam complete with all sorts of modern equipment like gears, clutch etc. I like V twins so below are a few pictures of 1920's Morgans with big V twin motors. I am not sure what the engines are, but if you know then do tell me and I will update the page.
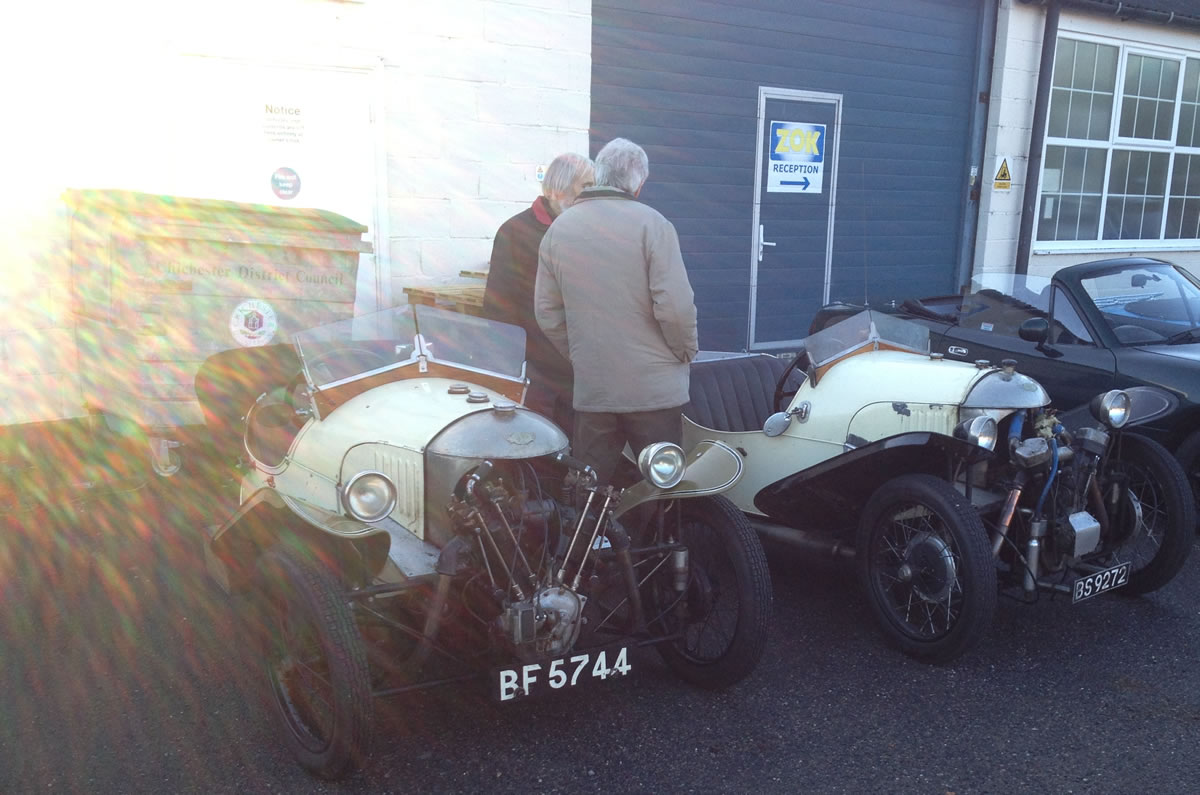
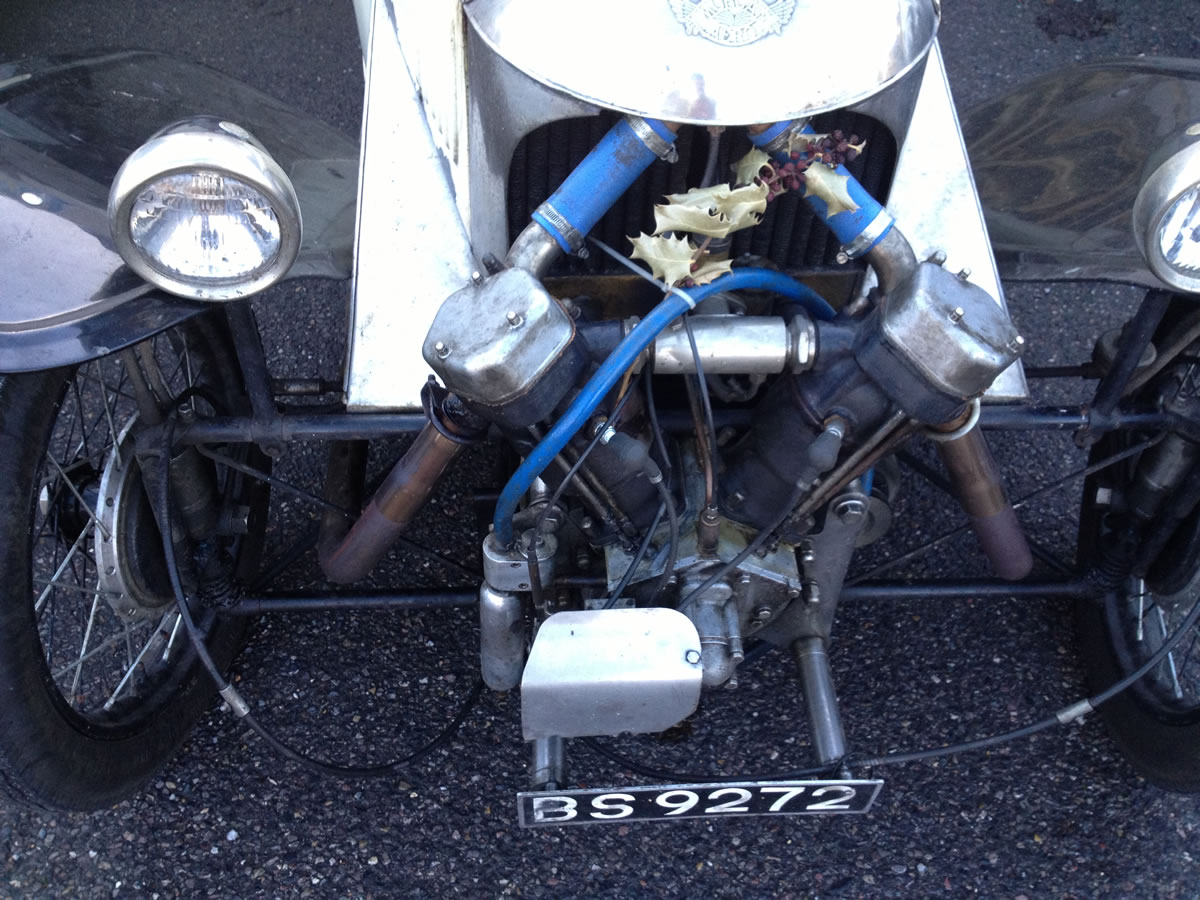
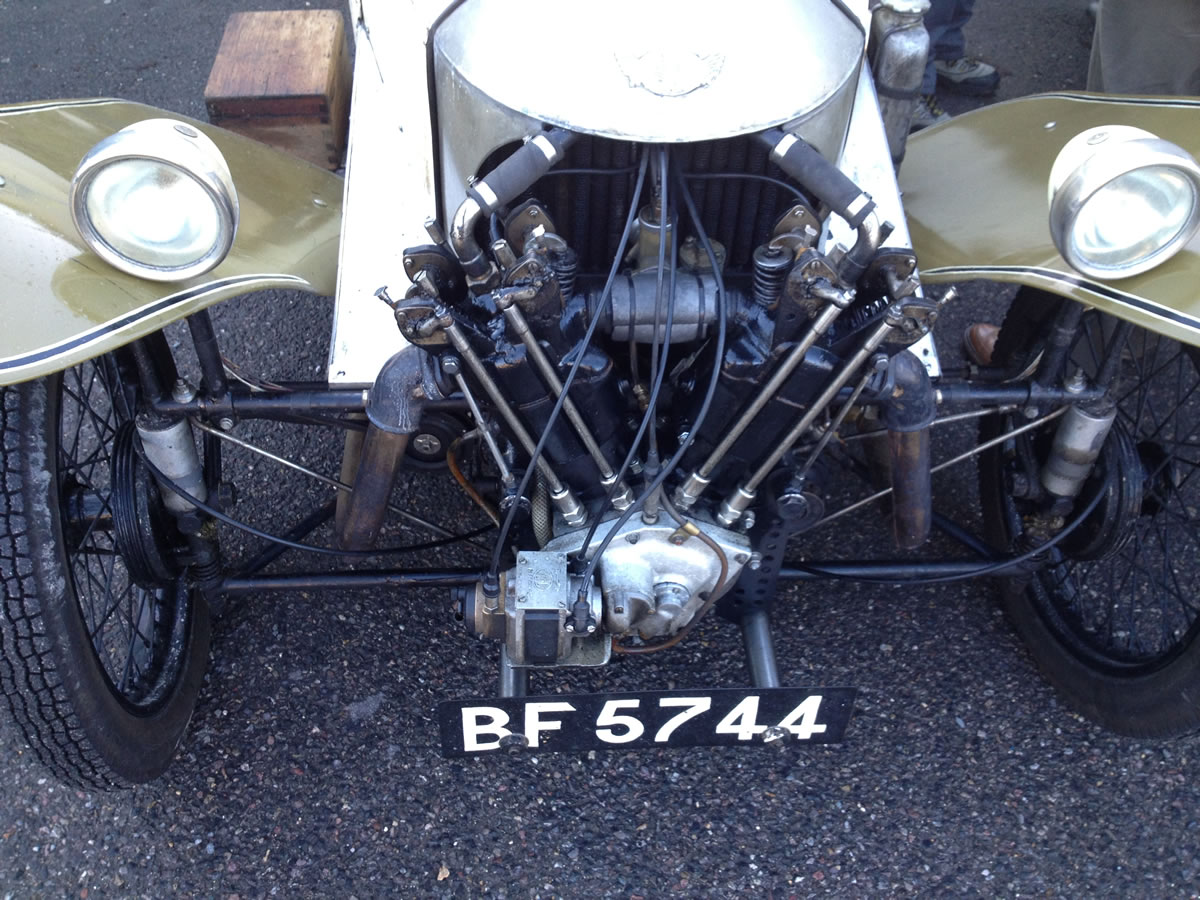
With all the shiny Christmas decorations being put away, the house always looks a bit dull for the first few days and to counter this I bought something shiny for the Triumph. I do not yet have lights on the machine so the first step was to buy a reproduction lamp bracket. It came from ebay for 30 pounds.

I have sent off my entry for the Banbury Run. I have not ridden in this event or even been to it before so it will all be a new adventure. I thought I would ride to The Banbury, do the event and then ride home. The event is about 120 miles away from me, so a 240 mile roundtrip is do'able with about 9 hours in the saddle! However the regulations seem to want you to stay at the event until 3 or 4pm to get your finishers award. If I leave at say 4.30pm then it will take me 5 hours to get home and by then it will be dark. Just as I was pondering this I had a phone call from someone looking to part with a motorcycle trailer and I think that is how we will have to go to The Banbury.
In my previous ramblings, I have mentioned trying to get up a hill near Harting. It now transpires that this is a famous motoring hill. From 1905 The South Harting Hill Climb was a major event that was widely reported in all the motoring press. If 1905 cars could get up it then I must have another go at it, though I think I will need to alter the gearing first as the Triumph is still on its Brighton Speed Trials sprint ratio ... and I am still waiting for the Guiness records people to reply to my record request.
We have now had a good dusting of snow about 15cm deep and when I was a kid this meant getting out a bike and going for a play. I must have got old in the last few years as the last few snowy years only inspired me to go for walks and play in 4x4's and the bikes stayed snug in the garage. Whilst most of my other bikes are not suited to snow with too much power and fat tyres and my enduro bike (a Husaberg) is not on the road, the Triumph however seemed do'able. It has low power and small tyres. The large roads had been gritted and mostly clear of snow but the little ones were still covered in snow and ice - not ideal riding conditions but worth trying!
I suspect I am the only person to be stupid enough to be riding a veteran bike in the snow today and whilst the ride was short, I returned home without falling off or any misbehavior. Riding on fresh uncompressed snow was OK and only a slightly loose feel, the unpleasant bit was the ridges of ice from the cars compressing the snow. This made the bike tramline and wonder all over the road, enjoyable only due to the adrenalin it released as we squirmed about. The most tricky part of using it on ice/snow was starting it as my feet slid about trying to get up to starting speeds. The engine ran perfectly and the low power of the brakes was a great help as lockups were less likely. If we get more deep fresh snow later this winter I think I will try a longer run on it as the riders of a century ago were not put off by snow. Maybe our health and safety mindset has taken too much fun from our lives and for me childish snowy motorcycling is back on the to do list. It is scary though!

Below is a 1914 Triumph engine that now lives in my garage. It is a May 1914 500cc engine. In 1914 all engines were by default 550cc and 500cc engines were special orders for the TT models to keep to the 500cc engine size limits. Probably not many 1914 500cc engines exist. I intend to build it up into a TT racer type machine. All I need is the rest of the bike.
The engine has been completely rebuilt with new: Mainshaft, crank pin, big end bush, small end bush, tappetts, valve guides, inlet cam wheel, valve springs, new piston rings, valve caps, exhaust nut, screws, main bearings, cam followers and rollers. It is running standard size bore and with all the new parts it is as close to a new engine as you can get.
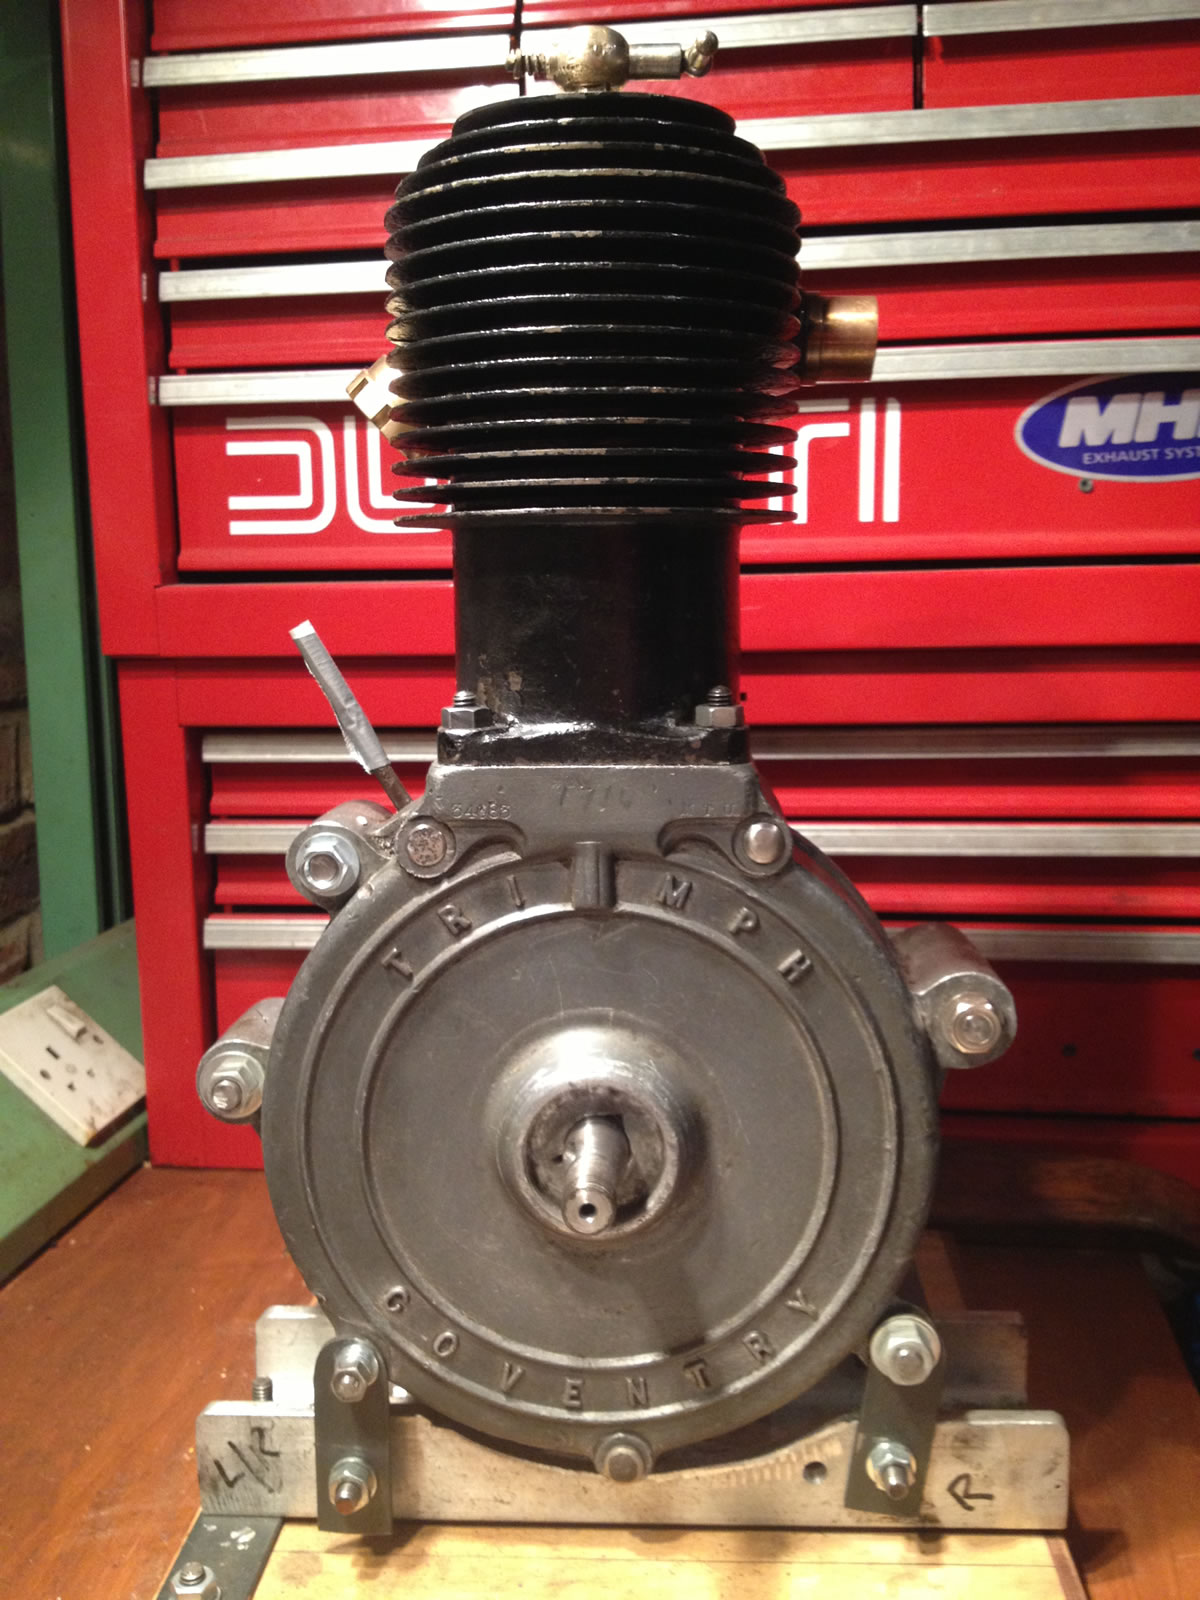
February 2013
A few bike riding friends popped in to say hello and after a coffee they were ready to sample the Triumph. A quick check over and all it needed was air in the tyres and it was ready for a ride. I think they were all a little surprised that it started instantly and after a minute or two to let it warm up I was off down the lane and out onto some quiet country lanes. We stopped and I gave them all a few minutes on what all the controls do and how to ride it. Then with a push the first lucky rider was off for a 5 mile scamper on it. All went well and he was pleasantly surprised by how nicely it went, maybe another convert to veteran motorcycling. Next up was Jenny who although she rides and has raced a Ducati looked a little nervous and was visibly shaking! So we had a 1914 Triumph making a young lady literally weak at the knees with excitement! She set off in fine form, but I had forgotten to tell her not to hold the bars too tight and it all looked a bit wobbly and she did very well to keep going up and down dale along the Sussex Downs. Five miles later her ordeal was over and it was apparently the scariest bike ride ever! The next "victim" for the Triumph was a lad who has only been riding for a few years and he got on with it very well and seemed to very much enjoy the experience. After everyone had had a go I rode it home and put it away and in traditional fashion we all adjourned to the pub to discuss the mini adventure.
Below is Jenny experiencing post ride euphoria from still being alive!
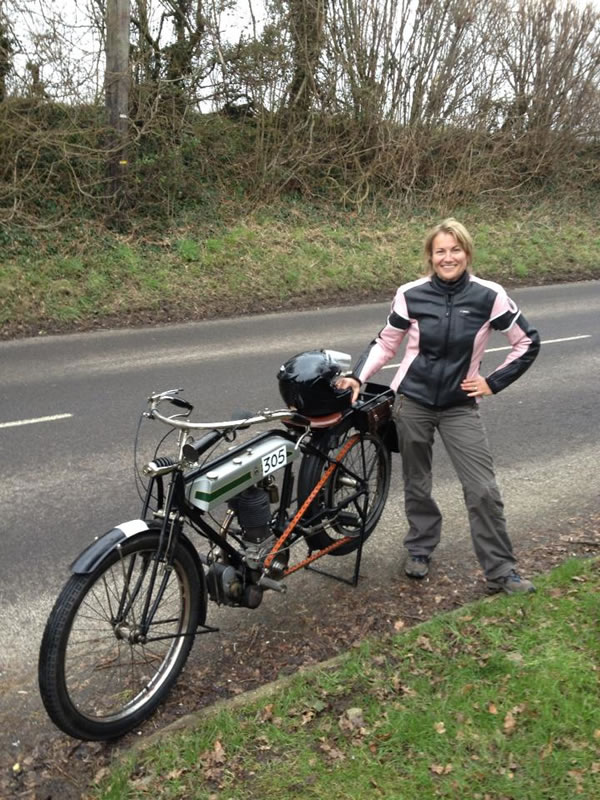
Whilst my Trusty Triumph is currently behaving itself, on the other side of the planet (ish) Andrew's 1908 is behaving very badly! With just a few weeks to go before its first major run it has broken its frame and seized its engine! You can see if Andrew will fix it in time by reading his article here
If you have read my ramblings from the beginning you will know that the bigend bearing failed on my machine soon after I bought it. I now know of a few other machines that have suffered the same fate. I have now learned that most/all of these have failed due to the wrong type of metal being used for the bigend bearing. Thanks to Ian Jennings (Guru on all matters relating to veteran machines!) I now know that the following specification should be used.
The bronze must be PB 1, the pin should be hardened to a depth of 70 thou and then ground to be a good fit through the flywheel. The running clearance should be 2 thou and end float 20 thou but as long as the rod clears the flywheels more is ok. If the old pin is to be used clean up as best they can and make the running clearance 6 thou. The big end must be run in for at least 500 miles, with oil changes. and keep plenty of oil in the engine. Use a straight 50 grade oil.
March 2013
Well March has started off very well with us (the Triumph and I) being given an award by The Sunbeam Club. The trophy is the big shiny John St Clair Grondono Memorial Trophy for "most meritorious performance in a speed event" and is for our antics at last years Brighton Speed Trials. Below is the trophy in all its glory! Splendid stuff and a huge thanks to the Sunbeam Club for the honour.
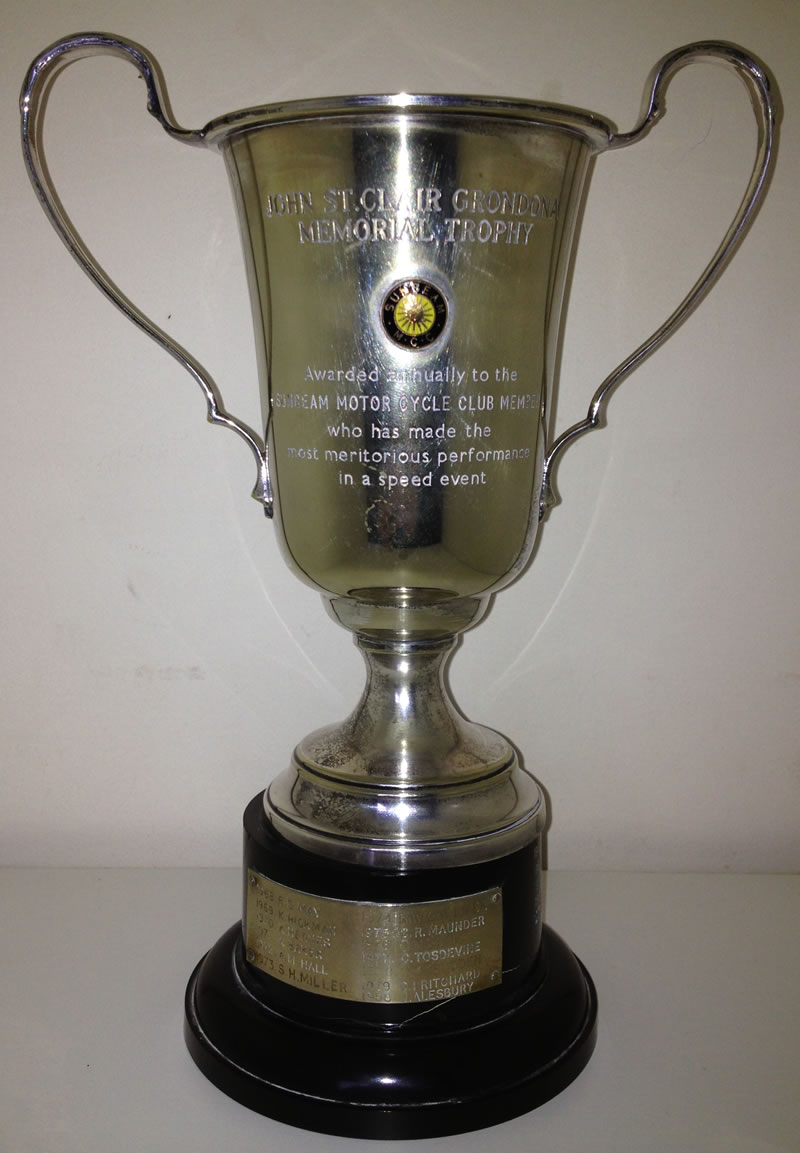
Even though the Triumph is in regular use I still need to do a few jobs on it in readyness for the Pioneer.
Have been out of action for the last week with a bug so hopefully this weekend will be tinkering and getting it out for a ride.
Preparation for the Pioneer Run has been ongoing over the weekend. I have removed the drive belt and cleaned it and checked it over - all the links are good. I ran a spanner over all the bolts and found a few lose and checked all the spokes. I stripped the carb and cleaned out a little muck and generally checked it all over. I have refitted the rear view mirror, the front cycle electric light and the rear suitcase to carry all the spares I might need - probably overkill but I want to be able to repair any misbehavior. I have made up a spare cable for the decompressor with cable etc from Venhills. With the right tools it is an easy job. A tool "birdcages" the cable end to ballon out into a tiny birdcage shape that perfectly fills the outside end of the nipple. This is cleaned of grease, dunked in liquid flux and then dipped into a small vat of liquid solder and voila a properly done spare cable.
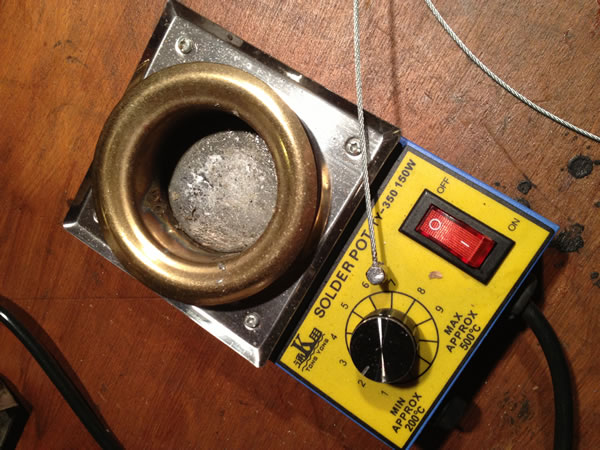
I popped around to Chris's (Veteran Triumph guru) as he had picked up some new crankcase bolts for my 1914 500cc engine. They are beautifully made and come from Adrian and Ian at veterantriumph.co.uk.
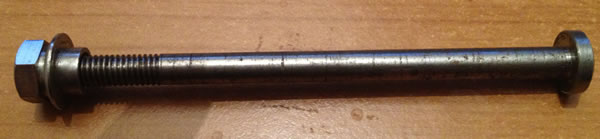
The Pioneer Run was cancelled due to the predicted weather. We were expecting 4 inches of snow and ice and sub zero temperatures so it was the right decision as 300+ veteran bikes in these conditions could have led to some accidents.
A fellow veteran enthusiast who is building up a 1914 Triumph kindly sent me the picture below of "my" Triumph at the 2009 Pioneer with its then owner Peter Hallows about to set off for Brighton - thanks Chas!
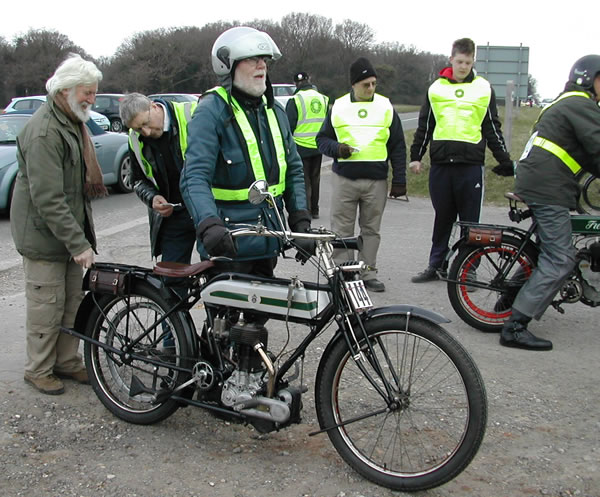
I have been searching for a good set of gas lights for my bike for more than a year and not found anything so when I saw a pair of early electric headlights on ebay I bid on them and won the pair for just £53, which seemed like a bargain as both are complete.
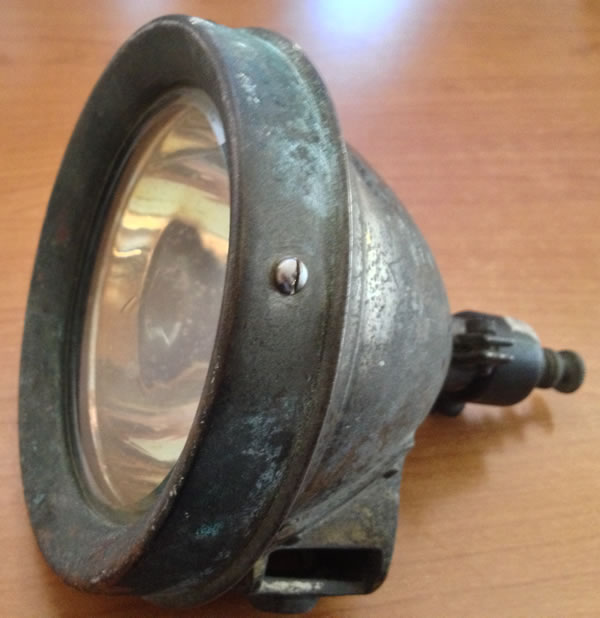
They are branded Nytelyte and the first mention I can see of this brand is in the letters page of The MotorCycle from 1921. So therefore I reason they were made before 1921, but not exactly certain when. They appear identicle to the Voltalite lights sold by Ward and Goldstone from 1911 or maybe earlier. These lights are refered to as "Penetra" headlights so I am assuming they were made by someone else and the riveted on name would mean they could be given diferent brandings for diferent customers - well thats my current theory. Ward & Goldstone continued making automotive electrical products up to the 1980's when after an acquisition they became the Volex Group, which still exists today. I have sent them an email to see if they have anyone who deals with their history and ancient products.
The picture below is from The MotorCycle from 1911 (page 317) so electric lights were available this early and probably a year or two before. I had a setup like this on my bicycle when I was a kid and it worked quite well. I cant yet be sure if my lights were available in the pre 1915 era, but it looks likely and even if they were not they would have been a fitment certainly from 1921 onwards.
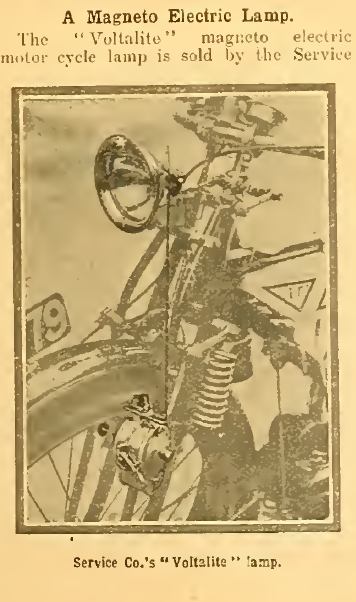
As I researched the subject of pre 1915 electric motorcycle lighting I saw mention of people driving their electric lights from the magneto. Some systems had a generator that was driven from the tyre (as above), but some refer to powering the lights directly from the bikes magneto - which intrigued me. Below is FRS's advert for magneto powered lights. FRS were one of the premier (perhaps The premier) maker of gas lights for bikes. They made a gas light that would throw a beam 1,200 feet! and period reviews seem full of praise so if the top vendor was making such lights they would seem unlikely to risk their reputation if they did not work.
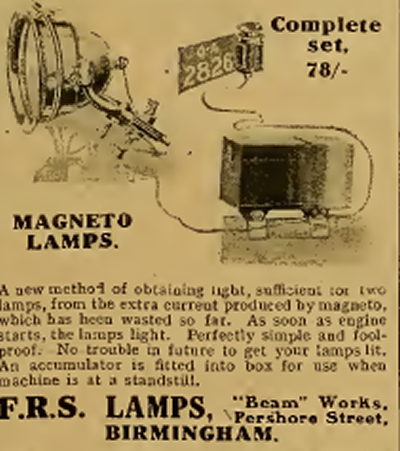
I suspect that you would have flickery lights depending upon the engine speed and surely the HT pulse would be likely to blow bulbs. I am not sure how it would be connected up and suspect that you would need a battery to even it all out. I have asked around and no one seems to have tried it so I shall continue to investigate - all ideas appreciated! Worst case is I can power the lights directly from a battery which should give me quite a few hours of light to get back from the pub and some early electric lights were powered just from the battery.
A new eBay purchase arrived today - a new tyre a 26x2.5 tyre that originated in China or somewhere eastern by the lettering. I was looking for a tyre with a rounded profile as most of the new replacements have a square profile which I think will make the handling a little odd when you "fall" off the square edge during spirited cornering! When my new wheels are finished I shall try it out.
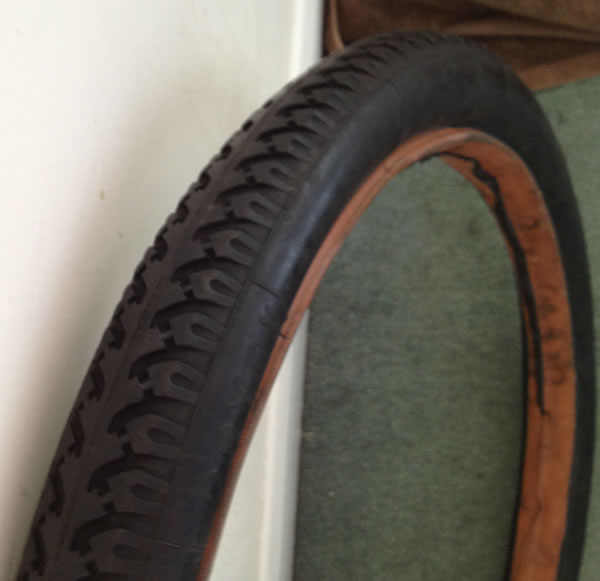
April 2013
With the English spring temperature touching a toasty 8 degrees, thoughts turned to long summer bike rides. In any warm part of the world 8 degrees would be considered cold, but here in the UK it is a temperature that will have inspired thousands of bikes out onto the road.
I pulled a Ducati out for a spin but during its winter hybernation it has sprung a petrol leak. Clearly the bikes had been planning misbehavior as when I looked at the Triumph it also seemed to have been leaking.
The Triumph has a simple needle valve in the tank that shuts off the fuel supply. This seemed to be how the fuel was leaking. I thought that perhaps some muck was trapped in the needle valve and thus keeping it slightly open and allowing some petrol to trickle past. The tank needed to be drained to remove the needle assembly. I found some grinding paste in readyness for lapping the male and female parts of the needle assembly together for a perfect drip free seal. When I came to remove it, I discovered that the lower nut was slightly lose and any slightly loose petrol unions will allow petrol to get past. With the unit out it all looked fine with no muck in it and it tested petrol proof. The only part that did not look perfect was the fiber washer that was a bit secondhand.
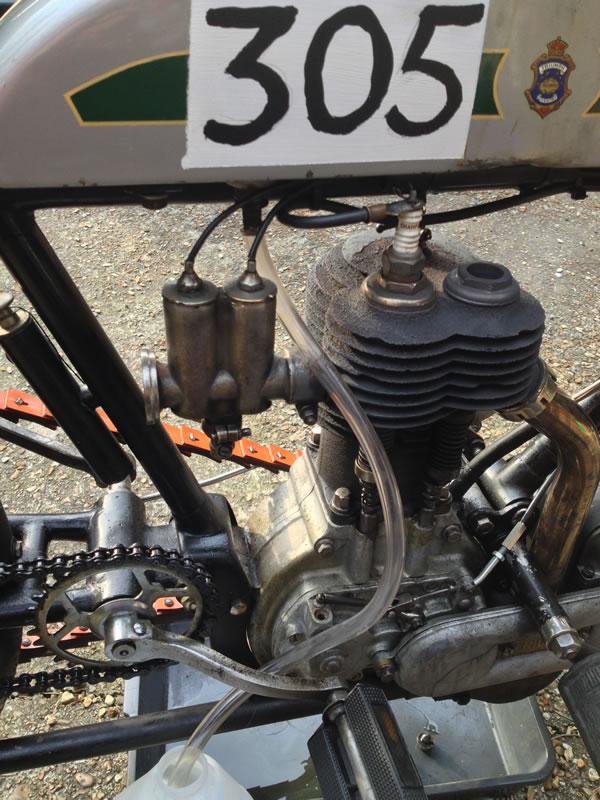
As I did not have a new replacement I flatted it down with some wet and dry on a sheet of glass. With it looking perfect again and a small smear of sealant it all went back together. I made a mug of tea and sat down to watch for any drips and after a while it seemed fuel tight. Whilst this tinkering was ongoing I removed the sump plug to let it drain and measured what came out. It was almost clear, had no muck in it and I collected about 40ml of oil. When they were made they put four shots of oil into an engine and this was described in the era as two egg cups of oil which roughly translates to about 70-80ml of oil. As it was cold and the oil (SAE50) slow and sticky I expect there was another 10ml stuck inside that gravity would not persuade to come out. With the sump plug still out and no more oil dripping out I gave the pump a full shot of oil and after a while another 20ml of oil came out. Sump plug back in and four shots of fresh oil and all was ready for a ride. Sadly by this time supper was also ready and no time for a test ride.
April 20th 2013 - 60 miles
A gloriously sunny day and after a thorough checkover and a top up with petrol and oil and air in the tyres we were off. We headed West and then North up a series of pleasant empty lanes will no fixed destination in mind - just enjoying riding it. After an hour or so we stopped at a country pub and sat in the sun basking like a seal with a pint of ale to replenish lost fluids. Then we were off again on more perfect English country lanes. The countryside is verdant green, the sky blue and the Trusty Triumph is in its element. Most of the time we are doing 20-35mph and just taking in the scenery whilst keeping a eye open for potholes. A couple of fast cyclists give us a run for our money, but we eventually leave them behind and continue on. We are still on lanes at the back of the Downs, which are mostly familiar, but if I see a turning I have not tried before we head up it to see where it leads. One such sharp left turn immediately starts to climb and as it gets steeper it defeats the Triumph and we coast to a halt, turn around and restart as gravity rushes us down the hill. Whilst I started riding up the hill at little more than 10mph it should have climbed it so something is not right with the Trusty. I will investigate when I get home. We continue on for another hour before heading for home. The last couple of miles are on a main road and we definately seem to be down on power with the bike struggling to get to 35mph. As I approach my lane I slow looking for a suitable gap in the traffic to turn right as with no clutch I cannot stop and wait for a gap, but instead have to time my turn to suit the gap in the oncoming traffic. We manage the turn, but when I open the throttle the engine dies and we coast to a halt.
It felt like it was running out of fuel, but a peep inside the tank says we still have some. I press down the tickler on the carb and it does not "tinkle" so it is not pressing on the float. This means that not enough petrol is getting to the carb or the float would be floating higher. I am not far from home, but it is all uphill and its hot and I do not want to fail to arrive home under power. Out with the tools and a minute later we have the petrol pipe off and it seems to be blocked. Blowing down it (or trying to) does not clear the blockage so I need something long and flexible to clear it. Luckily in preparation for Pioneer Run I had made up a spare decompressor cable and that quickly did the trick. With the petrol pipe back on the Trusty fired up straight away and sounded strong and with tools put away and riding gear back on we chuffed up the hill to home.
April 24th 2013 - 5 miles
A few locals have just founded the Midhurst Motorcycle Club and as they are having a gathering at a local Midhurst pub I decide to head over on the Triumph. I have to stop on the way and bump into some friends who had no idea I had a bike (clearly I haven't been rambling on about it enough at the pub...) and they watch as I set off and I can hear amused voices.
The bike does not feel 100% and I suspect another fuel blockage. I arrive at the club meeting and have a pint whilst the bike cools. Once it has cooled I remove the petrol pipe and all seems OK. I do not have lights on the bike so as the light starts to fade I realise I will have to head home. By the time I have finished chatting the dark is rapidly arriving as we head off. Once I am away from the lighting around the Pub I am plunged into darkness and can just make out the sky and hedges and hope I do not find any potholes.
Riding in the dark is quite exciting and invigorating and you quickly adjust to the gloom.
There is definitely something wrong with the bike as if I open the air/choke lever more than 30% it starts to die. With a little lever juggling we make our way home, though we are well down on power. I shall investigate.
The picture below shows how dark it was.
April 25th 2013
My plan to build my spare 1914 500cc engine into a TT model moved a small step closer today when I was very generously given a rear frame casting/lug for a TT style veteran Triumph - many thanks to Robbie.
The TT models did not have pedalling gear and this lug together with the right tubing creates a Triumph with a shorter wheelbase.
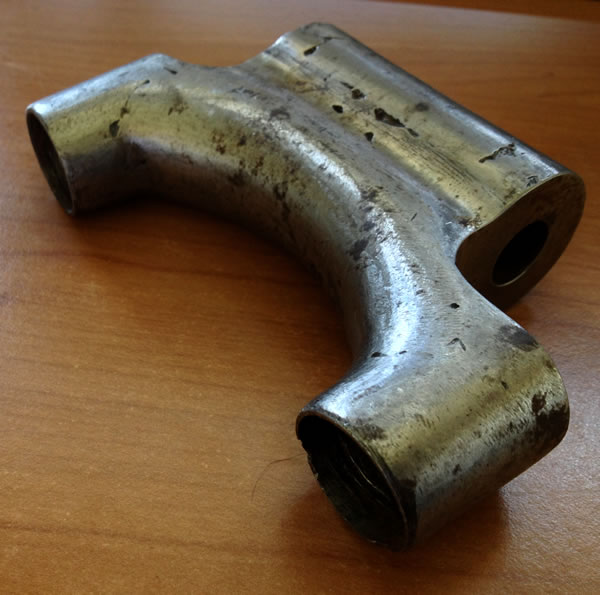
The pictures below show the shorter rear frame on a TT model.
This bike is a 1914 TT model that was for sale in the UK at Verralls - they kindly let me take some pictures.
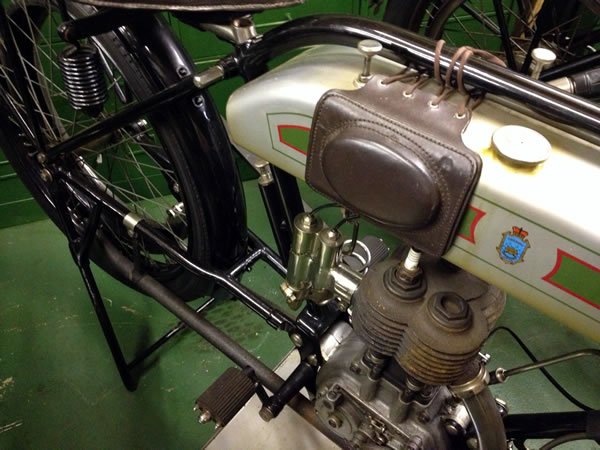
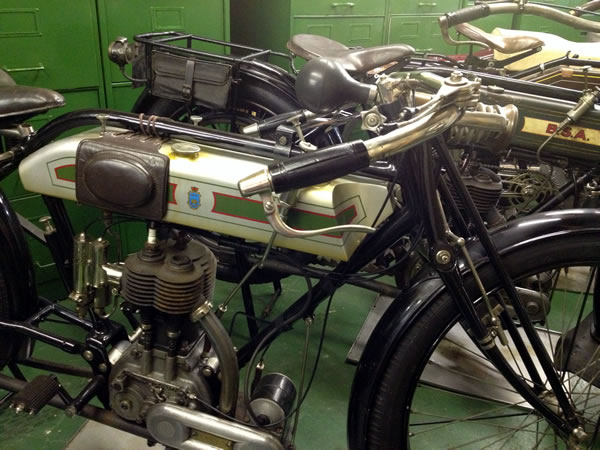
Below you can see a very nice little accessory on the Verralls bike - a steering damper. I am not sure if its a period item, but it looks the part.
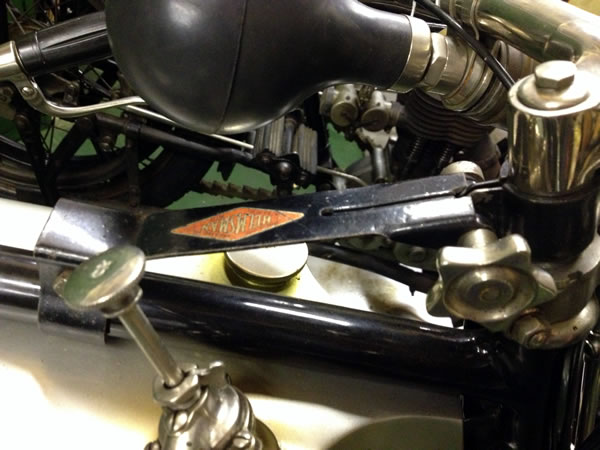
April 28th 2013 - 10 miles
As the fault seems to be related to the carb I removed it and stripped it back to its components. The float bowl has some fine muck in the bottom and its sticky so I use some aersol carb cleaner to disolve it. The main and only jet is clear and the gauze filter that sits between the petrol pipe and the carb top has some bits trapped in it. When I remove this to clean it I can see that the intake hole into the top of the float chamber is also partially blocked with fine muck. With all the parts cleaned it all goes back together and back onto the bike. It fires up straight away and now ticks over with the levers in their usual position so all seems well and a test ride is in order.
I have acquired an mini HD video camera - a GoPro3 and this is attached to my helmet to capture some onboard veteran Triumph footage! You can see the video here - http://www.youtube.com/watch?v=d1x2GfLiFfA
We set off down the lane in fine style, though it still seems to be a little down on power and head off onto the local lanes. Within a few minutes it is obviously not 100% as we struggle with a few small hills and eventually come to a halt on a long steep climb that it usually romps up. We turn and head back for home. After a warming mug of tea and with the bike cooled off I take off the carb and all seems fine. If its not the carb then its some new form of misbehavior. I fear the worst and remove both of the valve covers from the head to get a good look inside the engine. The bore looks to be in fine condition and very little carbon on the piston or valves. The valves are opening and closing as they should. I am running out of time to tinker, but when I have another spare hour I will investigate further. It could be the valves not seating properly, the timing could be out or the plug failing. My Grandfathers 1911 copy of Hint and Tips has a great deal of information and suggestions for solving problems, so I shall be using this as a guide to finding the issue.
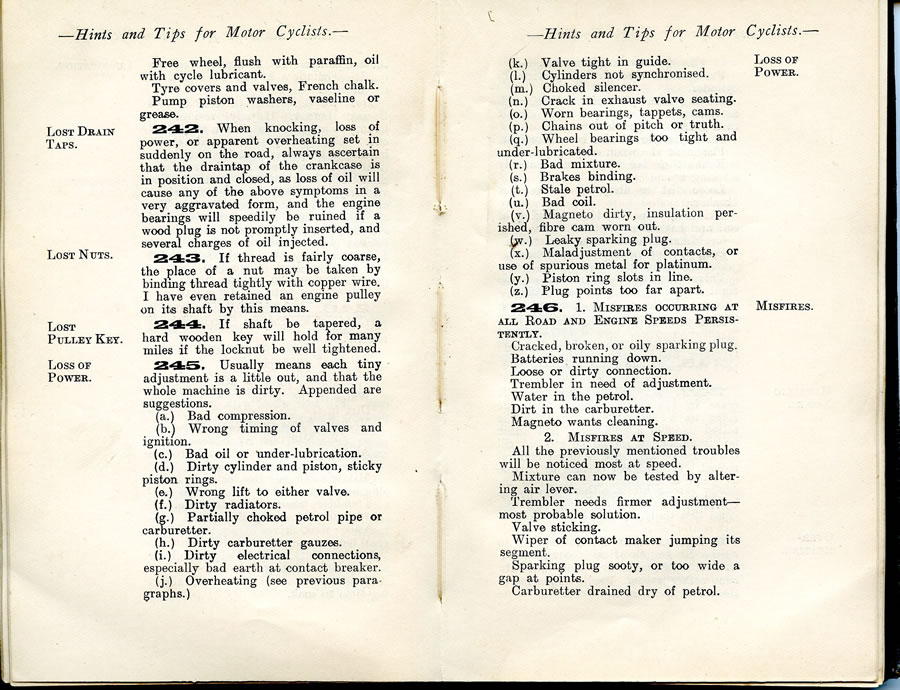
29th April 2013
A fellow veteran Triumph owner who knows a whole lot more than I do suggested I look at the valve seating as a poor seal between the valve and valve seat will lead to a loss of compression and power. As the exhaust valve generally has a harder life than the inlet valve I decided to check this first. When it was in full health you needed to pull in the decompressor to push it along and now there is not so much resistence so it does seem to be losing compression somewhere.
1st May 2013
Last year I bought a period Triumph gadget for holding the valve springs closed and this proved to be a useful thing. Simply turn the engine over until the valve spring is compressed and then push it over the compressed spring.
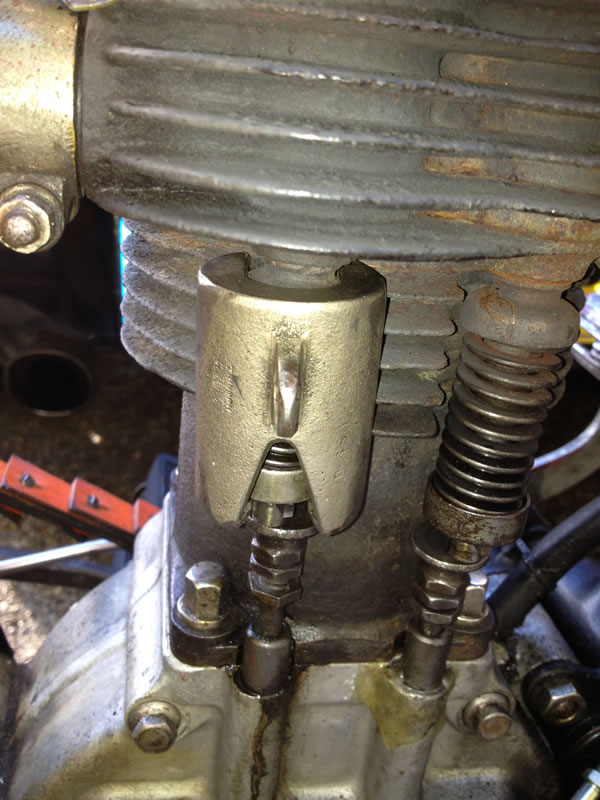
Turn the engine over further until there is no pressure on the valve and then you can remove the valve. The valve is held against the spring by square pin that sits in a slot in the valve and it is easily pulled out when it is not under the pressure of the spring. The valve then easily comes out and then you can simply pull out the spring. All very easy and simple. The exhaust valve is fairly clean with minimal carbon deposits and cleans up easily with a brass brush. The face of the valve is a bit mucky and does not have a nice clearly defined line showing where the face that should mate with the valve seat. After a prolonged hunt around the garage I find a small tin of my fathers containing some grinding paste and a grinding tool (rubber sucker on a stick). It is always nice to use something of my Dads as it reminds me of all the tinkering we did when he was still about.
I put a very small smear of paste onto the mating face and drop in the valve and after ten minutes of turning the valve backwards and forwards I have a good even clean grey line around the whole mating surface on both the valve and valve seat. A very enjoyable bit of tinkering. The valve is cleaned of all grinding paste and refitted and the clearance checked and all is good.
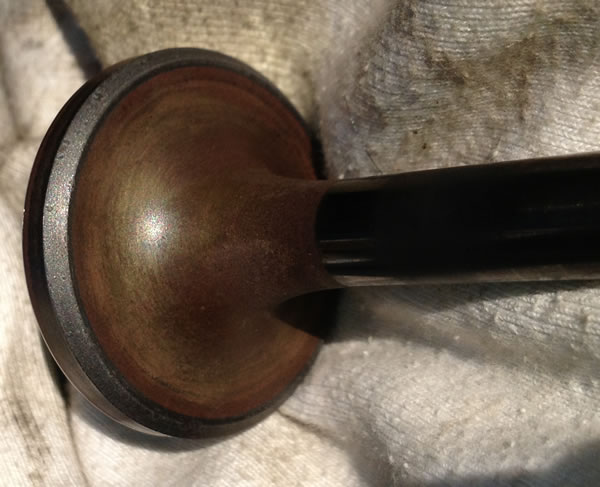
To test and see if the newly ground valve is an air tight fit I use a few tablespoons of petrol and tip it onto the valve.
If the petrol leaks away between the valve and seat then I still have a poor seal. The petrol stays put and is an encouraging sign.
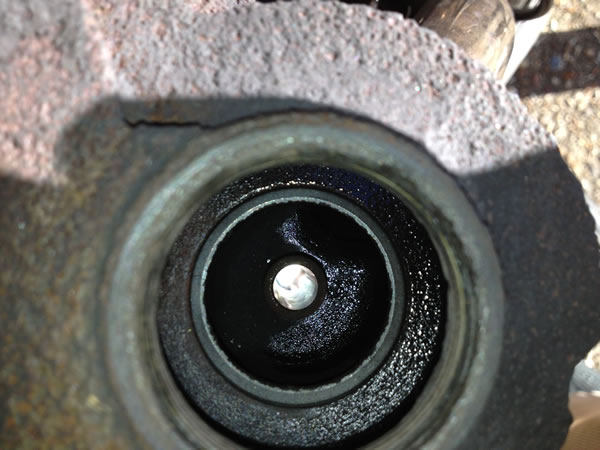
The inlet valve is removed and looks fine, but I give it the same treatment and put it all back together. It now seems to have more compression judged by the pressure required on the pedal to turn over the engine. I fire it up and it runs sweetly and then I need to stop as it appears to be my turn to cook dinner. When I push it back into the garage it again seems to have more compression - so all promising - the test will be how it runs up the local hills!
May 4th 2013
My test run around the local hills has shown a great improvement and I was able to climb the local Sussex hills, though the performance is still not 100%.
On some of the hills the climb almost brought us to a halt whereas previously we would have romped up it. On some hills I even had to resort to zig zagging up the hill to effectively reduce the severity of the hill.
I had a further attempt to use my new video camera to film the Triumph in motion and have added these to YouTube.
Part One see http://www.youtube.com/watch?v=g3pwrLfpiEI and part two - http://www.youtube.com/watch?v=g3pwrLfpiEI
Below is an image from the video just heading west out of Midhurst on the A272 and below that is the same spot, but from just over 100 years ago.
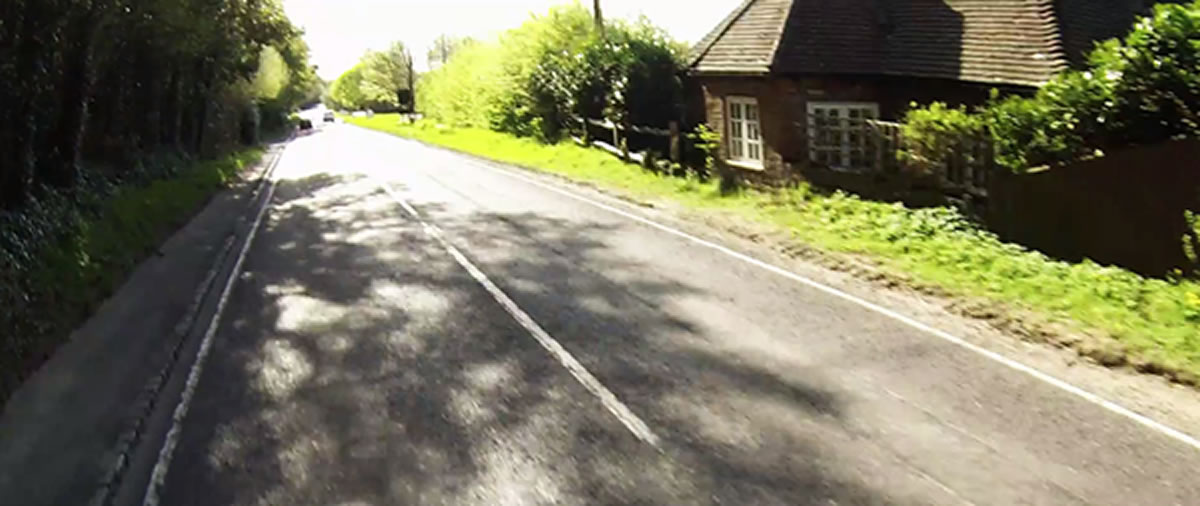
The house on the right has not changed very much. This is the sort of road we would have been riding on a century ago.
The surface will be rolled stone chips and gravel, all covered in a fine dust and topped off by copious amounts of horse poop.
All rather slippery and the reason why front brakes were so feeble - no one wanted to have a front wheel skid (or side slip as it was called in period) and fall off.
It does look quite lovely and I expect belting around it at 40mph a century ago would have been rather exciting.
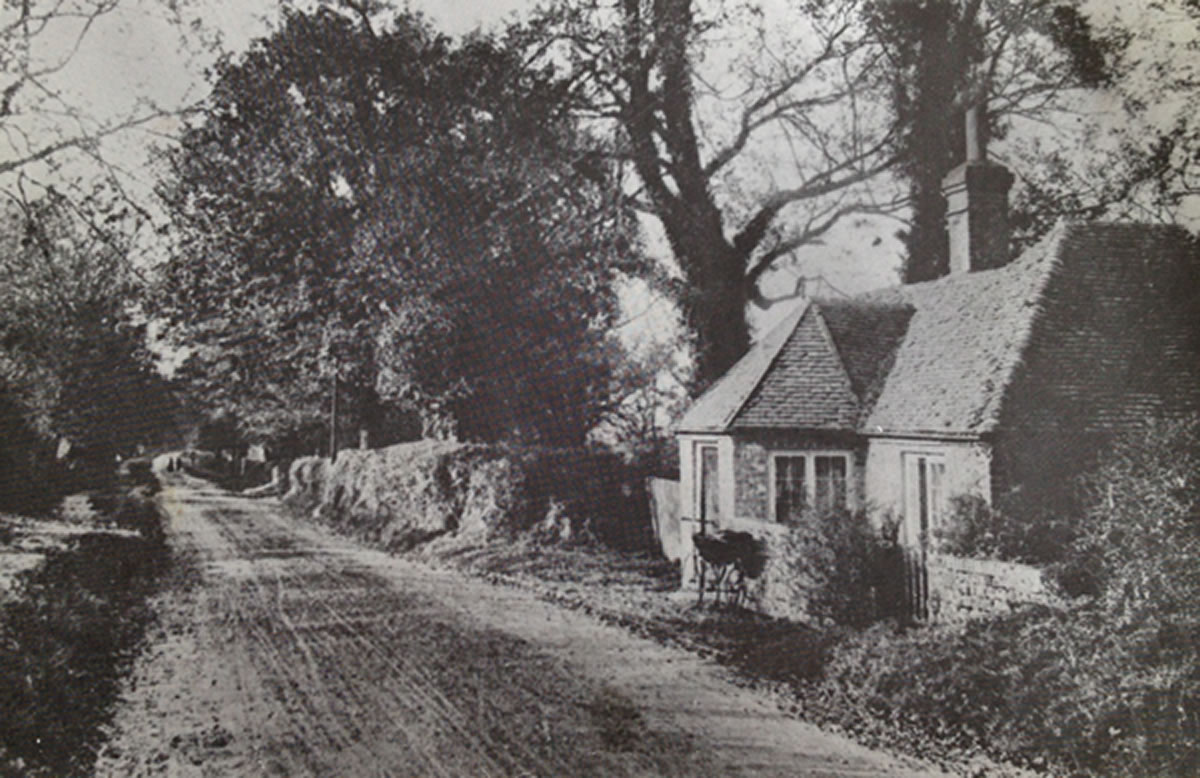
Back to the bike .. I must admit to being a bit confused now as to what is wrong with it. I have checked everything and thought the valve griding would have sorted it. I now need to go over everything again and try and find the problem. It starts fine and runs well at low speed and the problem seems to be more apparent the more you open the throttle. Whilst I have stripped the carb and fuel line many times I still think it may be fuel system related. Hopefully I will discover the problem(s) soon as I have plans to ride it next weekend on the Ixion run and if its back to 100% health I plan a full days riding.
May 10th 2013
Mixed weather over the last few days has paused test riding, but today was dry so out we went for a run.
One of the issues I fixed was the exhaust valve which was not seating perfectly due to a ridge in the exhaust valve seat. I had not noticed this before as I had used coarse grinding paste and the size of the coarse grains had been big enough to rough up the exhaust valve face. When I tried it again with fine paste it did not touch both faces. I found a ridge on the seat face that was just feelable with a finger nail. This meant that the valve and seat faces only touched on the ridge and not on the wider face and hence a seal, but a poor one. I should have noticed this the first time I took it apart, but then I am a novice learning my way and did not think to double check - now I have learned. I do not have a valve seat cutter so had to spend hours slowly grinding it away with grinding paste - a very slow laborious job, but eventually a nice clean even mating surface was achieved. I needed to adjust the valve clearance, but that was a simple job with the locking nuts. The inlet valve was also ground in with fine paste and all went back together. The inlet valve spring was fractured and I replaced the spring with a new one. I also annealed the big copper gaskets that sit under the valve covers and tidied up the threads on these and then used a little Copaslip when it went back together. A very satisfying bit of tinkering. I rechecked the ignition and carb and all seemed fine.
So had I fixed it? Performance was much improved and almost back to normal, though still not 100%. I stopped on the ride to changed the spark plug for a new one to see if that helped and it did a little. I parked outside the old Post Office in Redford as they are also a lovely cafe and across the road is a charming old garage, the like of which has now almost vanished in the UK - shame.
Redford is called Redford after the iron ore rich red coloured stream that used to run across the road or more accurately probably before there was a road. This area of West Sussex is full of hammer ponds that were used to power furnaces and create iron and used the local iron ore and local charcoal in the production. The hammer ponds were created from damming the local springs that run off The Downs to create a reservoir of water to power the furnace bellows, the hammers to crush the iron ore and power primitive lathes that bored out the cannon castings. Many of the cannons used against the Spanish Armada were created in the area. Historian now believe that one of the reasons for victory against the Spanish was that our gunners were able to have a great deal of gunnery practice as iron canons were much cheaper that bronze ones and so they were more accurate and deadly. Fernhurst is just a couple of miles away and Fernhurst means Furnace in the Woods as hurst means wood, woodland or wooded hill.
I had read in a fine old period article that if your bike has a fuelling issue when hill climbing, if you press the tickler whilst riding and things improve then it points to the needle/float height being wrong. I did try this and again a slight improvement so I need to look again at the carb. Not easy trying to reach a gloved hand down to the tickler trying to avoid having your fingers mangled in the belt drive or roasted on the cylinder.
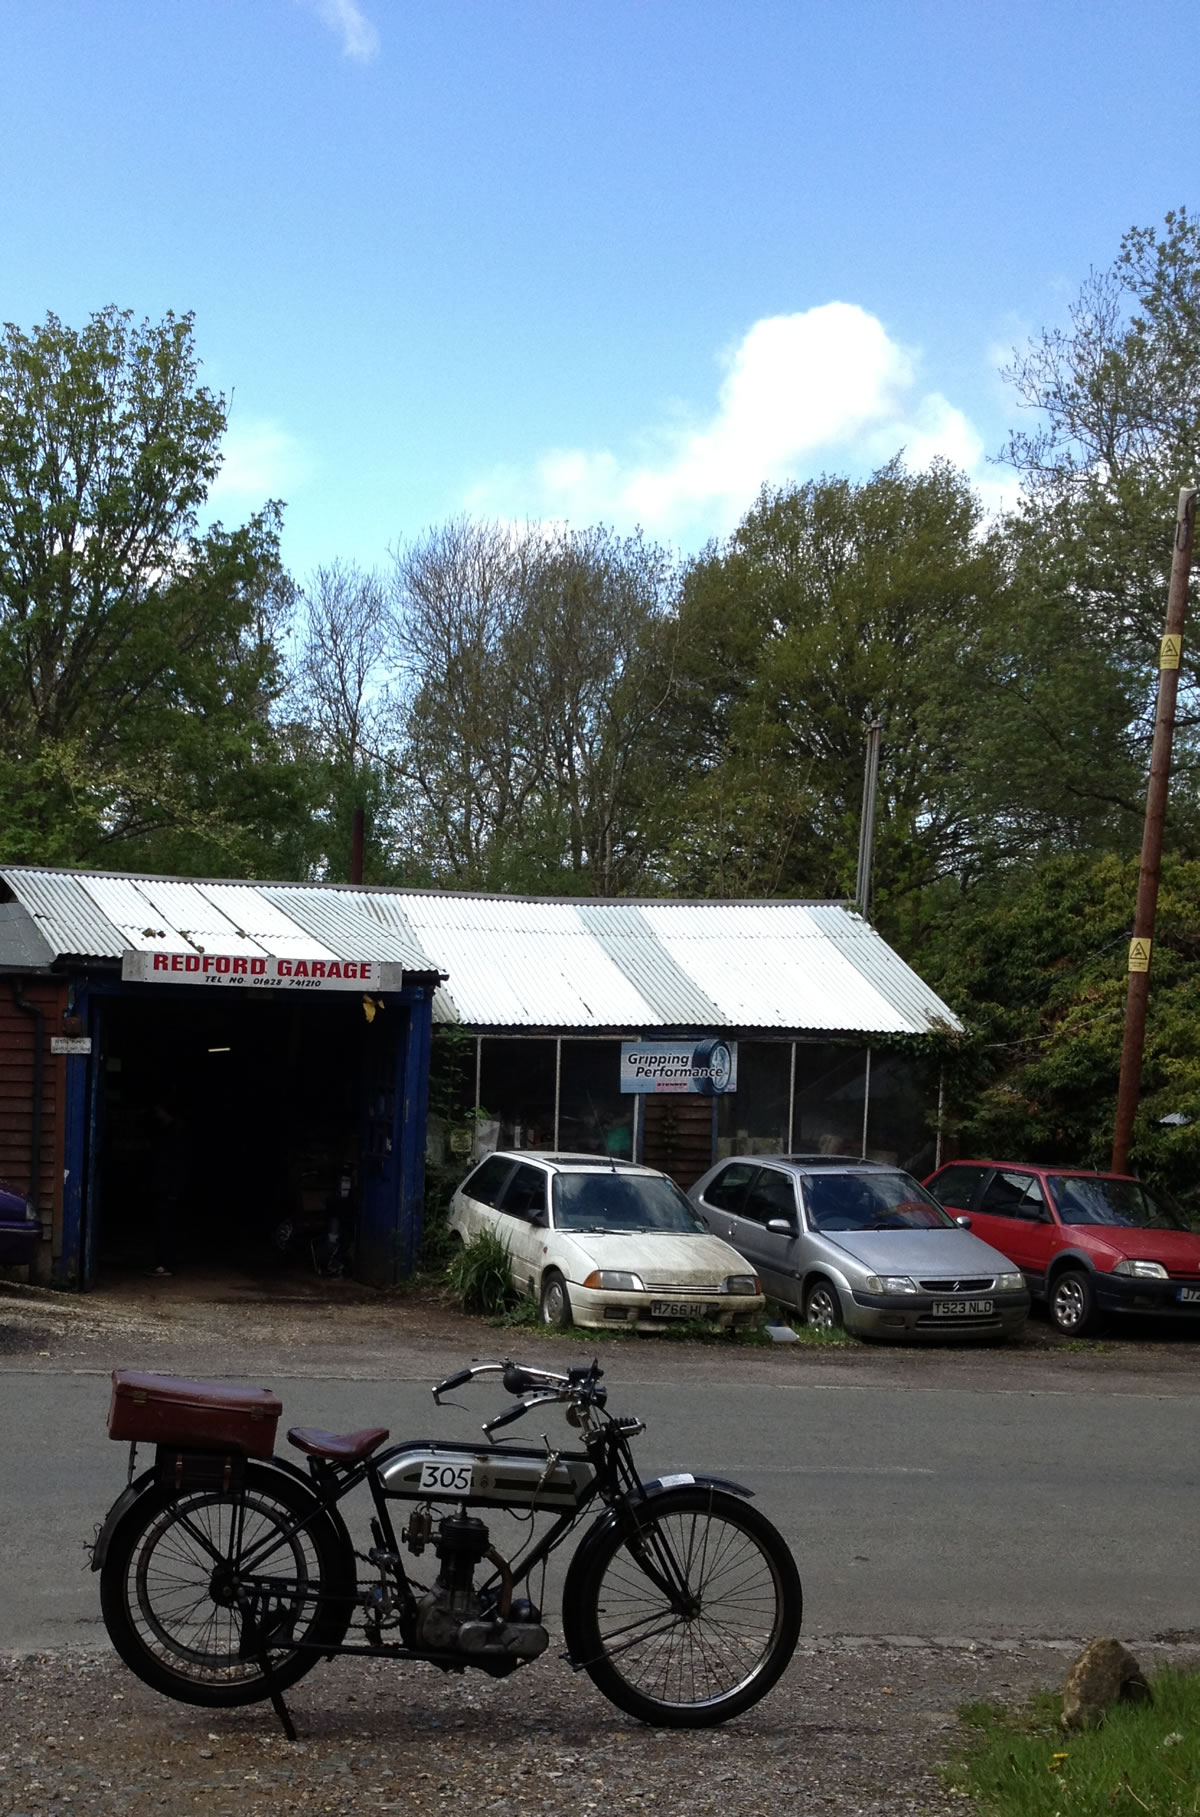
I looked afresh at my carb and with it removed from the bike I was more easily able to see if the float height was correct.

It appeared a little low as when the floating float rose and cut off the intake of petrol the petrol had not quite reached the top of the jet. The carb only has one jet. After much tinkering and a range of alternative needles kindly loaned by Chris R I finally found a setting that seemed almost spot on. I say almost spot on as I could not quite get it 100% perfect. The needle runs through a hole in the float and the float rises up the needle until it reaches a small brass fitting and then the float lifts the needle up until it eventually blocks the flow of fuel from above. Looking at Chris's original needles I could see that they seemed to be designed so that the angled brass fitting pushed into the fuel intake and shut off the petrol. With my needle the brass fitment had a square rather than a tapered end. I put my needle in a drill and spun it and carefully used a fine file to give it an angled top.

At some height settings the the end of the needle would block the fuel intake and a mm either way and it would be the brass fitting - with two variables it made it tricky to adjust. I did not want to cut any of Chris's so I left it in the best setting and have ordered some new materials so that I can experiment and make up my own. With the float height set perfectly I should just have a small bulge of petrol on top of the jet, but not flowing from it.
After this it certainly ran better.
All of this tinkering got me thinking.
If I am say just 5% away from the perfect settings with fuel, valves, ignition timing then I will have a drop in performance of 15% plus. I wonder how many veteran bikes are running but only delivering a proportion of their performance due to them not being setup perfectly. As my performance slowly slipped away, many riders may not notice and a new owner may just accept it's performance as that of a 100 year old bike. So if you have a veteran bike do have a look at all the settings and you may suddenly get a whole lot more power! From exchanging emails with numerous other veteran riders, the valve seating, ignition timing and blocked fuel flow are the main places to check. I am no expert on these matters and there are plenty of people with decades of experience and I would really welcome any feedback from them? I suspect that many are of a generation where they do not visit the internet.
I aim to see if I can get every setting as close to perfect as possible.
May 27th 2013
A lovely warm day and just time for a short scamper out around the lanes and returned home via braving Midhurst High Street with all its uphill traffic lights and roundabouts - all went well. When I returned home I even gave it a quick clean.
June 2013
A couple of short local rides this month and today (9th) whilst I was outside tinkering with the Triumph my neighbour walked around to say hello and brought with him the two fascinating pictures below.
The first one is his uncle a Mr Frank Manning sitting on an FN. The family history says he was a test rider, racer and development engineer for them and he was killed at Brooklands due to some gate being closed when it should have been open. They believe he was killed at Brooklands in the 1920's - maybe 1925. The picture was taken at Brooklands. Can anyone identify the model and year and cast any light on this story?
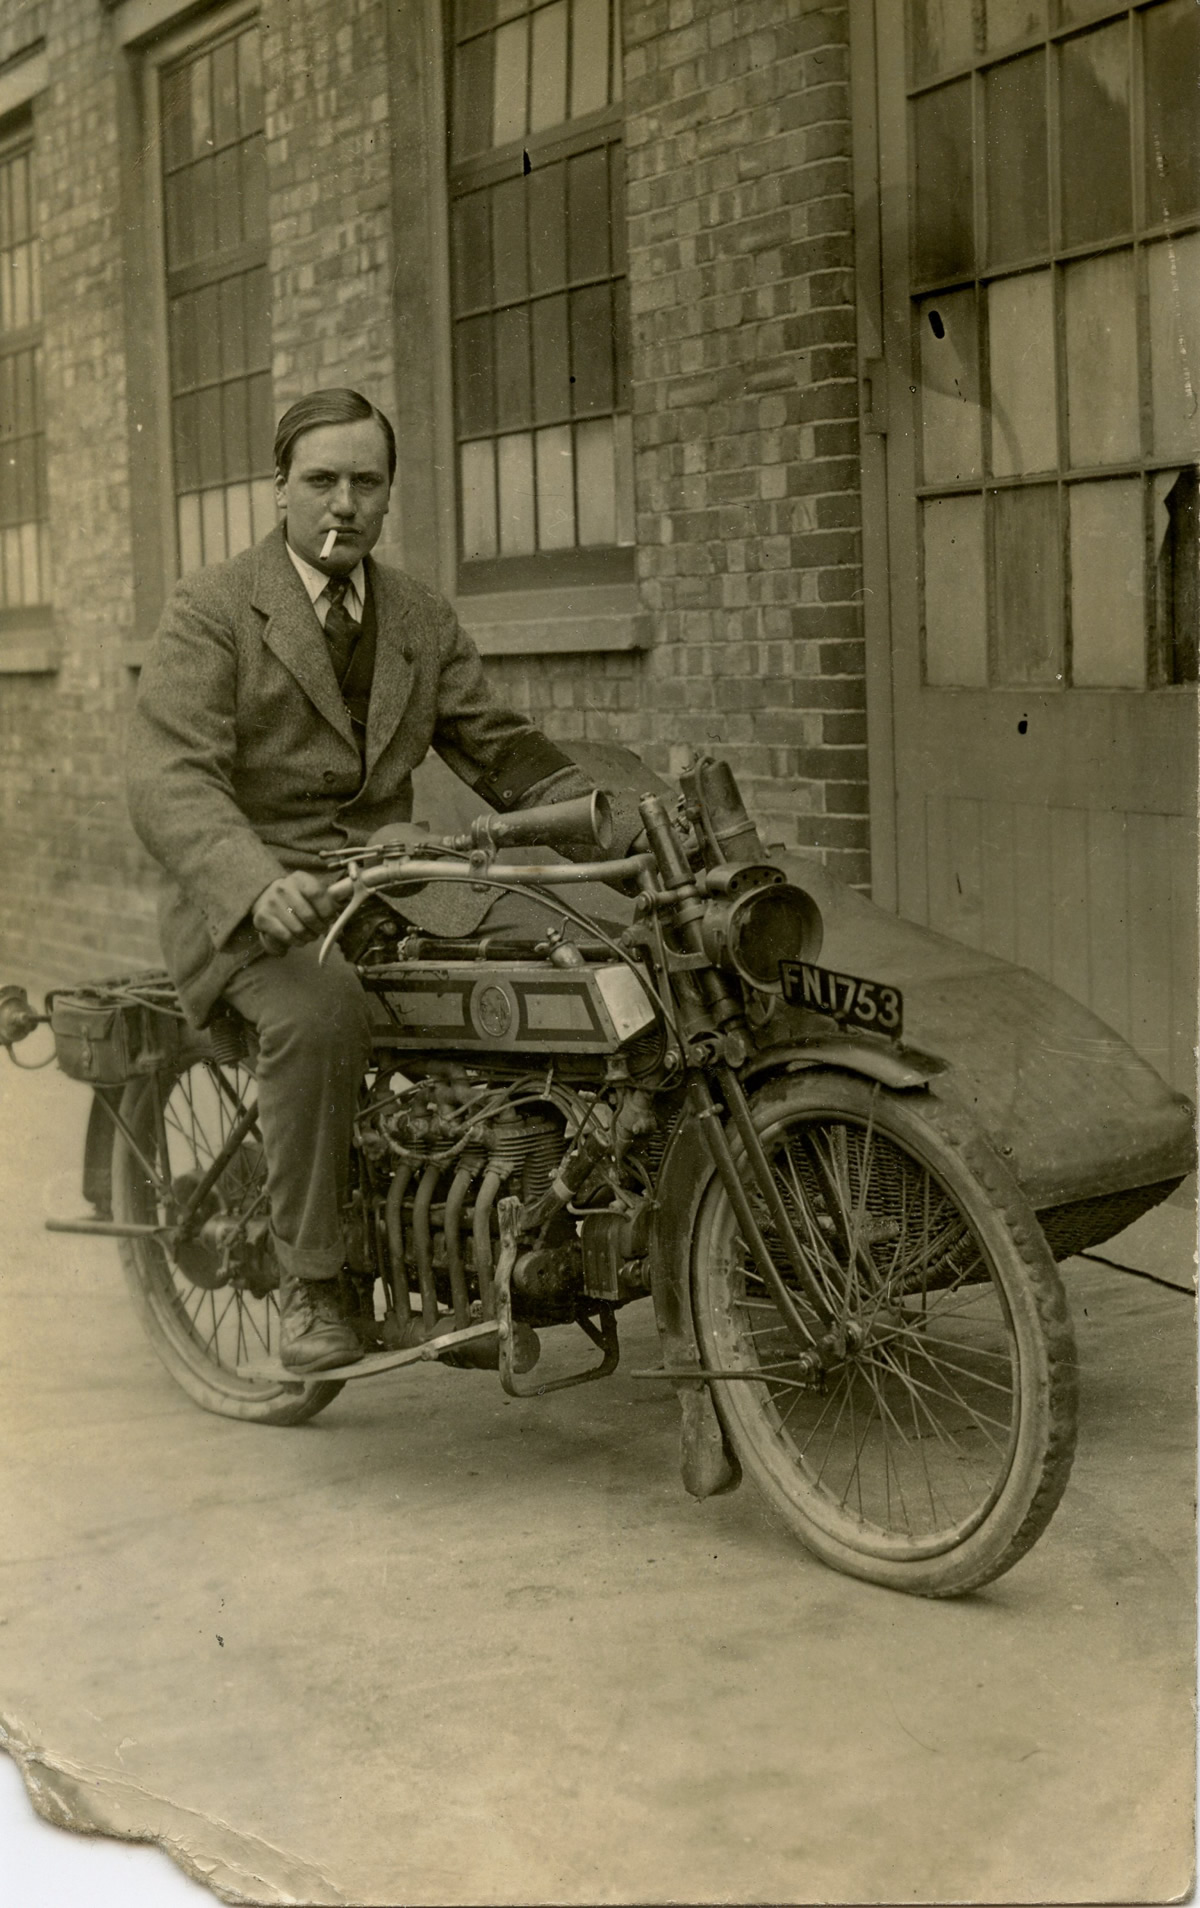
The next picture is of John Manning (Franks younger brother) and he seems to be on veteran era bike - but what is it?
Everyone seems to agree that the bike below is a Bradbury - but what year and model?
The LX registration tells us that it was first registered in London and probably c1911 or 1912?
All information gratefully received and will be passed to the family.
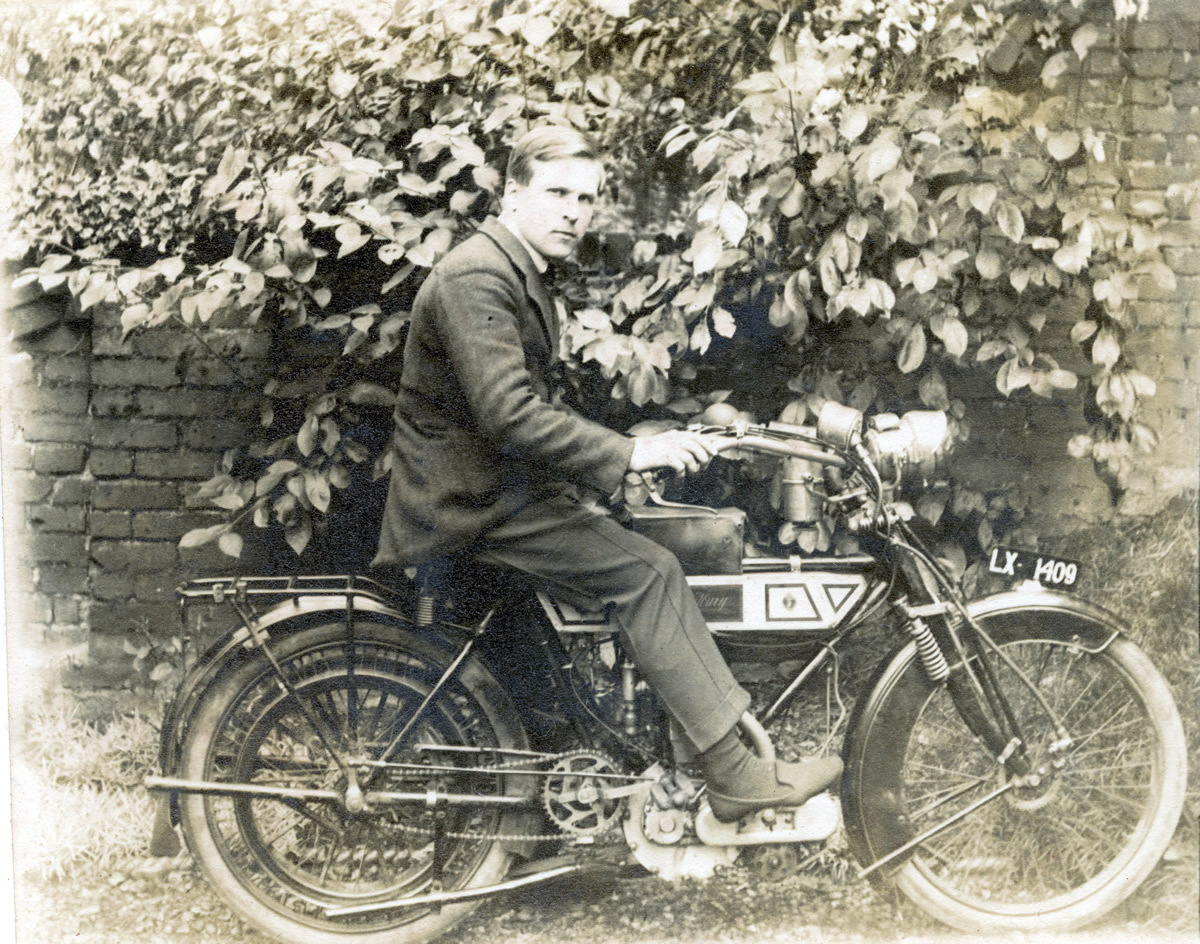
So far this month I have been out every week and continue to tinker. Yesterday I took out the rear wheel as the tube had been creeping and the valve was not square on the rim and if it creeps too far it can tear out the valve and obviously puncture.
This month continues to be a busy one for the Triumph with a trip out at least once a week. The highlight so far has been the Banbury Run. My fellow veteran Triumph owning friend Chris came and collected me and Triumph at 4.45am on the Sunday morning for the trip to Banbury. An early start, but a lovely time to be up and about.
I have never done a Banbury before and as I was number 6 away (of 600 entrants) I had clear roads and fairly flew around the course. I missed a couple of the route instructions and added about 12 miles to the official c35 mile route around very pretty small lanes. To get an award you are meant to average 15mph, but enthusiasm got the better of me and we sped about and arrived far too early at the check points. One wrong turning had us heading up a seriously steep hill (maybe the infamous Sunrising) and we almost crested it before we chuffed to a halt and stopped. I turned around and let gravity restart the engine and it was so steep that the brakes had little impact on our progress and for a few seconds it was a tad interesting ... but was soon back under control and off back to find the correct route. Two hours after setting off we were back at the start and seemed to be the first rider back. The rest of the afternoon was spent talking to friends, looking around at the bikes and autojumble. The VeteranTriumph stand was particulary interesting and I had a few bits to collect and bought a few more spares including some valve springs. Ian Jennings had kindly made me a set of hubs for the wheels that were fitted with modern bearings and the rims I bought earlier had been kindly collected from the platers and brought to Banbury by Noel Whittall, who is very well known for his long distance exploits on his Triumph. I now need to get the wheels lined and built.
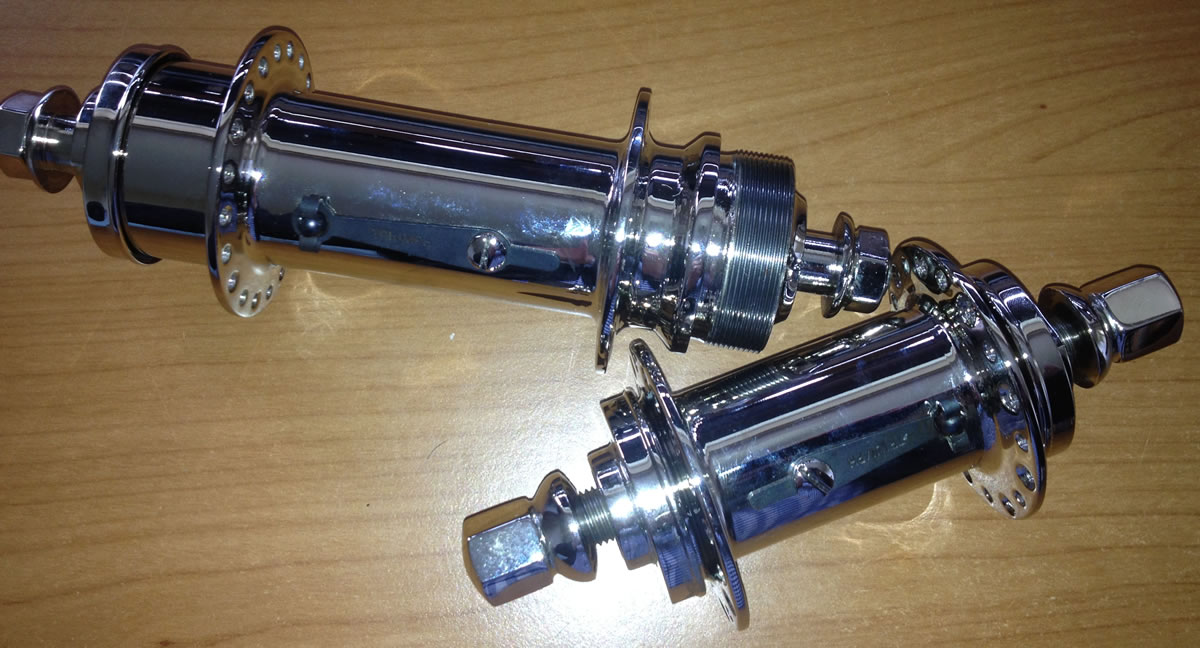
Here I am having just passed the Di Dion trike at the start of the event.
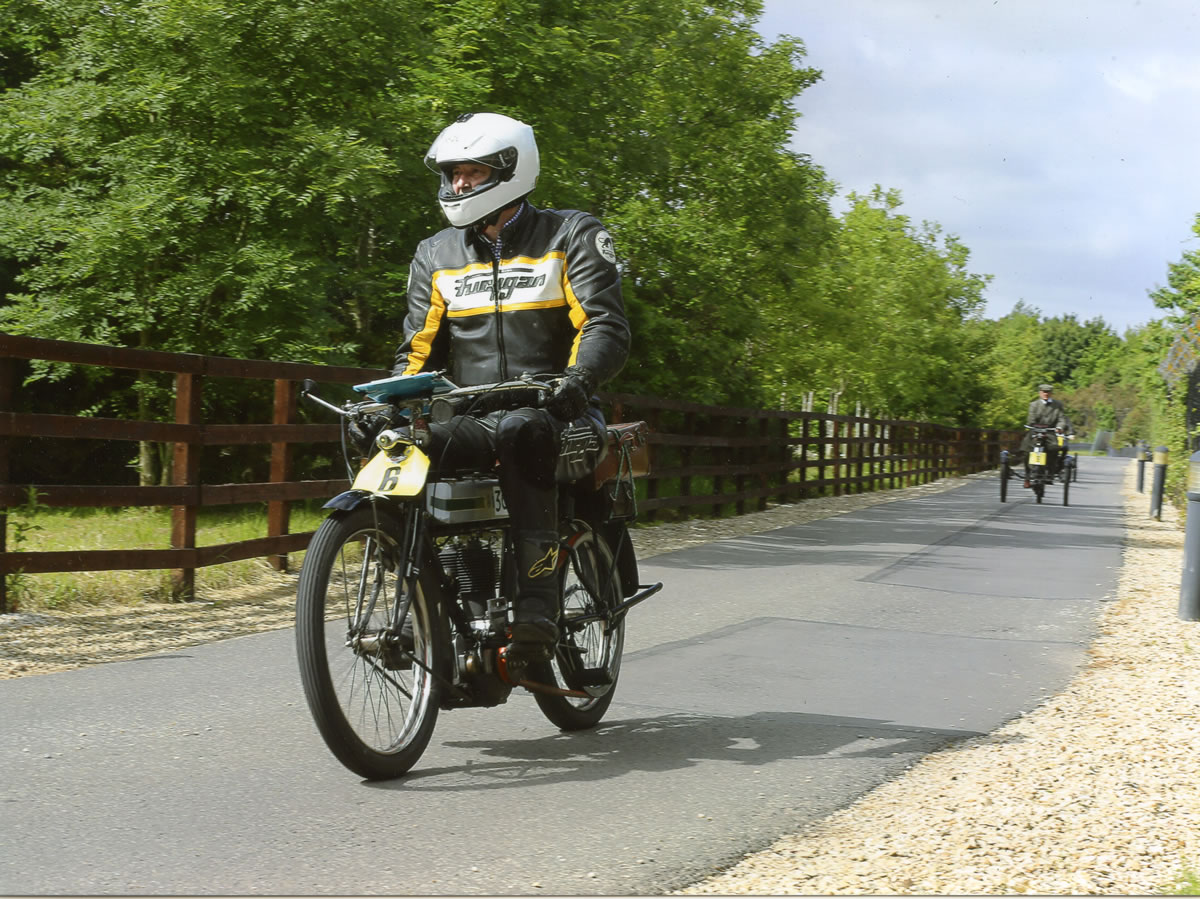
July, August & September - Total around 250 miles
The miles have continued to pile up as we have been out every week for a ramble around the local lanes. The only incidents have been a sticking float once or twice that is cured by a thorough clean out and a slow almost inperceptable reduction in performance. I have a test hill that I use to check performance and in fine fettle it summits its at speed (well speed ish) and gradually it has lessened until we just make the hill. The exhaust valve seat seems to be the cause and I think I will need to get it recut to get it to seal properly. I will wait until I take it off the road to do the wheels.
I didnt ride it quite as much over these months as I had a new machine in the garage to use. The Brough Superior Club very kindly lent me a Brough SS80 for two months and I managed around 1,800 miles on it. I have also had a ride on a series A Vincent Rapide so lots of exotic (expensive!) bikes. The picture below is me aboard the HRD - a very very impressive machine. I will write up my experiences shortly.
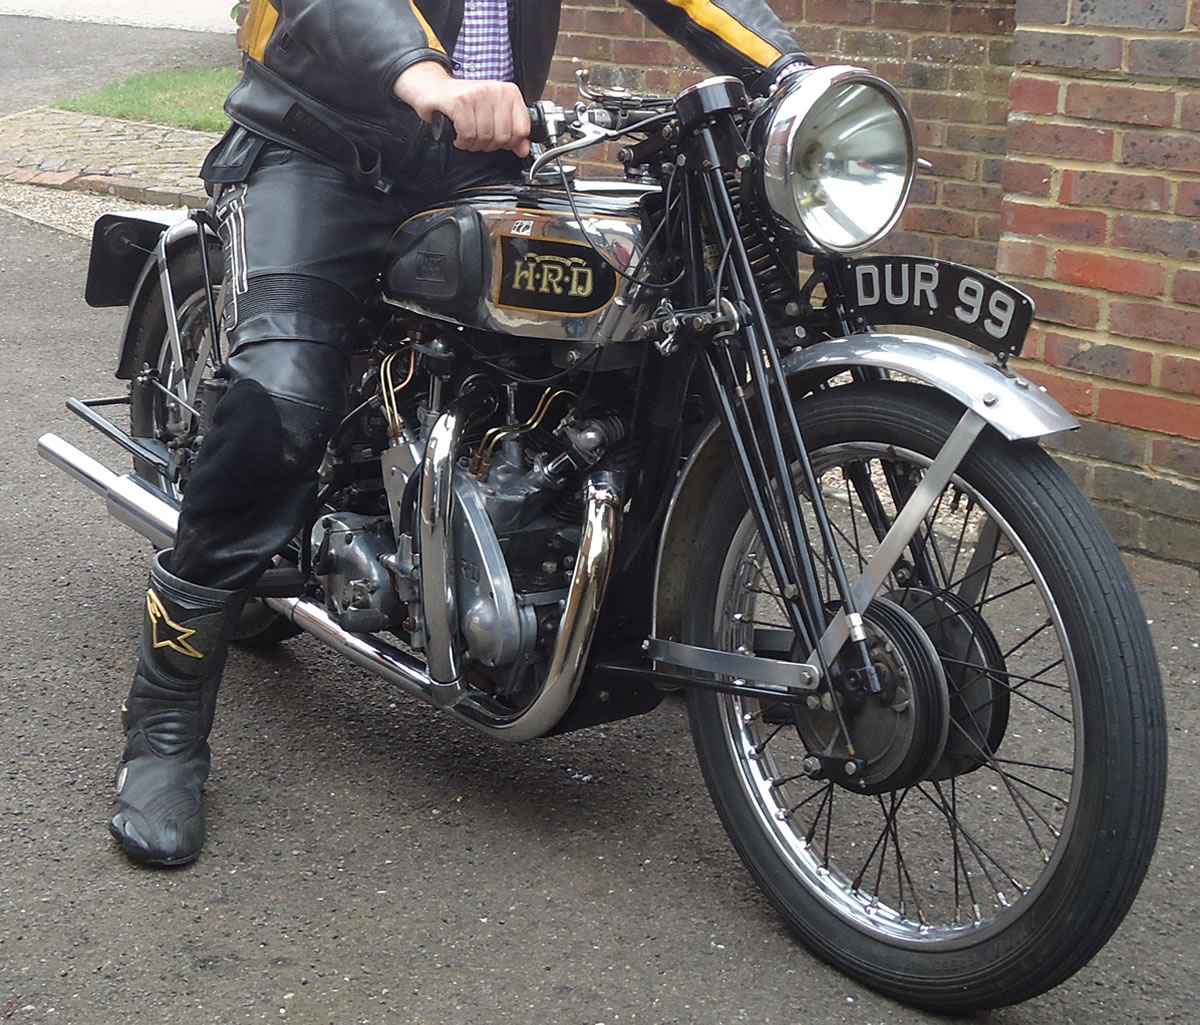
I was very generously given a Triumph timing cover and a cam by Brent from Australia who even shipped it to me and wouldn't take anything for the parts or shipping.
He even went to the trouble of vapour blasting it before sending it. It will be put to good use on my racer.
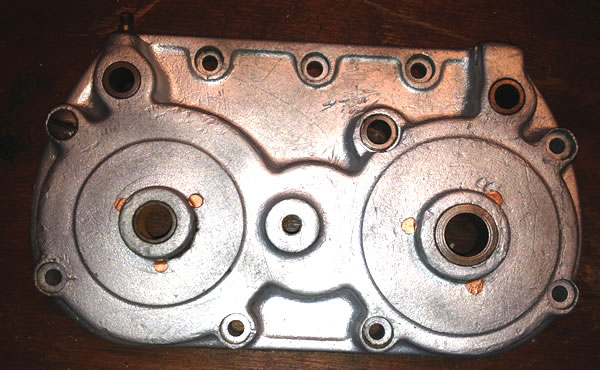
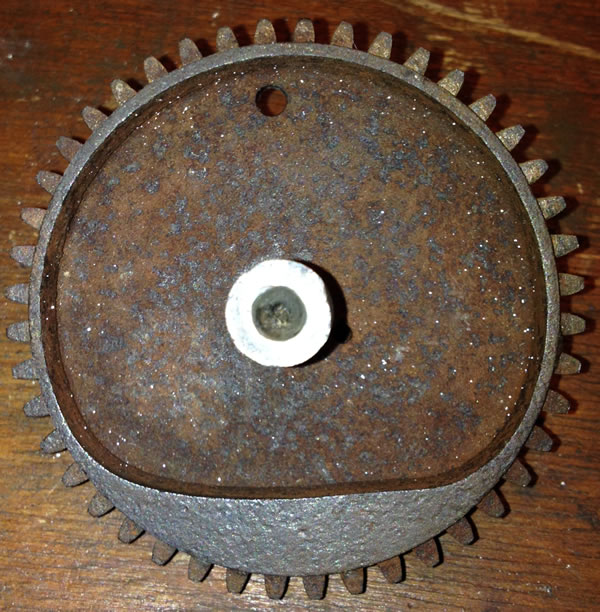
October 2013
We have been out for a tootle every week and so far the highlight has been taking to the Goodwood race track. Goodwood has a regular monthly gathering called the Breakfast Club, where each month has a theme and thousands turn up to walk around the pits and paddock looking at all the exotica that turns up. Its free to get in and so it always has a good turnout. October was Italian themed and the last one of the year. I took a nice leisurely route down to Goodwood and was expecting to enter the circuit via the main gated entrance, but approaching from the West one of the side entrances was open and in we went. A marshal was on duty but my lack of brakes meant I was past him before I could stop and after a swerve around an obstacle or two I found that we were on the Goodwood race track! Instinctively I accelerated as we were on a race track and were still gaining pace down the Lavant Straight as we headed into Woodcote which turns us right towards the start/finish line. Inside my helmet was laughter and a broad grin - we are on a race track! Shortly after the fun was curtailed as the track was blocked with Ferraris, Lamborghinis and other Italian tat. We chuffed to a halt and parked up on the track. After the Triumphs track debut I fancied a bacon butty and wondered off to have a look around. Most of the modern Italian supercars look much the same as aerodynamics tend to blur design to similar lines and none of them really took my fancy. Whilst wondering around I found a Ducati 916 covered in little sticky triangles that belongs to a mate that we all call Triangles for obvious reasons and we had a good catch-up standing next the Triumph. I was surprised by how many stopped to take an interest in it and it seemed to be of particular interest to passing women. So much so that Triangles christened it a 99 year old Babe Magnet after a fine young blonde lady had spent considerable time admiring it. Who says Blondes are stupid?
I rode it back around the track and headed for home down the lanes. I arrived home a little later with no misbehaviour. A fine morning out.
One further ride in October and then its time for some work on the bike that will keep it off the road for a few weeks
.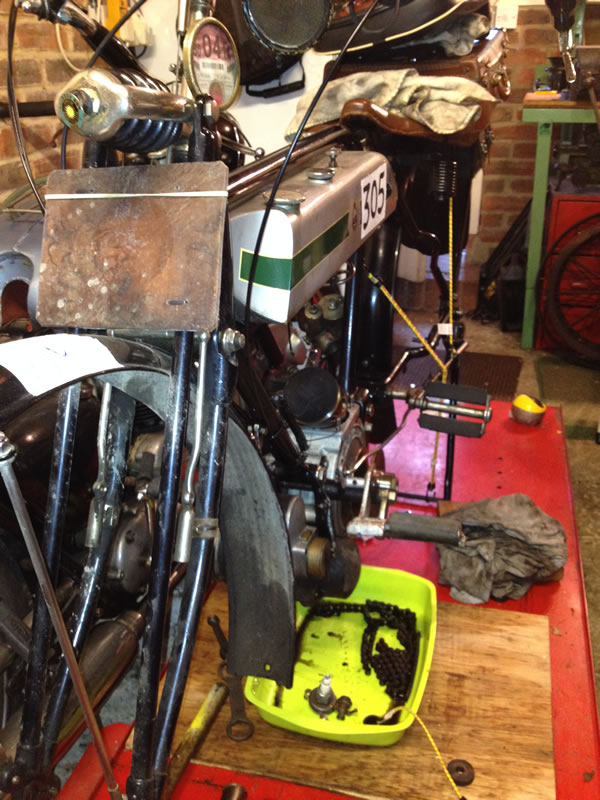
The wheels are off the bike and away with the new rims and hubs to act as templates for the wheel builder.
As I had done over 2,000 miles on the engine it was also time to take of the barrel to check the condition and also recut the exhaust valve seat.
It is simple to take apart, just remove the exhaust pipe and carb and undo the four nuts the hold the barrel. The plug and priming tap need to come out for clearance. Then bring the piston down to bottom of its stroke and gently pull the barrel up and hinge it forward and off it comes. It is a tight fit but with care and an extra pair of hands it is not too difficult.
I do not have a valve seat cutter so I need to get someone to do this for me. The piston and inside of the barrel all look good, but two of the piston rings have their gaps next to each other and this has allowed some mixture to blow past and this would slightly reduce performance. I will correct it when I put it back together.
The colour of the inside and the top of the piston is the colour of rich tea biscuit which seems to show that the mixture and burn is close to ideal.
The exhaust valve seat was recut by a local and very well known veteran engine engineer. He made a very fine job of it and the inside of the barrel was in excellent condition with the honing marks still apparent. It seems to show no sign of having done around 2,000 miles with only very primative air filtration.
Just before Christmas my new wheels were finally ready for collection and so I set off to Steve at WheelWise at Cowford in Sussex. If you ask anyone in the region who is THE man to rebuild wheels, everyone will point you at Steve at WheelWise. WheelWise can be contacted on 01403 864533.
The wheels have bright nickel plated hubs and rims and stainless spokes and look lovely, with flawless plating. As yet I have not painted any black or red banding onto the rims and may leave the paint off for now.
Before refitting the tyres I ran my hand around inside the tyre checking for any unwanted sharp additions and removed a few small bits of debris. With the tyre clean and a little watered down soap applied to the beaded edges to make them slippery and seat better, the tyre was pulled on just by hand. The tube was then carefully fitted inside the tyre and I made sure it was not twisted, kinked or trapped anywhere. The other side of the tyre was then pulled onto the rim. The tyre already had a cm size chunk cut out of it where the valve sits to give it clearance and allow it to slot into the beaded rim. With the tyre on I inflated it to 40psi to ensure it seated and I had no leaks. Sadly this revealed a 2cm long crack in the sidewall of the tyre, rendering it scrap. I thought I would fit the other tyre, but a close inspection of it revealed that the beaded edge was starting to pull apart from the body of the tyre, which also meant this one was scrap too. I have previously been riding around on them and suspect they might carry me a few more miles, but decided it was not worth the risk as when a beaded edge tyre deflates it is likely to come off the rim with exciting results. So with everywhere shut for Christmas holidays I cannot get any tyres for a while.
February 2014
In October I thought the bike would be off the road for a few weeks .... but as I needed to await the new wheels and then I needed new tyres and tubes and work on other bikes intervened and then it started raining and our local lanes have become a bit of a challenge with many floods and epic potholes appearing. Apparently a pot hole is a term created many centuries ago when some of our roads were clay and gravel and locals needing to make a new pot would dig up a pot sized chunk of clay and make a pot - hence pot hole. I know that the meaning of many words/phrases have numerous potential origins, but this one sounds believable. I live in Midhurst in the valley of The River Rother so much of the area suffered in the floods and near continual pouring rain and large lurking potholes hidden under the water did not encourage me out in January. Yes fair weather rider and all that but one local hidden pothole was so large it tore the wheel clean off a friend's car - not something you want to encounter on a bike, especially with my new wheels. Accordingly it was February before we ventured out for a few local scampers and the cold damp air was much appreciated by the engine. I was contacted by a motorcycle magazine looking to do a feature of World War 1 motorcycles and agreed to help. A few Sundays later the editor and photographer visited and I rode The Trusty out to various local locations for numerous pictures. FYI some people believe that the term Trusty Triumph was coined by the WW1 despatch riders, but the term was in use several years before the start of the Great War. Setting off from the final photo shoot location, we had some misbehavior as you'd expect as it had an audience and it needed a couple of pushes to get going. We arrived home OK after a 25 miles outing though we were well down on power.
The usual suspects were checked: carb stripped and OK, valve clearances OK, fuel pipe not blocked, nice fat spark ... but when I checked the ignition timing it was out. The engine drives the magneto via a chain and the sprocket on the magneto is on a taper. Whilst various methods exist to set the timing, the easiest seems to be to undo the nut on the magneto sprocket so it is no longer driving the magneto. Then turn the engine so it is just before Top Dead Centre (TDC) just before the engine should spark/fire. Then with the engine set at the ideal position manually turn the magneto until the points are just about to open and then nip up the magneto sprocket nut to lock the timing up. You can read more on the Veteran Bosch Magneto pages. It is a little fiddly as things move about slightly when tightening things up, but a few minutes and it seemed to be spot on. You can either find TDC with a bit of wire down through the priming tap hole or just take out the exhaust valve cap and with a torch you can clearly see the piston and just turn the motor over by hand. Afterwards it started instantly and ticked over sweetly so seems better. Hopefully a test ride tomorrow.
April 17th 2014 - I have now sold my fine steed to Malcolm, who will hopefully give it some regular exercise, I needed to sell it to buy my Grandfathers 1911 Triumph, which I have wanted to own for 30+ years.
I have written almost 40,000 words about my 14 Triumph (half a novel!) on these pages!
You can read about my 1911 Triumph here - http://www.go-faster.com/1911Triumph.html
I have also required the remains of a c1903 Ascot and I am researching its history - you can read about The Ascot - here -
http://www.go-faster.com/AscotMotorcycle.html
If you have any old veteran era parts that you would part with or have any information to share, then please do contact me via paulg@go-faster.com or give me a call on 07776 140245.
A short list of essential things I have learned ...
Oil
A 50 grade oil is considered to be the ideal. When the engines were built at the factory they had 4 full pumps of oil put into the engine and they should always have about the same volume when running. I have read this in various period publications and it has been recorded as a teacup of oil or about two egg cups of oil – so before they started exact measuring of things!
So I would suggest to be sure how much oil you have – start it and warm it then drain the oil and see how much you had in it. Then put in 4 pumps of oil and run it and give it oil every 5 miles or so depending upon load/speed. When you get back from your ride drain the oil and see how much is in it. It obviously blows/leaks out as you go but you will be able to see if it is retaining about the teacup of oil needed to keep it healthy. In some old publications including one Triumph one, it suggests draining the oil after every ride and refilling. I shall be doing this in future as it will remove any muck that’s trapped in the oil and ensure you set out on each ride with the correct amount at the start. Another publication suggests flushing the motor with paraffin every now and again and then re oiling which seems a good idea. If after your ride you have a teacup of oil in the sump then you are oiling it about right. Less oil left and give it more when riding and vice versa. I think if you put in too much then it will just blow out more and if you have loads in the sump it will be less easy to turn over the engine due to the drag of the oil.
Gearing
If you have a fixed engine (no clutch or gears) then you adjust the gearing by the front pulley. I have been running a 5.5:1 ratio and it would climb almost anything and run to a maximum of around 45mph. 6:1 shoul get even a tired bike up any hill and 4.5:1 is probably the norm for flatter roads and a higher top speed. If you intend to switch between ratios then have two drive belts at the correct length for each.
In reading an article written by Ixion in 1905 (see 1905 Triumph) I have also realised that you can change your gearing without adjusting the pulley. Ixion refers to using different width belts that will accordingly run higher or lower on the front pulley and hence vary the gearing. I have added it to my to do list to find some fatter and slimmer belt to try.
If you want to be able to vary your gearing then you could look at buying a new adjustable/variable pulley - see www.jasdane.com.au
Tyres
You need to keep them inflated to over 30psi and maybe over 40psi if you are heavy as otherwise the tyre will creep around the rim, come off the rim or rip the valve out and you will have blow out - which will be quite exciting! Some people suggest 40psi and I run mine around this figure as I am 6ft4 and weigh 17st. Peter from Australia gave me a good suggestion, put an alignment mark on the tyre and rim so you can easily see if the tyre is starting to creep around the rim. Once the valve starts to be angled due to the tyre moving you may be too close to it being ripped out - better to see the tiniest movement and do something about it. I am running my rear at 45psi and the front at 35psi. I weigh over 17st/100kg hence the higher pressures.
The following very useful info on rim sizes was generously provided by Nick.
|
|||||||||
| RIM SIZE | WIDTH A | WIDTH B | CIRCUMFERENCE D | DIAMETER D | |||||
| 24x2 | 35mm | 1.3/8" | 47mm | 1.7/8" | 1628.8mm | 64.1/8" | 518mm | ||
| 24x2.25 | 35mm | 1.3/8" | 47mm | 1.7/8" | 1577mm | 62.1/8" | 502mm | ||
| 26x2 | 35mm | 1.3/8" | 47mm | 1.7/8" | 1811.4mm | 71.5/16" | 576.5mm | ||
| 26x2.25 | 38mm | 1.1/2" | 51mm | 2" | 1810mm | 71.9/32" | 576mm | ||
| 26x2.5 | 35mm | 1.3/8" | 47mm | 1.7/8" | 1692.3mm | 66.5/8" | 539mm | ||
| 26x3 | 42mm | 1.11/16" | 55mm | 2.3/16" | 1610mm | 63.3/8" | 512mm | ||
| 650x65 | 38mm | 1.1/2" | 52.5mm | 2.1/16" | 1600mm | 62.7/8" | 509mm | ||
| 700x80 | 45mm | 1.3/4" | 61.25mm | 2.3/8" | 1610mm | 63.3/8" | 512mm | ||
| 28x2 | 35mm | 1.3/8" | 47mm | 1.7/8" | |||||
| 28x3 | 42mm | 1.11/16" | 55mm | 2.3/16" | 1755mm | 69.1/8" | 559mm | ||
| 30x3.5 | 51mm | 2" | 68mm | 2.11/16" | 1835mm | 584mm | |||
| 710x90 | 51mm | 2" | 68mm | 2.11/16" | 1618mm | 515mm | |||
| 715x115 | 62mm | 2.7/16" | 82mm | 3.1/4" | 1414mm | 450mm | |||
| 730x130 | 62mm | 2.7/16" | 82mm | 3.1/4" | 1414mm | 450mm | |||
| 760x90 | 51mm | 2" | 68mm | 2.11/16" | 1759mm | 560mm | |||
| 810x90 | 51mm | 2" | 68mm | 2.11/16" | 1932mm | 615mm | |||
| 815x105 | 62mm | 2.7/16" | 82mm | 3.1/4" | 1926mm | 613mm | |||
| 875x105 | 62mm | 2,7/16" | 82mm | 3.1/4" | 2118mm | 674mm | |||
| 820x120 | 67mm | 2.5/8" | 90mm | 3.9/16" | 1778mm | 566mm | |||
| 880x120 | 67mm | 2.5/8" | 90mm | 3.9/16" | 1979mm | 630mm | |||
| 895x135 | 77mm | 3" | 100mm | 3.15/16" | 1854mm | 590mm | |||
| TYRE | APPROXIMATE LOAD PER WHEEL IN KILOGRAMS | ||||||||||||
| SIZE | 100 | 150 | 200 | 250 | 300 | 350 | 400 | 450 | 500 | 550 | 600 | 650 | 700 |
| 24x2.25 | 35 | ||||||||||||
| 26x2 | 35 | ||||||||||||
| 26X2.5 | 35 | 35 | |||||||||||
| 26x3 | 40 | 45 | 50 | Suggested Beaded Edge tyre | |||||||||
| 28x2 | 35 | 40 | Pressure in PSI | ||||||||||
| 28x3 | 40 | 45 | 50 | ||||||||||
| 30x3 | 50 | 55 | 60 | ||||||||||
| 30x3.5 | 50 | 50 | 55 | 60 | |||||||||
| 710x90 | 50 | 55 | 55 | 60 | 60 | 60 | |||||||
| 760x90 | 55 | 55 | 60 | 60 | 60 | ||||||||
| 810x90 | 50 | 55 | 60 | 60 | 60 | 65 | |||||||
| 815x105 | 55 | 55 | 60 | 60 | 60 | ||||||||
| 875x105 | 55 | 60 | 60 | 65 | 65 | ||||||||
| 820x120 | 60 | 65 | 65 | 70 | 75 | 75 | |||||||
| 880x120 | 60 | 65 | 65 | 70 | 75 | 75 | |||||||
| 895x135 | 65 | 65 | 65 | 70 | 75 | 80 | 85 | ||||||
Wheel Building
If you live in the south of England then everyone has high praise for Steve at WheelWise - 01403 864533.
Wheels
Front Wheel Rim
Beaded edge rim 26 x 2 1/2 x 2 ¼ Westwood pattern B1
36 hole, No dimpling
Polished ready for plating
FYI: 12 gauge spokes, 200 size nipples, Spokes cross 4 times.
Rear Wheel Rim
Beaded edge rim 26 x 2 1/2 x 2 ¼ Westwood pattern B1
40 hole, No dimpling, spokes cross 4 times.
Polished ready for plating
FYI: 12 gauge spokes, 200 size nipples, Spokes cross 4 times.
The lacing pattern of the spokes for a 1914 Triumph is below.
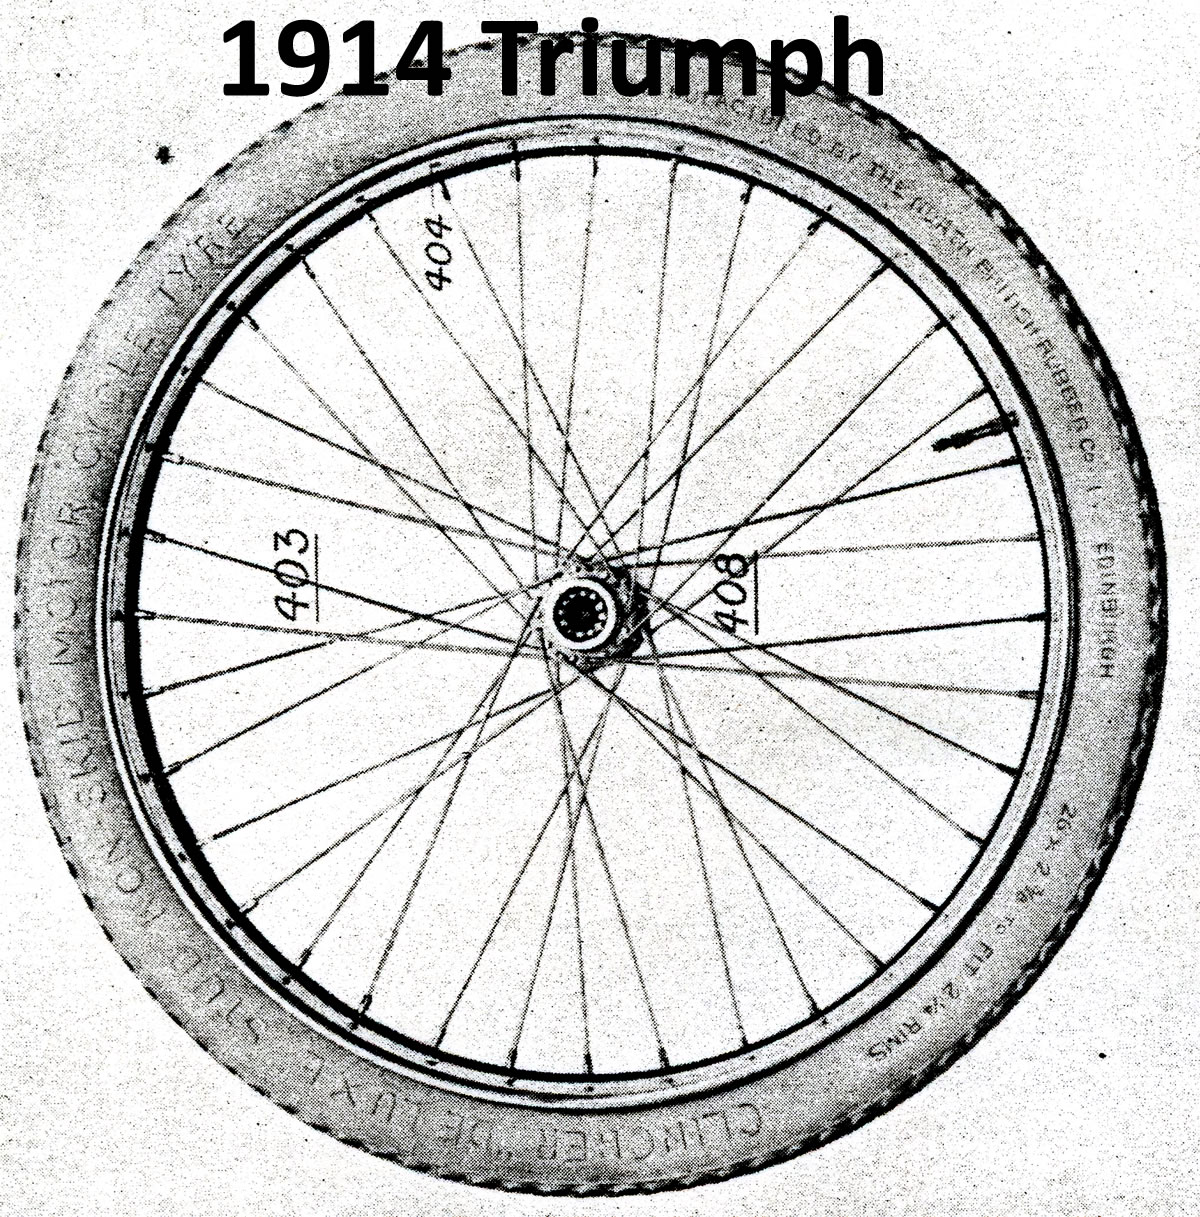
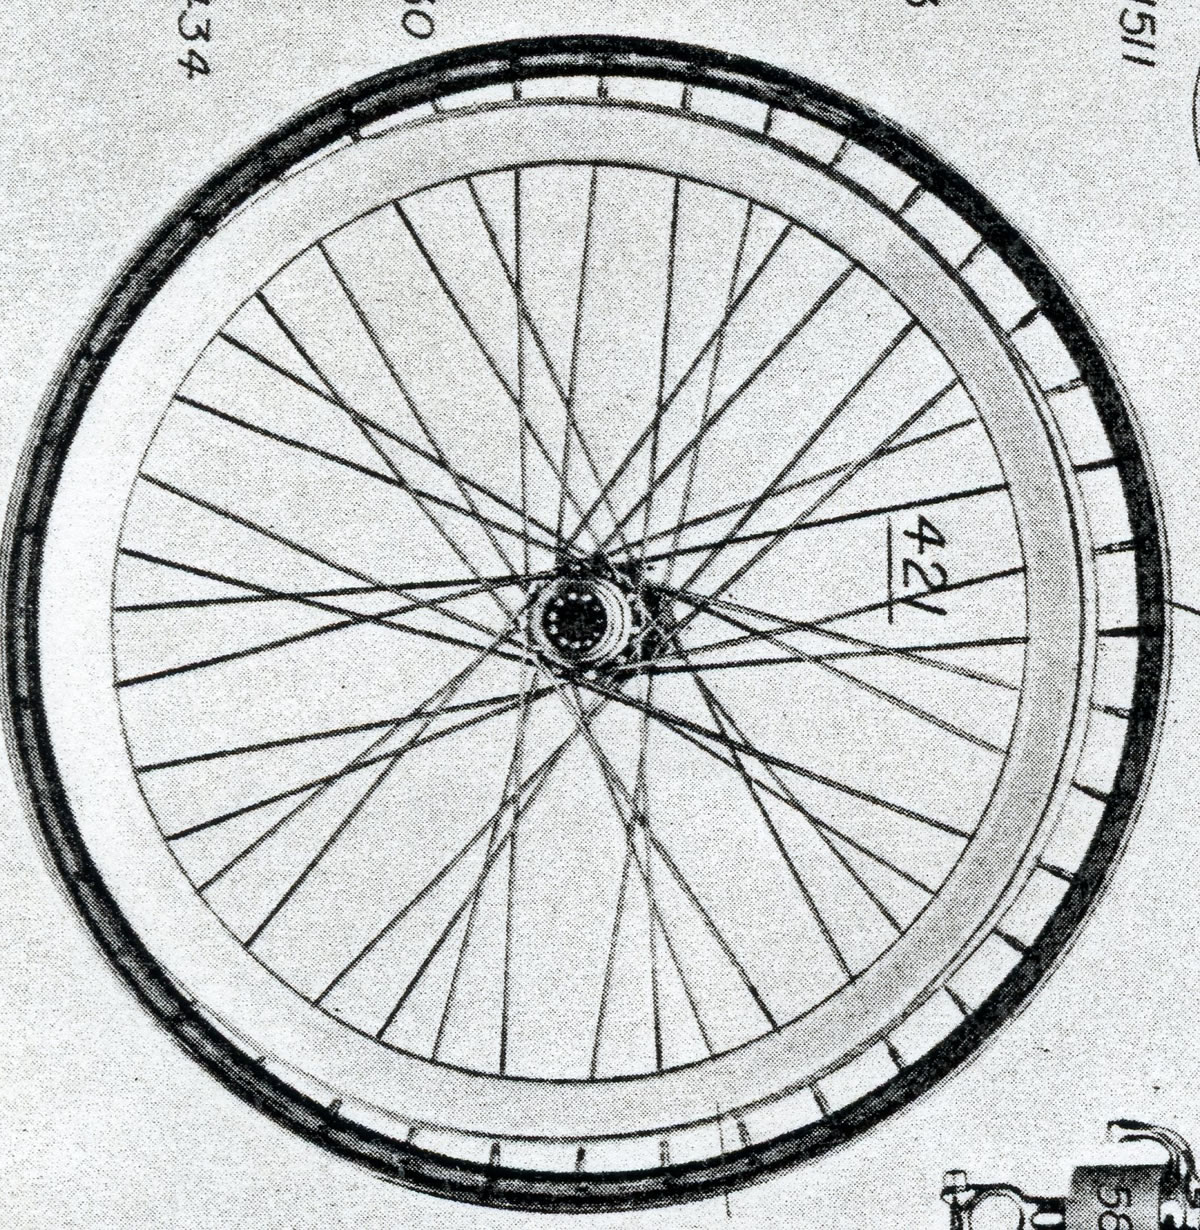
Engine
For a bigend bearing, the bronze must be PB 1, the pin should be hardened to a depth of 70 thou and then ground to be a good fit through the flywheel. The running clearance should be 2 thou and end float 20 thou but as long as the rod clears the flywheels more is ok. If the old pin is to be used clean up as best they can and make the running clearance 6 thou. The big end must be run in for at least 500 miles, with oil changes. and keep plenty of oil in the engine. Use a straight 50 grade oil.
Things to take with you on a ride
Spanners and tools that cover all the parts of the machine. Leatherman type pliers are always carried.
If you have a linked belt then take a few spare links as if one pulls out you will need to replace it. I always take 5-6 spare links to be sure. Ideally take a spare belt and if running a solid belt take a spare tested connector.
A variety of screw on/solder less nipples as old cables will fail.
Spare cables. If the decompressor cable breaks then your ride is probably over so take a spare one. The cable threads through the handlebars so make up a spare with a soldered nipple on the handlebar end that will then slide down to the engine end. Make up inner cables for the carburettor also as one of these snapping will also stop your ride. With solder less nipples you may be able to carry on but a length of inner cable is best and takes up almost no space. A couple of bullet connectors that have been cut/modified to fit over lengthways nipples.
A couple of spark plugs and connectors and a length of HT lead.
A variety of nuts and bolts. Cable ties.
Tyre levers and a spare tube and puncture kit.
A tiny can of WD40 incase your magneto gets wet.
It stops running what is the cause?
The number one cause for me and others seems to be muck getting into the carb and blocking it up. If you have never taken your carb apart then dont wait to have to do it at the road side, take it apart in the safety of your garage and see how it all goes together - they are very simple. Where the petrol pipe enters the carb top fit a small peice of metal gauze to filter out small bits of muck. If you cannot find any then I can post you a bit for free.
The next likely cause is a loss of spark. Firstly try swapping plugs and when you get it running test all your plugs to make sure they work as otherwise you might have a duff one. Check the HT lead and if all seems good then its likely to be the magneto. It is not unusual for the magneto sprocket to slip/move on the magneto's shaft and either get out of synch or not rotate atall. The sprocket is held in place by a woodruf key so check that it is in place and spinning. If the magneto is dead then you need to know what you are doing to restore it. Period Bosch magnetos appear often on ebay and its worth getting a spare and having it renovated to have a known working spare. Restoration will cost c£100 to £200.
Bits to find
Lucas 'King of the Road' No. 458 light and gas generator and a rear light as this is what my grandfather used a century ago.
Original period saddle.
Pre Ride Maintenance
As I ride it, talk to more owners and get good advice from owners who see this web page - I am learning more about how to keep them in ideal riding condition.
Check tyre pressures, oil and petrol before every ride. Check all nuts and bolts for tightness.
Remove drive belt and degrease it. I use hot water and washing powder.
Clean drive belt rim with petrol to remove all traces of slippery oil and do the same on the brake rim.
With drive belt fitted turn it a full circle to ensure that all links are heathly.
Take tools that cover every nut and bolt on the bike. Pliers for the belt and spare links. A spare plug and plug clip. Tyre levers and puncture kit. Thin wire to poke through blocked jets. Cable ties.
Literature
I have added a 1914 Triumph Repairs and parts Catalogue on another web page, click here - 1914 Triumph Repairs and parts Catalogue
I have started to list all of the Triumph Veteran era Patents on their own page, see Triumph MotorCycle Patents
If you have ever wondered what was for sale in 1914, have added the 1914 Buyers Guide - a lot of makes/models available then! -
see http://www.go-faster.com/VeteranMotorcycles1914.html
Period Accounts of Riding
Fancy a 6,000 mile offroad ride across Africa? In 1903 Mr Tom Silver did and set off on his 1903 Quadrant. The tale of this epic adventure is available here -
http://www.go-faster.com/quadrantmotorcycle1903TomSilver.html
If you have wondered what it was like to travel the countryside by motorcycle 100 years ago, then I have found an excellent article from 1911 that I think conveys it well.
See - http://www.go-faster.com/veteranmotorcycle1911riding.html
In 1903 the first motorised coast to coast crossing of the USA took place. A 1902 California motorcycle was used. The rider should be an American hero, but seems forgotten about. I have added a page about his 50 day epic adventure, see http://www.go-faster.com/GeorgeWyman.html
Should you wish to say hello or give a novice veteran rider some advice, my email is:
Hidden away on the Internet is a fantastic free resource of Veteran Era copies of The Motor Cycle (thanks to Chris in NZ for pointing it out)
Complete copies of each edition have been scanned with editorial, adverts etc.
It holds probably 25,000+ pages of The Motor Cycle from 1907 to 1922 onwards and is free to download!
Go to
http://www.archive.org/details/texts
This brings up the Boston library web page.
Top left hand side is a box with search- type in motor cycle (two words ) click the red go button
This brings up a list of half year motorcycle volumes click on your choice to download or read online
It also contains some interesting period books and other related publications.
The search facility now (May 2012) seems to be disabled, but the publications listed below, can still be retreived via the links below:
Click on the links below to get to the publications. You can download them as PDF files and you can search them to say find all of the mentions of Triumph. A very useful resource.
http://archive.org/details/motorcycle05lond_
http://archive.org/details/motorcycle101lond_
http://archive.org/details/motorcycle102lond_
http://archive.org/details/motorcycle112lond_
http://archive.org/details/motorcycle132lond_
http://archive.org/details/motorcycle152lond_
http://archive.org/details/motorcycle16lond_
http://archive.org/details/motorcycle17lond_
http://archive.org/details/motorcycle18lond_
http://archive.org/details/motorcycle19lond_
http://archive.org/details/motorcycle20lond_
http://archive.org/details/motorcycle21lond_
http://archive.org/details/motorcycle22lond_
http://archive.org/details/motorcycle23lond_
http://archive.org/details/motorcycle24lond_
http://archive.org/details/motorcycle25lond_
http://archive.org/details/motorcycle26lond_
http://archive.org/details/motorcycle27lond_
http://archive.org/details/motorcycle28lond_
http://archive.org/details/motorcycle29lond_
http://archive.org/details/motorcycle61lond_
http://archive.org/details/motorcycle62lond_
http://archive.org/details/motorcycle72lond_
http://archive.org/details/motorcycle81lond_
http://archive.org/details/motorcycle82lond_
http://archive.org/details/motorcycle91lond_
http://archive.org/details/motorcycle92lond_
If you are looking for more information on old Triumphs, then a series of excellent booklets are available via the link below:
http://users.actrix.co.nz/cornelius/Triumph/Booklets.htm
Another excellent source of Veteran Triumph literature is http://brucemain-smith.com/framestrans.html
Movies of Veteran Motorcycles
I have managed to find a few old movies from Pioneer Runs from long ago.
In 1955 Gordon Little organised a Pioneer Run to Paris - all 160 miles! if it, you can see a short video here:
http://www.youtube.com/watch?v=6c6nhpXEvFw
I have also managed to find a movie of the 1961 Pioneer run and that is here:
http://www.youtube.com/watch?v=4LkafqpcZ2Q
In addition, you can watch a colour movie of the 1955 Banbury on the link below, coverage of The Banbury starts about 19 minutes 30 seconds into the film.
The link below should take you to the Yorkshire Film Archive and specifically to Film number 4540 “Hot Work”
A short clip of the 1950 Pioneer can be watched here
More Information on Veteran Triumphs
If you are looking for more information on veteran Triumphs then below are a list of excellent sites:
http://users.actrix.co.nz/cornelius/Triumph/
If you have a veteran era hub gear that needs attention then I am reliably informed that this is the man to talk to - http://www.motorcyclehubgears.com
http://veterantriumph.co.uk/ - this site are the main manufacturer of early Triumph parts and a font of all knowledge. These are THE Veteran Triumph experts.
http://www.bertpol-vintagemotorcycles.com - this is a Dutch site that also makes parts for Veterans, restores bikes and sometimes has bikes for sale.
If you need a rear hub chain freewheel and cannot find one from a veteran supplier, then try a UK based industrial supplier called Cross & Morse.
See http://www.cross-morse.co.uk/freewheel.asp
And if you feel inspired to buy a Veteran bike, then I have created a page of places where you might find one for sale -
http://www.go-faster.com/VeteranMotorcycleForSale.html
I am trying to learn now about the numerous Veteran era saddles and have created a page to try and build up and share some knowledge on this subject, see -
http://www.go-faster.com/VeteranMotorcycleSaddles.html
A fellow Veteran Triumph owner is restoring a 1908 model and I have started a page on it, see 1908 Triumph MotorCycle
http://www.go-faster.com/1908Triumph.html
And as Triumph first created a bike with their own engine in 1905 this is a bit of a landmark in Triumph history so I have created a 1905 Triumph page, see 1905 Triumph MotorCycle
http://www.go-faster.com/1905Triumph.html
An excellent book about riding an early Triumph has been written by Noel Whittall. I have read it three times so far! You can buy it at Amazon (see below) and no doubt other places.
http://www.amazon.co.uk/Stupid-Thing-Do-Meander-Scotland/dp/1908037148
I have added some high resolution pictures on separate pages, see:
1914 Triumph Motorcycle - Right Side
1914 Triumph Motorcycle - Right 3/4 View
1914 Triumph Motorcycle - Left Side
The pictures below are of the bike just before I bought it.
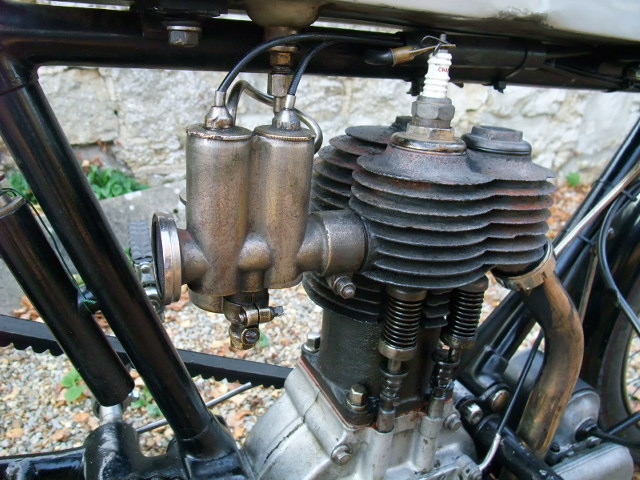
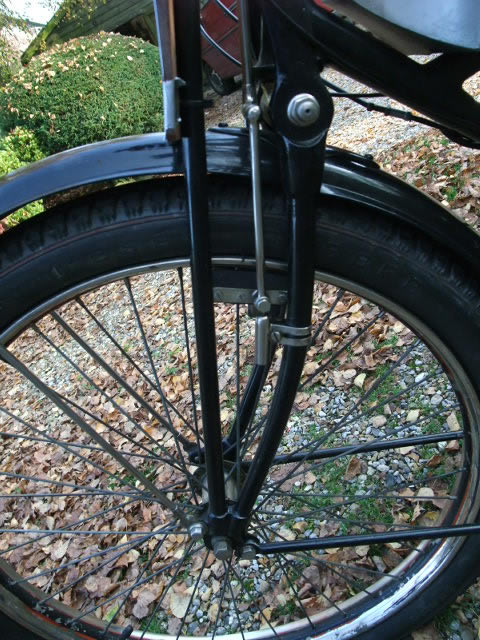
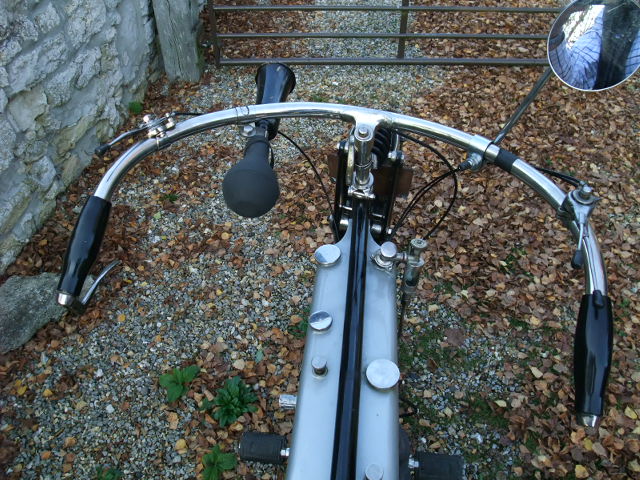
The picture below shows the front of the tank. The cap on the left is for oil and on the right is the oil feed system.
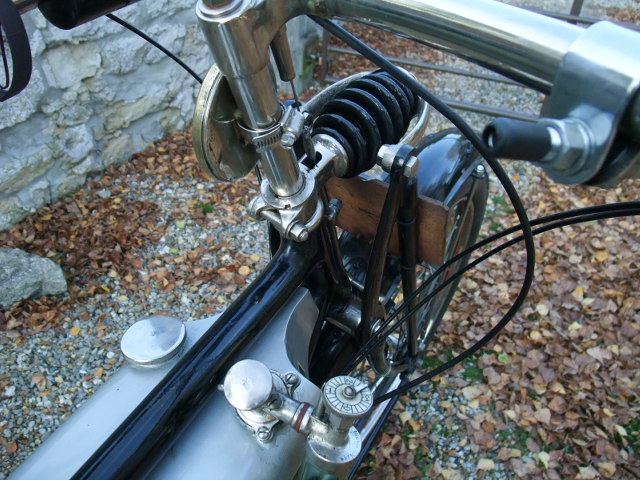
The picture below shows the oil feed. You have to manually feed oil to the engine. On the left is the top of a plunger and this feeds oil to an adjustable drip feed. You can adjust the drip of oil to the engine based upon speed and load. You just need to remember to pump it every 10 minutes or so!
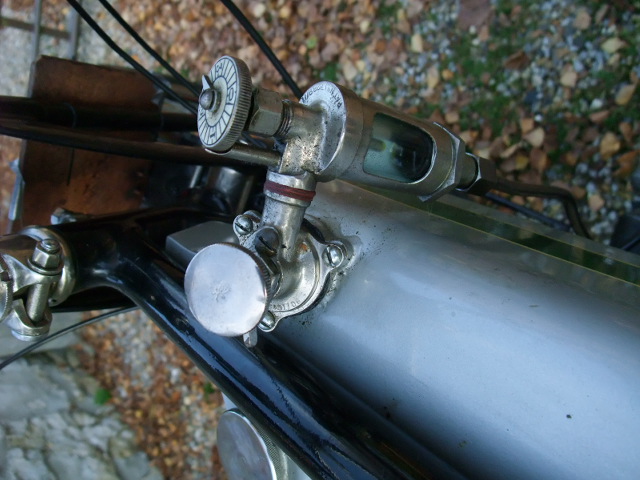
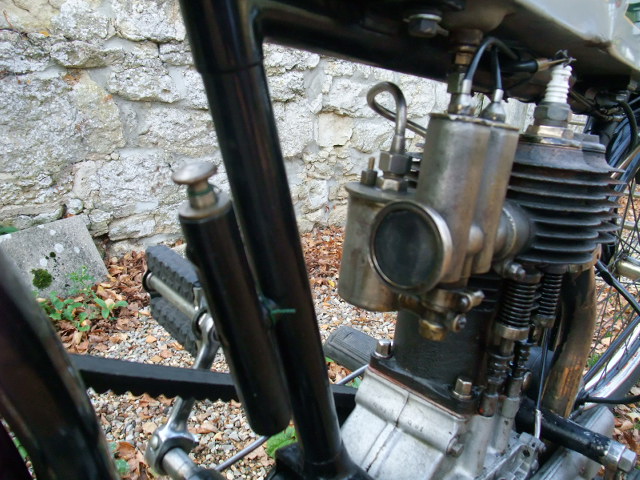
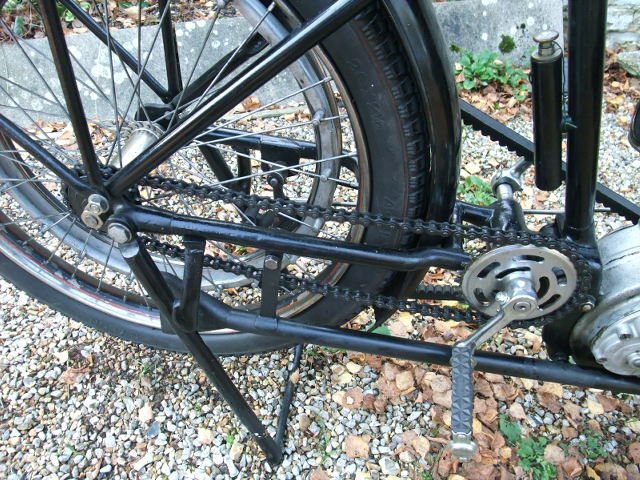
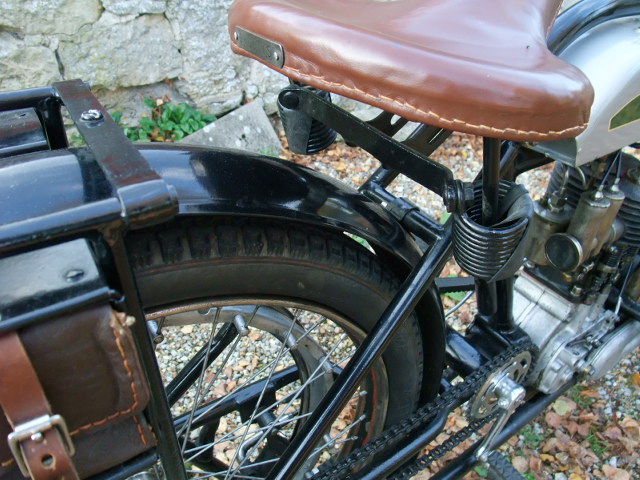
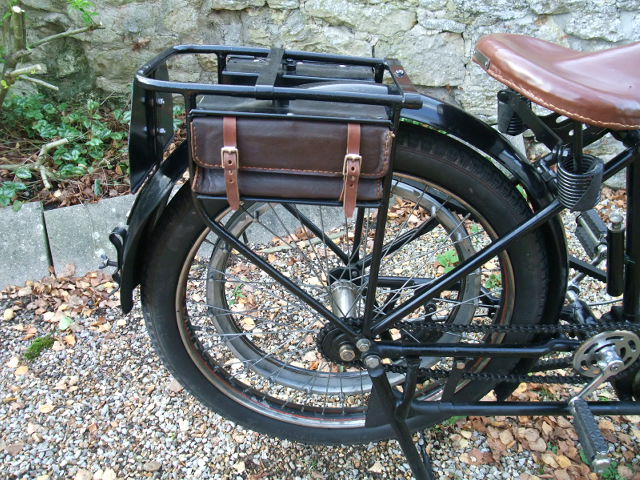
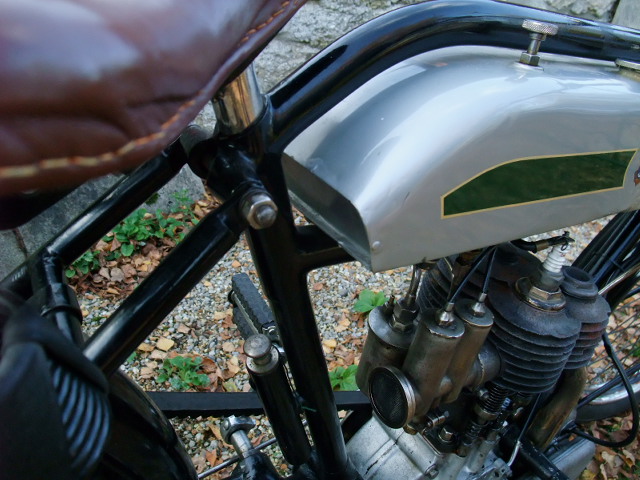
The picture below shows the rear brake in all its glory.
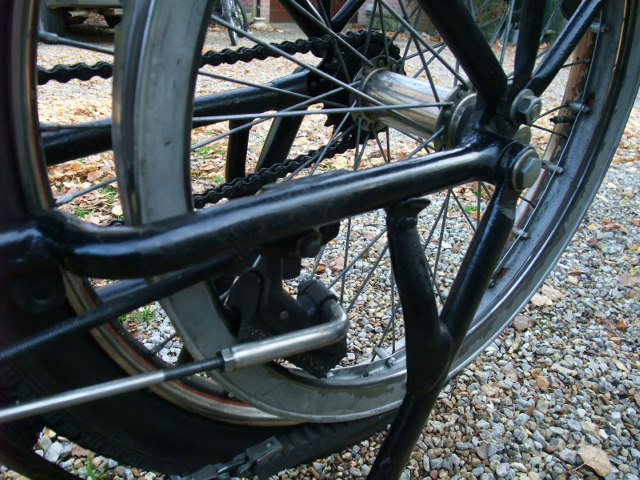
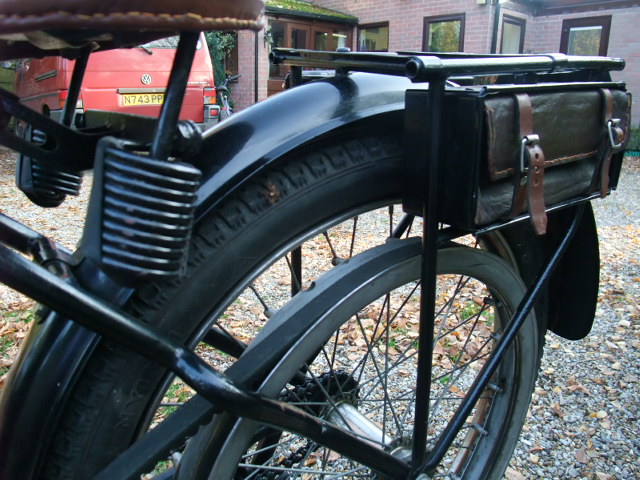
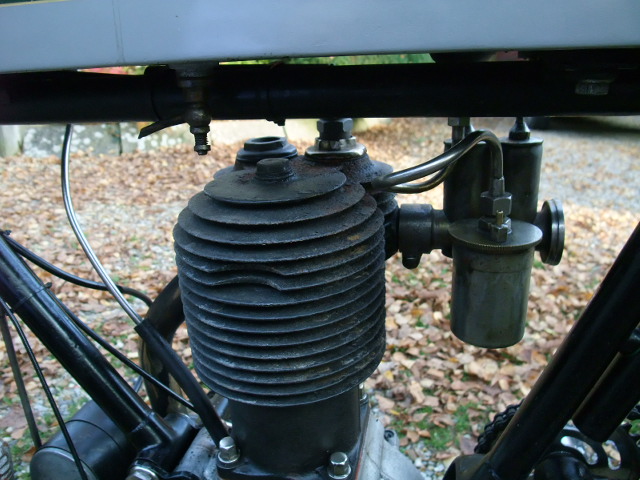
Below is the left side of the engine and the drive pulley.